**Assess your substrate condition before applying any waterproofing membrane.** Clean surfaces must be structurally sound, free of dust, oils, and loose particles—any contamination creates a barrier between membrane and stone, leading to delamination and eventual water intrusion. For natural stone installations in showers and wet areas, this preparation step determines whether your waterproofing lasts five years or fifty.
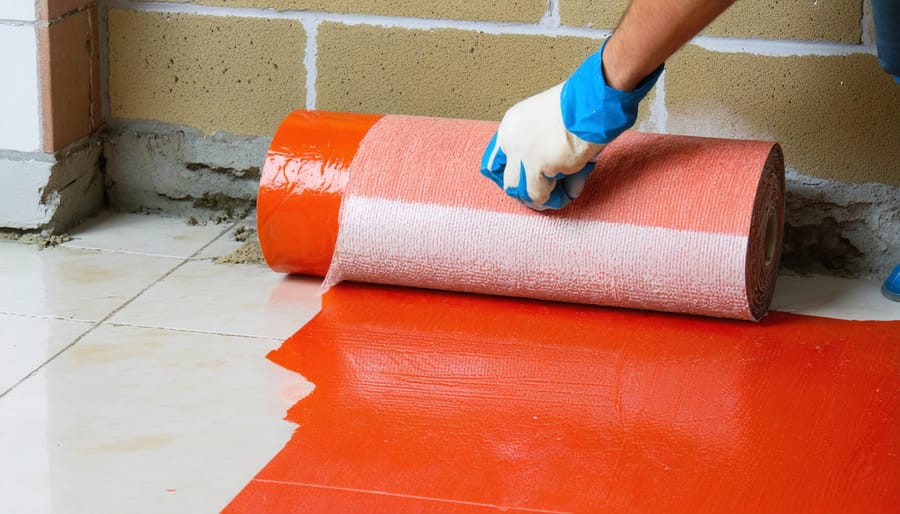
**Apply liquid or sheet membranes in multiple thin layers rather than one thick coat.** Building up waterproofing gradually—typically two to three coats with drying time between applications—ensures complete coverage without pinholes or weak spots that allow moisture penetration. Focus extra attention on corners, seams, and penetrations where 90% of waterproofing failures originate.
**Extend your waterproofing membrane at least 6 inches beyond the wet area on all sides.** Water doesn’t respect visible boundaries; it migrates through grout lines and porous stone. In shower installations, treat the entire enclosure floor-to-ceiling, including the curb and extending onto the bathroom floor beneath tile or stone.
**Test your waterproofing before installing stone by conducting a flood test for 72 hours.** Fill the shower pan to the curb height and monitor for leaks—discovering failures now costs $50 in materials versus $5,000 in demolition and reconstruction later. This critical step, often skipped in weekend home improvement projects, separates successful DIY installations from catastrophic water damage requiring professional remediation.
Understanding Water and Natural Stone: Why Waterproofing Matters
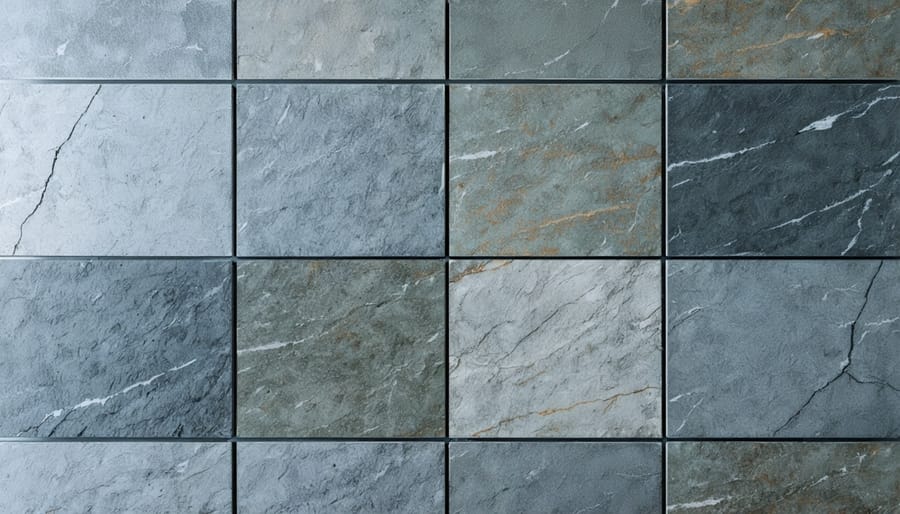
The Porosity Factor: How Different Stones Absorb Water
Understanding porosity is fundamental to successful waterproofing, as different stones absorb water at dramatically varying rates. This characteristic determines both your sealing strategy and long-term maintenance requirements.
**Marble** typically exhibits 0.2-0.5% porosity, making it relatively dense but still vulnerable to water penetration in untreated applications. **Granite** ranks as one of the least porous natural stones at 0.4-1.5%, though lighter colors tend to absorb more moisture than darker varieties. **Limestone** presents a significant challenge with 5-20% porosity, acting almost like a sponge in wet environments. **Travertine’s** distinctive pitted surface creates porosity levels between 10-25%, with visible voids that channel water deep into the stone structure. **Slate** varies considerably by origin, ranging from 0.5-3% absorption rates.
To test your stone’s vulnerability, conduct a simple water drop test: place a few drops on an unsealed area and observe. If absorption occurs within 4-5 minutes, immediate sealing is critical. Limestone and travertine typically show instant darkening, while dense granite may take 10+ minutes to show any change. This practical assessment helps you gauge how aggressive your waterproofing approach needs to be.
What Happens When Waterproofing Fails
When waterproofing fails in natural stone installations, the consequences extend far beyond surface-level moisture issues. Water infiltration quickly compromises the substrate beneath your stone, causing wood rot, drywall deterioration, and potential mold growth that spreads behind walls where it remains invisible until significant damage occurs.
One of the earliest visible signs is efflorescence—those white, chalky deposits that appear on stone surfaces as water carries minerals through porous materials. While aesthetically unpleasing, efflorescence signals deeper problems: moisture is migrating through your installation. Staining follows, particularly on absorbent stones like limestone and marble, creating permanent discoloration that no amount of cleaning can fully remove.
Grout deterioration accelerates dramatically when waterproofing fails. Cracks form, grout becomes powdery and loose, and gaps appear between tiles—creating additional entry points for water and accelerating the damage cycle. In severe cases, tiles begin debonding from the substrate entirely.
The financial impact is sobering. What might have cost $500-1,000 for proper waterproofing materials and careful installation can balloon into $5,000-15,000 or more for complete demolition, substrate replacement, mold remediation, and reinstallation. Structural repairs add thousands more if water reaches framing members, making prevention through proper technique absolutely essential.
Essential Waterproofing Materials and Tools for Natural Stone
Waterproofing Membranes: Sheet vs. Liquid Options
When waterproofing natural stone installations, you’ll encounter two primary membrane types: sheet membranes and liquid-applied options. Understanding their differences helps you select the right solution for your project.
**Sheet Membranes** consist of pre-formed plastic or rubber materials that you cut to size and adhere to surfaces. They excel in large, flat areas like shower pans and bathroom floors. The primary advantage is consistent thickness—you get uniform protection without worrying about application errors. They’re particularly forgiving for DIYers since you can see exactly where coverage exists. However, sheet membranes require meticulous attention at seams, corners, and penetrations where leaks commonly develop. You’ll need specialty tapes and corner pieces to maintain waterproof integrity at these transitions.
**Liquid-Applied Membranes** are painted or rolled onto surfaces, creating a seamless barrier that conforms to complex shapes and irregular surfaces. They’re ideal for shower niches, curved walls, and areas with numerous penetrations like valve stems. The liquid format eliminates seam concerns and easily wraps around obstacles. The trade-off? Application thickness matters significantly—too thin means inadequate protection, while excessive thickness wastes material and drying time. You’ll need multiple coats and must maintain proper mil thickness throughout.
**Best Use Cases:** Choose sheet membranes for straightforward, large surfaces where seam management is minimal. Opt for liquid membranes in intricate areas, vertical applications, or when working around complex tile layouts. Many professional installers combine both methods, using liquid membranes for detailed work and sheet products for primary floor coverage.
Sealers, Primers, and Specialty Products
Selecting the right sealers and primers is critical for long-lasting waterproofing performance in natural stone installations. Understanding the differences between product types helps you match materials to your specific substrate and application needs.
**Penetrating Sealers** absorb into porous substrates like concrete, cement board, and certain stone types, forming a chemical barrier within the material itself. These water-based sealers don’t leave a surface film, making them ideal for substrates that need breathability. They’re particularly effective for pre-treating porous natural stone before installation, especially when sourcing natural stone with higher absorption rates.
**Topical Sealers** create a protective membrane on the surface, offering immediate water resistance. Sheet membranes, liquid-applied membranes, and trowel-on products fall into this category. They’re essential for shower pans, steam rooms, and areas requiring complete moisture barriers.
**Primers** prepare substrates for optimal adhesion of waterproofing membranes. Different primers suit different surfaces—acrylic primers for cement board, epoxy-based primers for non-porous surfaces like existing tile, and specialized primers for challenging substrates like painted drywall or plywood (though these are less common in proper installations).
**Specialty Products** include pre-formed corners, joint materials, and reinforcing fabrics. Waterproofing corners prevent membrane cracking at vulnerable joints, while reinforcing mesh strengthens transitions between different materials. Expansion joint compounds accommodate building movement without compromising the waterproof barrier, essential for larger installations or outdoor applications.
Preparing Your Substrate: The Foundation of Waterproof Success
Substrate Inspection and Repair Checklist
Before applying waterproofing materials, thoroughly examine your substrate to ensure long-term performance. Start by checking for structural integrity—press firmly across the surface to identify any soft spots, flexing, or movement that could compromise your waterproofing layer. Concrete and cement board should feel solid without deflection.
Next, inspect for cracks, holes, or gaps. Even hairline fractures can allow water penetration, so mark all problem areas for repair. Remove any loose material, old adhesive, or debris using a scraper and vacuum. Check corners and seams where walls meet floors, as these junctions are particularly vulnerable to water infiltration.
Address all defects before proceeding. Fill small cracks with appropriate patching compounds, and consider implementing proven stone repair methods for damaged substrates. Replace severely compromised sections entirely rather than attempting superficial fixes.
Verify proper drainage slope, especially critical for shower floors. Use a level to confirm a minimum ¼-inch drop per foot toward the drain. Without adequate slope, water pools on surfaces, increasing failure risk and potential for mold growth beneath your stone installation.
Finally, ensure the substrate is clean, dry, and free from contaminants like oils or soap residue that prevent proper waterproofing membrane adhesion. This preparation phase determines your project’s success.
Priming Different Substrate Materials
Different substrate materials require tailored priming approaches to ensure proper waterproofing membrane adhesion. Understanding these distinctions prevents common installation failures that lead to water damage.
**Concrete surfaces** must be fully cured (typically 28 days) and free from dust, oils, and laitance. Clean thoroughly with a stiff brush and vacuum before applying primer. Highly porous concrete may require two primer coats, allowing the first to fully dry before the second application. Fill any cracks wider than 1/8 inch with appropriate patching compound before priming.
**Cement board** presents a moderately absorbent surface that readily accepts primer. Focus on seams and screw heads, which create potential weak points. Apply primer in consistent, overlapping strokes to achieve uniform coverage without pooling.
**Plywood substrates** demand extra attention due to wood’s organic nature. Ensure the plywood is rated for wet environments (exterior grade minimum). Apply primer liberally to seal the surface, paying special attention to cut edges where absorption is highest.
**Existing tile** requires thorough cleaning with degreaser and light sanding to create mechanical adhesion. Use specialized bonding primers designed for non-porous surfaces. Test a small area first to verify the primer bonds adequately to the glazed surface before proceeding with full coverage.
Step-by-Step DIY Waterproofing Application
Critical Areas First: Corners, Seams, and Penetrations
Before applying waterproofing membrane to large surfaces, you must address the most vulnerable points where water intrusion typically occurs. These critical areas require reinforcement to prevent cracks from translating through the waterproofing system.
**Inside Corners and Floor-to-Wall Transitions**
Inside corners where walls meet and where floors transition to walls create natural stress points. Apply a generous coat of waterproofing membrane along these joints, extending 4-6 inches onto each adjacent surface. While the membrane is still wet, embed waterproof fabric tape or pre-formed corner pieces into the membrane, smoothing out any air bubbles or wrinkles. The fabric bridges the corner, distributing stress and preventing membrane failure. Apply a second coat of membrane over the fabric, fully encapsulating it.
**Drain Assemblies**
The shower drain represents the most critical waterproofing junction. Use a bonding flange drain specifically designed for waterproofing systems. Apply membrane around the drain perimeter, then install a circular fabric reinforcement piece (typically 8-10 inches in diameter) with a pre-cut center hole. Press the fabric firmly into the wet membrane, ensuring complete contact. The drain’s clamping ring should compress the fabric and membrane together, creating a watertight seal. Never skip this reinforcement—drain failures cause extensive damage.
**Pipe Penetrations and Fixtures**
Where pipes penetrate floors or walls, create a “donut” of waterproofing protection. Apply membrane in concentric circles around the pipe, embedding fabric strips that wrap the penetration completely. For mixing valves and shower fixtures, maintain a 2-inch waterproofing radius around all penetrations. Build up multiple membrane layers if gaps exceed 1/8 inch. These reinforced details prevent water from tracking along pipes into wall cavities, where it causes hidden structural damage and mold growth.
Applying the Primary Waterproofing Layer
Applying your waterproofing membrane correctly is critical to preventing water penetration beneath natural stone installations. The application method depends on whether you’re using liquid or sheet membranes.
For liquid membranes, start by mixing the product according to manufacturer specifications—consistency matters significantly. Apply the first coat using a paint roller or brush, working in manageable sections. Focus on achieving even coverage without pooling or thin spots. Most liquid membranes require two coats minimum, with the second applied perpendicular to the first for maximum coverage. Each coat typically needs 1-2 hours drying time in optimal conditions, though full cure may take 24-48 hours. Check manufacturer guidelines, as humidity and temperature affect drying times considerably.
Sheet membranes demand meticulous attention to seams and overlaps. Cut pieces to fit your space, allowing 2-3 inch overlaps at all joints. Apply thin-set mortar to the substrate using a notched trowel, then firmly press the membrane into place, eliminating air bubbles by working from center outward. Overlap seams must be sealed with additional membrane strips or manufacturer-approved sealant.
Regardless of type, continuous coverage is non-negotiable. Pay special attention to corners, transitions, and penetrations—these vulnerable areas need reinforcement with fabric mesh embedded in extra membrane layers. Allow complete curing before proceeding with tile installation. Taking time at this stage prevents catastrophic failures later, protecting both your stone investment and underlying structure from moisture damage.
Testing Your Waterproofing Before Stone Installation
Before installing your stone, conduct a thorough flood test to verify your waterproofing membrane’s integrity. Plug the drain and fill the shower pan with water to the height of the curb threshold—typically 2-3 inches. Mark the water level and let it sit for at least 24 hours, preferably 48-72 hours for more reliable results.
Inspect the water level after the test period. Any drop beyond normal evaporation (about 1/8 inch) indicates a leak. Check beneath the shower pan and surrounding walls for moisture, paying special attention to seams, corners, and penetrations where fixtures will be installed.
If you detect leaks, identify the source through systematic inspection. Common failure points include inadequate overlap at membrane seams, insufficient coverage around drains, and gaps at wall-to-floor transitions. Small breaches can often be repaired with additional membrane patches and sealant, ensuring proper overlap and adhesion.
For significant failures, you may need to remove sections of membrane and reapply correctly. Never skip this testing phase—discovering leaks after stone installation means costly demolition and starting over. Document your successful flood test with photos and dates for future reference.
Installing Natural Stone Over Your Waterproof Barrier
Selecting Compatible Mortars and Adhesives
Choosing the right mortar or adhesive is critical for waterproofing success in your natural stone installation. The primary decision involves selecting between modified and unmodified thin-set mortars.
**Modified thin-set** contains polymer additives that enhance flexibility and bond strength. Use modified thin-set over cement backer board and in areas requiring extra adhesion. However, it’s incompatible with certain sheet membranes because the polymers prevent proper curing.
**Unmodified thin-set** works best directly over waterproofing membranes like Schluter-KERDI or similar systems. The membrane manufacturer’s specifications will clearly state which type to use—always follow these recommendations to maintain warranty coverage.
Check compatibility by reviewing your waterproofing membrane’s technical data sheet. Mismatched products can cause delamination, cracking, or complete installation failure.
**Application techniques** matter significantly. Mix thin-set to a peanut butter-like consistency, apply with the appropriate trowel size for your stone, and back-butter large format tiles. Achieve 95% coverage for wet areas to prevent water infiltration behind tiles.
Allow proper curing time between layers—typically 24 hours between membrane and tile installation. Rushing this process compromises the entire waterproofing system and your investment in quality natural stone.
Protecting Your Membrane During Installation
Once your waterproofing membrane is installed, protecting it during subsequent construction phases is critical to maintaining its integrity. Even small punctures or tears can create pathways for water infiltration, compromising your entire waterproofing system.
**Choose the Right Trowel**
Select notched trowels specifically designed for waterproofing applications. For most sheet membranes and liquid-applied systems under natural stone, a 1/4″ x 1/4″ square-notch trowel provides adequate mortar coverage without excess buildup. Avoid trowels with sharp edges that might pierce the membrane. When setting heavy stone tiles, use a 1/2″ x 1/2″ square-notch trowel to ensure proper bonding while distributing weight evenly.
**Follow Proper Installation Sequence**
Always work from the drain outward and bottom to top on vertical surfaces. This prevents unnecessary foot traffic over completed waterproofing. Use knee pads or boards to distribute your weight when working on horizontal installations. Mark your layout lines with chalk or removable tape rather than scoring the membrane with sharp tools.
**Protect Against Physical Damage**
Cover completed waterproofing with protective sheeting if other trades will be working in the area. Inspect the membrane thoroughly before applying thinset mortar, looking for any compromised areas. Minor damage can often be repaired with membrane patches or additional liquid coating, but only if caught before tiling begins.
Grouting and Final Sealing for Complete Water Protection
Choosing and Applying the Right Grout
Selecting the right grout is critical for waterproofing success in wet areas. **Epoxy grout** offers superior water resistance and durability compared to traditional cement-based options, making it ideal for showers and high-moisture environments. While more expensive and challenging to apply, epoxy grout doesn’t require sealing and resists staining and mildew growth exceptionally well.
**Cement-based grout** remains popular for its affordability and easier application. When using cement grout in wet areas, always incorporate a **waterproof grout additive** or liquid polymer instead of plain water during mixing. These additives significantly enhance water resistance and flexibility, reducing crack formation.
For application, work grout into joints at a 45-degree angle using a rubber float, ensuring complete fill without voids. Remove excess immediately with the float’s edge, then wait 15-20 minutes before initial cleaning with a damp sponge. For natural stone, avoid acidic cleaners that can etch surfaces. In shower floors and areas with constant water exposure, maintain grout joints at minimum 1/8-inch width for optimal waterproofing performance. Proper curing time—typically 72 hours before water exposure—is essential for maximum protection.
Surface Sealing: Your Final Line of Defense
Surface sealers act as your stone’s protective shield against moisture, stains, and deterioration. Apply penetrating sealers after your waterproofing membrane has cured and tile installation is complete—typically 72 hours after grouting. These sealers work by penetrating the stone’s pores rather than sitting on the surface, maintaining the natural appearance while blocking water absorption.
For shower installations, apply sealer to all natural stone surfaces including walls, floors, and thresholds. Use a clean microfiber cloth or foam applicator, working in small sections. Allow the sealer to penetrate for 5-10 minutes, then wipe away excess to prevent hazing. Most penetrating sealers require two coats for optimal protection.
Reapplication schedules depend on stone type and water exposure. High-traffic shower floors typically need resealing every 6-12 months, while walls may last 1-2 years. Perform a simple water test: drop water on the stone—if it beads up, your sealer is working; if it darkens the stone, it’s time to reseal.
Maintenance sealing is straightforward: clean surfaces thoroughly, allow to dry completely, then apply sealer following manufacturer instructions. This routine maintenance prevents water damage and extends your stone’s lifespan significantly.
Common DIY Waterproofing Mistakes and How to Avoid Them
The Top Five Waterproofing Failures
Even experienced DIYers fall victim to waterproofing mistakes that lead to expensive repairs. Understanding these failures helps you avoid them in your natural stone installation.
**Inadequate Membrane Coverage** tops the list. Many homeowners apply waterproofing only to obvious wet areas, missing critical zones like the substrate behind stone tiles or the transition between walls and floors. Your membrane should extend at least 6 inches beyond all wet areas, with particular attention to corners and seams where water naturally collects.
**Skipped Corners and Penetrations** create the most common leak points. Faucet holes, drain assemblies, and inside corners require pre-formed gaskets or extra fabric reinforcement embedded in the membrane. Simply brushing over these areas leaves microscopic gaps where water infiltrates over time.
**Wrong Product Selection** occurs when DIYers choose paint-on membranes for heavy-traffic shower floors or use cement-based products incompatible with natural stone. Always match your waterproofing system to your specific stone type—marble and limestone, for instance, require non-staining, breathable products.
**Insufficient Drying Time** between membrane coats or before tile installation compromises the entire system. Most membranes need 24-48 hours between applications and before tiling, though humidity affects this timeline. Rushing this stage traps moisture and prevents proper bonding.
**Lack of Testing** before installing expensive stone proves costly. Conducting a simple flood test—filling your shower pan with water for 24 hours—reveals failures when fixes are still straightforward, not after your travertine is permanently set.
When to Call a Professional
While many waterproofing projects are DIY-friendly, certain situations demand professional expertise. Complex shower configurations with multiple drains, steam rooms, or intricate natural stone layouts with detailed patterns require specialized knowledge to prevent failure. If you discover existing water damage, mold growth, or structural issues during prep work, stop immediately and consult a professional—these indicate deeper problems that DIY solutions cannot address.
Red flags during your project include pooling water that won’t drain, membrane tears you cannot properly patch, or uncertainty about proper slope calculations. Projects involving exterior stone installations, particularly those with freeze-thaw exposure, benefit from professional assessment due to the critical importance of drainage systems and substrate preparation.
Consider professional help if you lack confidence in any step, as waterproofing errors compound over time and repairs cost significantly more than initial proper installation. When substantial investment in premium natural stone is involved, professional installation often proves more economical long-term than risking costly failures from DIY mistakes.
Maintaining Your Waterproofed Natural Stone Installation
Routine Inspection and Resealing Schedule
Regular inspections are essential to maintaining effective waterproofing in your natural stone installations. Conduct visual checks every six months, examining grout lines, sealant joints, and stone surfaces for cracks, discoloration, or water stains. Pay special attention to corners, transitions, and areas around fixtures where water accumulates.
Key signs of waterproofing degradation include darkening or discoloration of stone (indicating water absorption), efflorescence (white powdery deposits), grout deterioration, and musty odors suggesting moisture infiltration behind surfaces. If water no longer beads on sealed surfaces, resealing is necessary.
Resealing intervals vary by stone type and location. Dense stones like granite in low-moisture areas may require resealing every 3-5 years, while porous stones like limestone or travertine in showers need annual treatment. Marble typically requires resealing every 1-2 years depending on usage. High-traffic outdoor installations may need more frequent attention due to weather exposure.
Test your sealer’s effectiveness annually by placing water drops on the surface—if absorption occurs within 10 minutes, reseal immediately. Maintaining a simple inspection log helps track treatment dates and identify problem areas before costly damage occurs.
Cleaning Products That Won’t Compromise Waterproofing
Maintaining waterproofed natural stone requires careful product selection to preserve both the stone’s beauty and protective barriers. Use pH-neutral cleaners specifically formulated for natural stone—these won’t break down sealers or waterproofing membranes. Avoid acidic cleaners like vinegar, lemon-based products, or harsh chemicals containing bleach, ammonia, or abrasives, which can etch stone surfaces and degrade waterproofing compounds over time.
For daily cleaning in wet areas, opt for diluted stone-safe soaps or specialized natural stone cleaners. When dealing with soap scum or mineral deposits, choose products labeled as safe for sealed surfaces. Always test new cleaners on an inconspicuous area first.
Steer clear of oil-based cleaners that leave residues, as these can create slippery surfaces and interfere with sealer performance. Similarly, avoid wax-based products marketed for “shine”—they build up layers that trap moisture and compromise waterproofing effectiveness, potentially leading to the very leaks you’ve worked to prevent.
DIY waterproofing for natural stone installations is entirely achievable when armed with proper knowledge, quality materials, and attention to detail. While the process requires patience and precision, the investment in learning correct techniques pays dividends through decades of leak-free performance. Successfully waterproofing your stone shower, bathroom, or outdoor space not only prevents costly water damage but also ranks among the improvements that boost value in your home.
Remember that rushing through preparation steps or compromising on material quality undermines even the most careful installation efforts. Take time to assess each layer, conduct flood tests, and address concerns before they become problems. However, recognize when a project exceeds your skill level—complex steam showers, structural issues, or extensive repairs may warrant professional consultation.
Approach your waterproofing project with confidence, but respect the process. The techniques outlined here reflect industry best practices proven across countless installations. When executed properly, your DIY waterproofing will protect your natural stone investment and provide lasting beauty and functionality for years to come.


