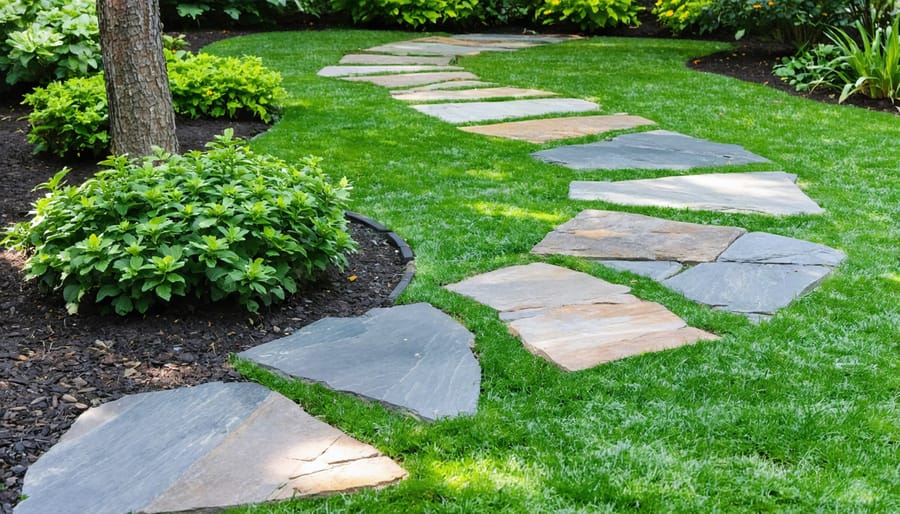
Transform your backyard into a stunning landscape by creating a DIY stone pathway that withstands decades of foot traffic and weather exposure. Master proven natural stone installation techniques to build pathways that blend seamlessly with your outdoor environment while providing reliable, maintenance-free access across your property.
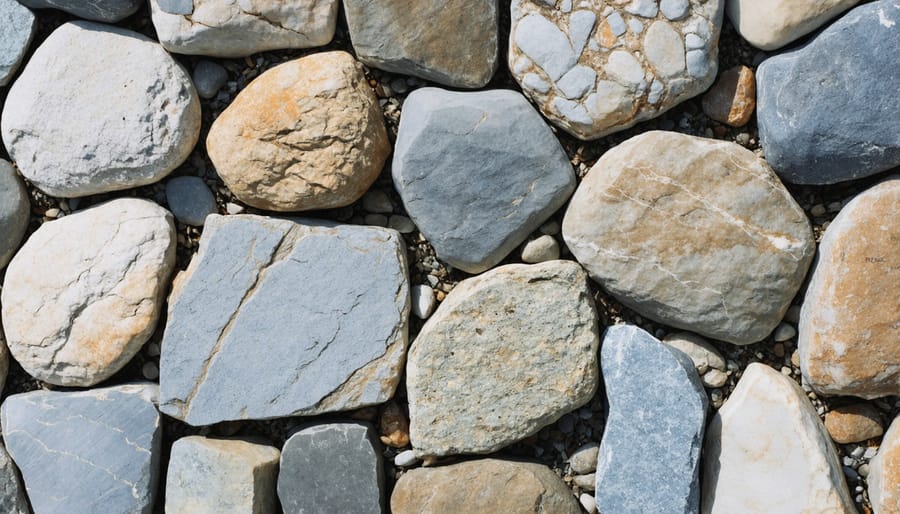
Select locally-sourced flagstone, slate, or limestone to reduce transportation costs and environmental impact while ensuring your pathway materials complement your region’s natural aesthetic. Calculate material requirements by measuring your intended path width (typically 3-4 feet for comfortable walking) and adding 10% extra for cuts and breaks during installation.
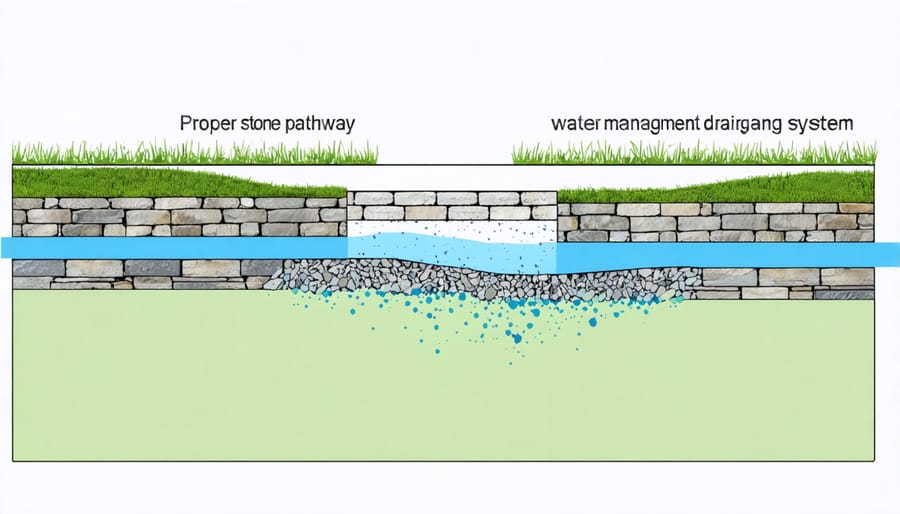
Proper base preparation determines your pathway’s longevity – excavate 6-8 inches deep, install landscape fabric to prevent weed growth, and create a solid foundation using 4 inches of compacted gravel followed by 2 inches of sand. Position stones with consistent 1/2-inch gaps, ensuring each piece sits firmly without wobble, then fill joints with polymeric sand for a professional, weed-resistant finish that enhances your property’s value and curb appeal.
Sourcing Sustainable Stone Materials
Local Quarries and Suppliers
Finding reliable stone suppliers in your area is crucial for cost-effective material sourcing and ensuring your pathway project’s success. Start by searching online directories and local business listings for stone yards and quarries within a 50-mile radius. Many suppliers specialize in native stones that naturally complement your local landscape and climate conditions.
When visiting suppliers, bring your pathway measurements and design plans. Most yards will let you hand-select stones, ensuring you get pieces that match your vision. Ask about remnants or mixed lots, which often come at discounted prices while providing the same quality as premium selections.
Consider factors like delivery options, minimum purchase requirements, and whether the supplier offers cutting services. Many local quarries also provide valuable advice on stone selection and installation techniques specific to your area’s soil and weather conditions.
Don’t overlook landscape supply stores and building material centers, as they frequently stock common pathway stones and can order specialty materials. Building relationships with local suppliers can lead to better pricing and access to unique stone selections as they become available.
Salvaged and Reclaimed Stone Options
Salvaged stone materials offer an eco-friendly and cost-effective alternative for creating stunning pathways. Local demolition sites, architectural salvage yards, and stone recyclers often have a wealth of reclaimed materials available at reduced prices. These materials include weathered cobblestones from old streets, granite curbing, and vintage flagstones from demolished buildings.
When sourcing salvaged stone, look for pieces with consistent thickness and stable surfaces. Weathered materials often have character-rich patinas that can add instant charm to your pathway. Common finds include old foundation stones, decommissioned street pavers, and surplus materials from construction sites.
Contact local masonry contractors and demolition companies to learn about upcoming projects that might yield usable stone. Many are willing to set aside materials for collectors. Online marketplaces and architectural salvage networks can also connect you with sellers of reclaimed stone.
Before purchasing, inspect salvaged materials carefully for structural integrity. While some surface wear is acceptable and often desirable, avoid stones with deep cracks or crumbling edges. Remember that irregular pieces can be incorporated into creative, mosaic-style designs, making the most of available materials.
Environmental Impact Considerations
When creating stone pathways, environmental impact varies significantly based on material choices and sourcing methods. Local stone reduces transportation emissions and supports regional quarries. Reclaimed or salvaged stones offer the most eco-friendly option, giving materials a second life while preserving natural resources. Permeable pathway designs allow proper water drainage, reducing runoff and supporting groundwater recharge. Consider using smaller stones or pavers that require less energy to extract and transport. Natural stone typically outlasts manufactured alternatives, making it a sustainable long-term choice despite higher initial environmental costs. When sourcing new stone, verify that suppliers follow responsible quarrying practices and land restoration protocols. Avoid using chemically treated stones or sealants that could leach harmful substances into the soil.
Selecting the Right Stone Type
Climate-Appropriate Stones
Selecting the right stone for your pathway requires careful consideration of your local climate conditions. Weather-resistant stone selection is crucial for ensuring your pathway’s longevity and minimizing maintenance requirements.
In freeze-thaw climates, opt for dense stones like granite or quartzite that resist water absorption and cracking. These materials withstand repeated freezing and thawing cycles without deteriorating. Avoid softer stones like limestone or sandstone in these regions, as they’re more susceptible to frost damage.
For hot, sunny climates, choose lighter-colored stones that reflect heat and remain comfortable to walk on. Travertine and limestone work well in these conditions, offering natural slip resistance even when wet. Their porous nature also helps manage surface water during occasional heavy rains.
Coastal areas demand special consideration due to salt exposure. Bluestone and slate prove excellent choices here, resisting salt erosion and maintaining their appearance despite maritime conditions. These stones also provide superior traction in wet conditions.
For regions with high rainfall, select stones with good drainage properties and natural grip. Textured granite and rough-cut slate are ideal choices, as they channel water effectively while preventing slippery surfaces. Consider incorporating proper drainage channels between stones to prevent water pooling.
Durability and Maintenance Requirements
Stone pathways require specific maintenance to ensure their longevity and preserve their aesthetic appeal. Natural stone’s durability varies significantly by type – granite and slate offer exceptional resistance to weathering, while softer stones like limestone need more frequent attention. Regular sweeping prevents debris accumulation and moss growth, while annual pressure washing maintains the stone’s natural appearance.
For pathways in high-traffic areas, inspect joints between stones every six months and replenish sand or grout as needed. In regions with freeze-thaw cycles, apply a penetrating sealer every 2-3 years to prevent water damage and cracking. Limestone and sandstone pathways benefit from resealing annually due to their porous nature.
Address any loose stones promptly to prevent pathway deterioration. For paths set in mortar, check annually for cracks or deterioration in the mortar joints. Repair small cracks immediately using appropriate masonry materials to prevent water infiltration and further damage. Keep surrounding vegetation trimmed to minimize root interference and organic debris accumulation, which can lead to staining and premature wear.
Aesthetic Considerations
When selecting stones for your pathway, consider how they’ll harmonize with your existing landscape elements. Natural stone colors typically range from cool grays and blues to warm browns and tans. Choose stones that complement your home’s exterior and other hardscape features. For a cohesive look, match the stone’s texture and color to existing elements like retaining walls or garden borders.
Consider the size and shape of stones carefully. Irregular, naturally-shaped stones create a rustic, organic feel perfect for cottage gardens or woodland paths. Uniformly cut stones offer a more formal, structured appearance suitable for modern landscapes. Mixed sizes can create visual interest, but ensure the stones maintain a consistent style throughout the pathway.
The surrounding plant life should also influence your stone selection. Light-colored stones can brighten shaded areas, while darker stones create striking contrast against bright foliage. Consider how the stones will look when wet, as this can significantly affect their appearance and safety. Some stones become slippery when wet, while others maintain their grip, making them better suited for frequently used pathways.
Installation Planning and Preparation
Site Assessment and Layout
Before breaking ground on your stone pathway, proper site assessment and layout planning are crucial for ensuring long-lasting stone construction methods. Begin by marking your intended pathway route using spray paint or garden hoses to visualize the flow. Consider natural walking patterns, existing landscape features, and drainage requirements when determining the path’s location.
Measure the total length and width of your planned pathway, accounting for any curves or transitions. Standard pathway widths range from 36 to 48 inches for comfortable single-file walking, while garden paths can be narrower at 24 to 30 inches. For front entrances or high-traffic areas, consider wider paths of 48 to 60 inches.
Evaluate the ground conditions where your pathway will be installed. Check for underground utilities by contacting your local utility company for marking services. Assess soil stability and drainage patterns during both dry and wet conditions. Note any slopes that may require steps or grade changes.
Create a detailed sketch of your pathway design, including measurements and materials needed. Calculate the square footage to determine stone quantities, adding 10% extra for cuts and waste. Mark reference points along the path using wooden stakes and string lines to maintain consistent width and proper alignment during installation. This preparation ensures your pathway will integrate seamlessly with your landscape while serving its intended purpose effectively.

Material Calculations
To accurately calculate materials for your stone pathway, start by measuring the total length and width of your planned path in feet. Multiply these measurements to determine the square footage. Add 10% to account for cuts and waste. For a typical 4-foot-wide, 20-foot-long pathway, you’ll need about 88 square feet of materials (80 sq ft + 10% extra).
For stone thickness, plan on 2-3 inches for flagstone or pavers. Calculate the base materials by multiplying your square footage by the depth needed: 4 inches of gravel base requires 0.37 cubic yards per 100 square feet, while 2 inches of sand setting bed needs 0.185 cubic yards per 100 square feet.
Cost estimates vary by region and material choice. Natural flagstone typically ranges from $15-30 per square foot installed, while concrete pavers run $10-20 per square foot. For a DIY project, expect material costs of $5-15 per square foot, depending on stone selection. Additional materials like landscape fabric, edge restraints, and joint sand typically add $1-2 per square foot to your total budget.
Tools and Equipment Needed
Before starting your stone pathway project, gather these essential tools and safety equipment to ensure efficient and safe installation:
Essential Tools:
– Wheelbarrow for transporting materials
– Shovel and spade for excavation
– Garden rake for leveling
– Rubber mallet for setting stones
– Level (both string and bubble types)
– Measuring tape and marking stakes
– Landscape fabric pins
– Utility knife
– Heavy-duty scissors
– Tamper or plate compactor
– Garden hose with spray nozzle
– Coarse-bristled broom
Safety Equipment:
– Safety glasses or goggles
– Work gloves (preferably heavy-duty)
– Steel-toed boots
– Knee pads
– Dust mask
– Back brace (for heavy lifting)
– First aid kit
Optional but Helpful Tools:
– Power washer for cleaning stones
– Edging tool for clean borders
– Hand trowel for detail work
– Square edge tool for alignment
– Gravel rake for substrate spreading
– Chalk line for marking straight paths
Keep all tools clean and in good working condition throughout the project. Consider renting larger equipment like plate compactors from local hardware stores if you don’t own them.
Sustainable Installation Practices
Water Management Solutions
Proper water management is crucial for the longevity of your stone pathway. Begin by creating a slight slope of about 1 inch per 8 feet away from your house foundation to prevent water pooling. Install a permeable base layer using crushed stone or gravel, which allows water to drain naturally into the ground.
Consider incorporating French drains alongside your pathway for areas with heavy rainfall or poor natural drainage. These hidden channels direct excess water away from your path and prevent erosion. Place small drainage gaps between stones, filling them with pea gravel or crushed stone to facilitate water flow while maintaining aesthetic appeal.
For sustainable water management, position your pathway to direct rainwater toward garden beds or rain gardens. This technique, known as passive water harvesting, reduces runoff and naturally irrigates nearby plants. In areas with strict water conservation requirements, consider using permeable pavers or leaving wider gaps between stones to maximize ground water absorption.
Always ensure your pathway’s surface maintains a slight crown or camber to shed water toward the edges, preventing the formation of puddles and protecting the integrity of your stone installation.
Eco-Friendly Binding Materials
For environmentally conscious pathway construction, several eco-friendly binding materials offer excellent alternatives to traditional cement. Sand-based polymeric jointing sand provides a stable, water-permeable bond while allowing natural drainage. This sustainable option prevents weed growth and remains flexible during ground movement.
Decomposed granite mixed with a natural stabilizer creates a firm, permeable surface that complements stone pathways while maintaining a natural aesthetic. Pine resin-based binders offer another organic solution, forming strong bonds between stones while remaining completely biodegradable.
For gaps between stones, consider drought-resistant groundcover plants or crushed recycled glass aggregate. These living or recyclable options not only secure stones but also contribute to local ecosystem health. Native moss can also be encouraged to grow between stones, creating natural adhesion while adding visual appeal.
When selecting binding materials, prioritize those sourced locally to reduce transportation emissions. Many regions offer location-specific solutions, such as locally processed stone dust or regional organic stabilizers, which minimize environmental impact while ensuring pathway durability.
Creating a DIY stone pathway is a rewarding project that enhances your outdoor space while promoting environmental sustainability. By choosing locally sourced materials, implementing proper drainage, and following correct installation techniques, you can build a pathway that will last for generations. Remember to prioritize sustainable practices by selecting reclaimed or locally quarried stones, using permeable laying methods, and incorporating native plants along the borders. Whether you opt for a formal design or a naturally flowing path, the key to success lies in thorough planning and careful execution. With proper maintenance, your stone pathway will not only provide functional access through your landscape but also serve as a beautiful, eco-friendly addition to your property that increases its value and appeal.