Repair deteriorating paving stones by identifying the root cause – whether stone paving joints keep failing, stones are cracking, or surfaces are settling unevenly. Remove damaged stones using a flat pry bar and rubber mallet, ensuring surrounding pavers remain undisturbed. Clean the exposed bedding sand thoroughly, replace it if contaminated, and reset stones on a properly compacted base. Restore joint stability by filling gaps with polymeric sand, which forms a flexible bond while allowing necessary movement.
Professional paving repair addresses both immediate damage and underlying structural issues that compromise your hardscape’s integrity. Left untreated, minor paving problems escalate into major safety hazards and costly repairs. Whether maintaining a residential driveway or commercial plaza, proper stone repair techniques extend pavement life while preserving its natural beauty and functionality.
Focus on preventive maintenance – regular cleaning, prompt joint repairs, and proper drainage management significantly reduce the likelihood of serious paving failures. Understanding these fundamental repair principles helps property owners make informed decisions about maintaining their stone installations for decades of reliable service.
Common Issues with Natural Stone Paving Joints
Weather-Related Damage
Weather conditions play a significant role in the deterioration of paving stone joints. The impact of natural stone weathering is particularly evident during freeze-thaw cycles, where water penetrates the joints, freezes, and expands, creating pressure that can crack or dislodge jointing material.
Heavy rainfall can gradually wash away sand-based joint fillers, while prolonged exposure to UV rays may cause certain polymeric jointing compounds to break down over time. Temperature fluctuations cause natural stone pavers to expand and contract, putting additional stress on the joints between them.
In regions with severe winters, the use of de-icing salts can accelerate joint deterioration by increasing the number of freeze-thaw cycles and introducing harmful chemicals. Similarly, in coastal areas, salt spray can infiltrate joints and lead to premature breakdown of jointing materials.
Regular inspection of paving joints during different weather conditions helps identify potential issues before they become severe. Installing proper drainage systems and using weather-resistant jointing materials appropriate for your climate can significantly reduce weather-related damage.
Vegetation and Weed Growth
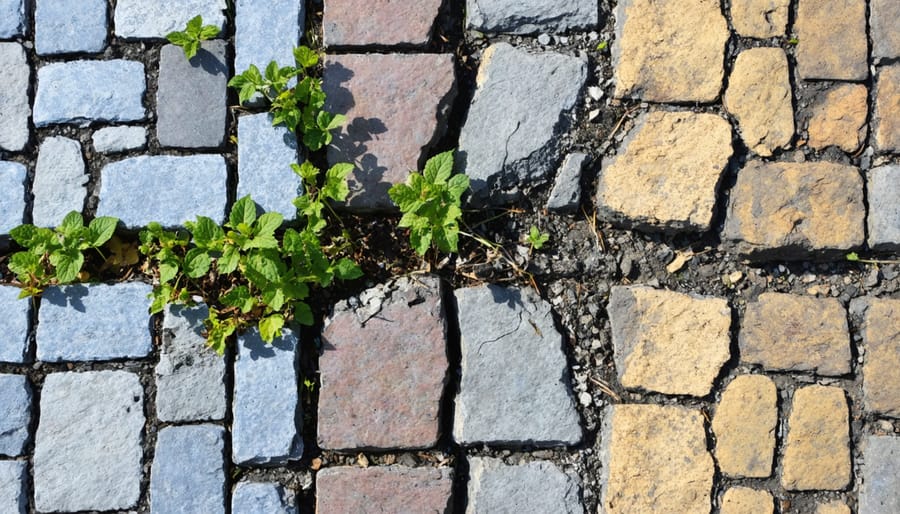
Vegetation and weeds growing between paving stones pose significant challenges for hardscape maintenance. These unwanted plants can cause severe organic matter damage by forcing joints apart and creating wider gaps that collect more debris. As roots expand, they can lift stones and create uneven surfaces, leading to trip hazards and accelerated deterioration of the paving system.
To prevent vegetation growth, regularly inspect joints for early signs of sprouting plants and remove them immediately, including their entire root system. Apply appropriate herbicides designed specifically for hardscaping, being careful to avoid products that might stain or damage the stone surface. Consider installing polymeric sand in joints, which contains compounds that inhibit weed growth while maintaining flexibility for natural stone movement.
Preventive measures include ensuring proper drainage, regular cleaning to remove organic debris, and maintaining tight joints between stones. For severe cases, complete joint removal and replacement may be necessary to eliminate established root systems and restore the paving’s integrity.
Essential Tools and Materials for Joint Repair
Jointing Materials
Several jointing materials are available for paving stone repair, each suited to specific applications and conditions. Traditional sand-cement mortar remains a popular choice for its durability and cost-effectiveness, typically mixed in a 3:1 ratio for optimal strength. Polymeric sand offers a modern alternative, featuring special additives that harden when exposed to water, creating a flexible yet stable joint that resists weed growth and insect intrusion.
For heritage properties or historically sensitive areas, lime mortar provides an authentic solution while allowing the pavement to breathe naturally. Resin-based jointing compounds offer superior strength and water resistance, making them ideal for high-traffic areas or locations subject to frequent washing.
Epoxy-modified grouts provide excellent chemical resistance and are particularly suitable for commercial applications. When selecting a jointing material, consider factors such as the paving stone type, traffic load, weather exposure, and local climate conditions to ensure long-lasting results.
Tools and Equipment
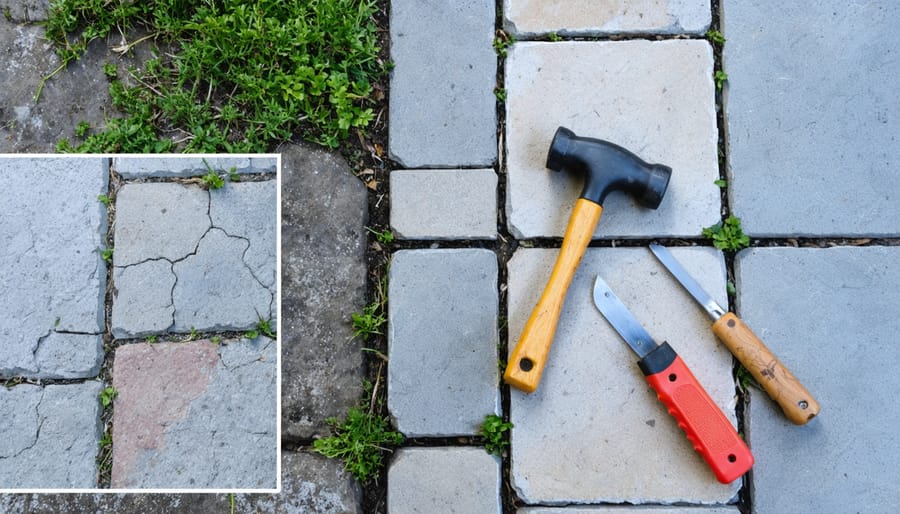
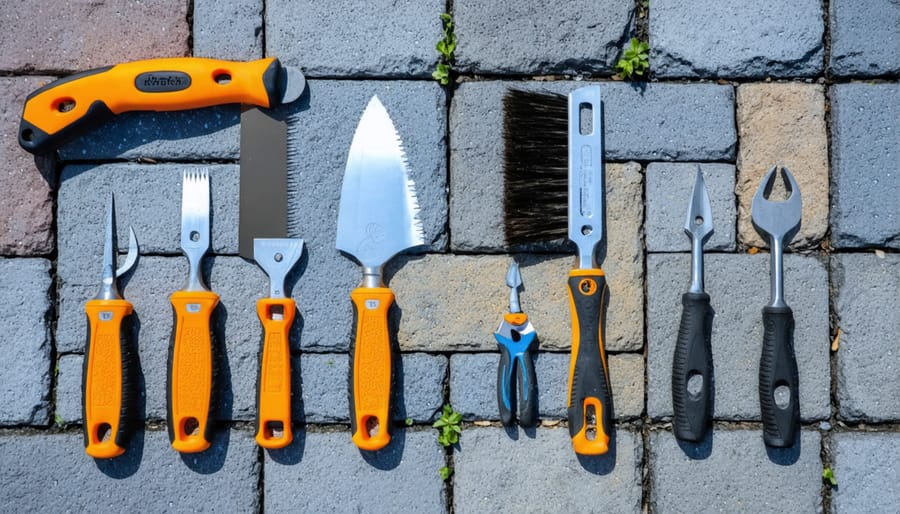
For successful paving stone joint repair, you’ll need several essential stone masonry tools and equipment. Start with a wire brush and chisel for removing old mortar and debris. A pressure washer or garden hose with adjustable nozzle helps clean the joints thoroughly. You’ll need a pointing tool or jointing iron for precise mortar application, along with a mixing bucket and trowel for preparing repair mortar.
Safety equipment is crucial: wear protective gloves, safety glasses, and a dust mask. Keep a measuring cup handy for accurate mortar mixing ratios. A margin trowel helps control smaller amounts of mortar, while a brush set assists in cleaning and finishing. For larger repairs, consider having a wheelbarrow for mixing bigger batches of mortar. A level ensures proper alignment during repairs, and rubber mallet helps adjust stones if needed.
Step-by-Step Joint Repair Process

Preparation and Cleaning
Before beginning any paving stone repair work, proper preparation and cleaning of the area is essential for achieving lasting results. Start by thoroughly inspecting the affected area and marking damaged joints that require attention. Remove any loose debris, vegetation, or weeds growing between the stones using a wire brush or specialized joint cleaning tool.
For existing mortar or jointing compound, use a joint raker or angle grinder with a diamond blade to remove deteriorated material. Work carefully to avoid damaging the edges of the paving stones. Ensure you maintain a consistent depth of at least 25mm (or the manufacturer’s recommended depth) for the new jointing material to bond effectively.
Once the old material is removed, clean the joints thoroughly using a pressure washer on a low setting. This removes fine particles and dust that could compromise the bond of new jointing material. Pay special attention to the sides of the joints, ensuring they’re free from any residual material or contamination.
After pressure washing, allow the area to dry completely. Use a leaf blower or compressed air to remove any remaining moisture or debris from the joints. For optimal results, choose a dry day with no rain forecast for at least 24 hours after completion. The joints must be completely dry before applying new jointing material to ensure proper adhesion and curing.
Joint Material Application
Applying new joint material requires careful attention to detail for lasting results. Begin by ensuring the cleaned joints are completely dry before proceeding. Mix the jointing compound according to manufacturer specifications, typically achieving a workable consistency similar to wet sand.
Using a rubber float, spread the joint material diagonally across the paving stones, ensuring complete penetration into the joints. Work in manageable sections of about 20 square feet at a time to prevent the material from drying before proper application. Press the mixture firmly into the joints, maintaining consistent pressure to achieve even filling.
Once the joints are filled, remove excess material from the stone surface using a soft brush at a 45-degree angle. Be thorough but gentle to avoid displacing the newly applied joint material. After initial cleaning, use a slightly damp sponge to clean any remaining residue from the stone surface, being careful not to oversaturate the fresh joints.
Allow the joint material to cure according to manufacturer recommendations, typically 24-48 hours. During this time, protect the area from foot traffic and precipitation. For deeper joints, you may need to apply the material in multiple layers, allowing each layer to partially set before adding the next. This technique ensures proper compaction and prevents settling issues later.
After curing, inspect the joints for any low spots or voids that may need additional filling. Complete the process by lightly misting the entire area to aid in final setting.
Finishing and Curing
After completing the repair work, proper finishing and curing are crucial for ensuring long-lasting results. Allow the newly applied mortar or repair compound to set for approximately 30 minutes before removing any excess material from the stone surfaces. Use a soft brush to clean the area, being careful not to disturb the fresh joints.
For most repair materials, initial setting occurs within 24 hours, but full curing typically requires 72 hours under normal weather conditions. During this period, protect the repaired area from foot traffic and keep it covered if rain is forecast. In warmer weather, lightly mist the repair with water several times during the first day to prevent rapid drying and potential cracking.
Temperature plays a significant role in the curing process. Ideal curing conditions are between 50-80°F (10-27°C). In extreme temperatures, adjust curing times accordingly and consider using specialized products designed for those conditions. Avoid applying repairs when temperatures are expected to drop below freezing within 48 hours.
Once fully cured, inspect the repair work for any imperfections. Small surface irregularities can be smoothed with fine-grit sandpaper. Finally, consider applying a quality stone sealer to protect both the repair and surrounding stones from moisture penetration and future damage. Wait at least one week after repairs before applying any sealers.
Preventive Maintenance Tips
Regular maintenance of your paving stones can significantly extend their lifespan and prevent costly repairs. Start by inspecting your pavers quarterly, paying special attention to the joints between stones. Look for signs of sand loss, weed growth, or widening gaps, which can indicate potential issues.
Keep joints filled with appropriate jointing sand or compound to maintain structural integrity. Sweep the surface regularly to remove debris and prevent organic matter from settling into joints. After heavy rains, check that joint material hasn’t been washed away and replenish as needed.
Seal your paving stones every 3-5 years to protect against staining and weathering. Choose a penetrating sealer that allows the stone to breathe while providing protection. Before sealing, ensure the surface is thoroughly cleaned and joints are properly filled.
Address any loose or rocking pavers immediately, as they can create a domino effect of damage. When cleaning, avoid high-pressure washing directly on joints, as this can dislodge jointing material. Instead, use a gentle spray setting and appropriate cleaning solutions.
Consider installing edge restraints if not already present, as they help prevent lateral movement of stones. During winter, use sand or kitty litter instead of salt-based de-icers, which can damage both the stone surface and joint material.
Maintain proper drainage around your paved area to prevent water pooling, which can lead to joint deterioration and stone settling. Regular monitoring and prompt attention to minor issues will help maintain the beauty and functionality of your paving stone installation while preventing more serious problems from developing.
Proper maintenance of paving stone joints is crucial for the longevity and appearance of your hardscape installation. Regular inspection, timely repairs, and appropriate joint filling techniques can prevent more serious issues from developing. By following the repair methods outlined in this guide, you can effectively address deteriorated joints, protect against water damage, and maintain the structural integrity of your paving stones. Remember to choose high-quality jointing materials suitable for your specific application and climate conditions. While some repairs can be handled as DIY projects, don’t hesitate to consult professional help for extensive damage or complex installations. With proper care and maintenance, your paving stone installation can continue to enhance your property’s value and aesthetic appeal for many years to come.