
Paving stone joint sand forms the critical backbone of every successful hardscape installation, preventing shifting, reducing weed growth, and maintaining the structural integrity of your outdoor surfaces. This specially-graded material locks pavers together while allowing subtle movement from freeze-thaw cycles and ground settling. Unlike common playground or construction sand, professional-grade joint sand features precise particle sizing and superior angular grain structure that creates maximum interlock between stones. When properly installed and maintained, it transforms loose individual pavers into a unified, stable surface capable of withstanding decades of foot traffic, weather exposure, and environmental stress. Select the right joint sand material and installation method at the outset to avoid costly repairs and maintenance headaches down the road. Whether you’re installing a new patio, driveway, or walkway, understanding joint sand’s vital role will help ensure your investment delivers lasting beauty and functionality.
Understanding Paving Stone Joint Sand
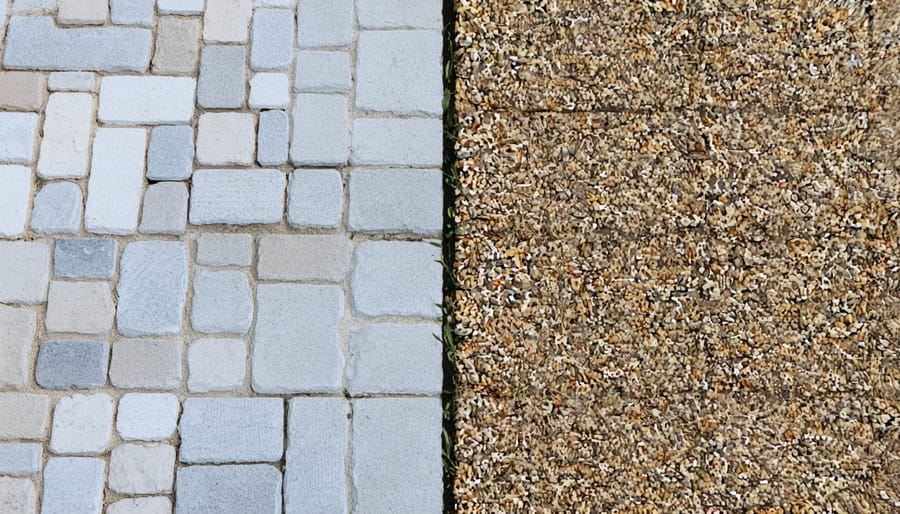
Traditional vs. Polymeric Sand
When choosing joint sand for paving stones, property owners typically face two main options: traditional masonry sand and polymeric sand. Traditional sand is a natural, untreated product that’s been used for generations. It’s cost-effective and easy to install, but it can wash away during heavy rains and may allow weeds to grow between pavers.
Polymeric sand, a more modern solution, combines fine sand particles with special polymers that harden when exposed to water. While initially more expensive, it offers superior durability and requires less frequent maintenance. The polymers create a flexible bond that helps prevent erosion, inhibits weed growth, and deters insects from nesting between pavers.
Traditional sand might be suitable for low-traffic areas or regions with minimal rainfall. However, polymeric sand typically performs better in high-traffic zones, sloped surfaces, and areas subject to regular washing or severe weather. It’s particularly valuable for pool decks and patios where joint stability is crucial for long-term performance.
Both options have their place, but the choice often depends on specific project requirements, climate conditions, and maintenance preferences.
Why Joint Sand Matters
Joint sand serves as the critical backbone of any paving stone installation, playing a far more important role than simply filling gaps between stones. This specialized material creates a robust interlocking system that prevents individual pavers from shifting, rocking, or moving under pressure. When properly installed, joint sand significantly reduces the risk of edge chipping and surface damage that can occur when pavers make direct contact with each other.
Beyond structural stability, quality joint sand acts as a barrier against weed growth and insect infestation, which can compromise the integrity of your paving installation. It also helps manage water drainage by allowing controlled percolation while preventing erosion that could otherwise wash away the bedding material beneath the pavers.
The presence of proper joint sand extends the lifespan of your paving installation by absorbing minor ground movements and preventing freeze-thaw damage in colder climates. Without adequate joint sand, even minor settling or seasonal ground shifts can lead to significant surface irregularities and potential tripping hazards. Regular maintenance of joint sand levels ensures your paving stones remain stable, attractive, and functional for years to come.
Common Joint Sand Problems
Sand Washout
Joint sand washout is a common issue that can significantly impact the stability and appearance of paved surfaces. This problem occurs when water from rainfall, irrigation systems, or pressure washing dislodges the sand between pavers, leading to various structural and aesthetic concerns. Similar to weathering effects on natural stone, sand washout can progressively worsen if not addressed promptly.
The primary causes of sand washout include heavy rainfall, improper drainage, steep surface gradients, and aggressive cleaning methods. When joint sand washes away, it creates voids between pavers that can allow them to shift, creating uneven surfaces and potential tripping hazards. These gaps also provide opportunities for weed growth and insect infestation.
Surface water runoff is particularly problematic, as it can create channels through the joints, gradually eroding the sand. This effect is amplified on sloped surfaces or in areas with poor drainage. Modern stabilized polymeric sands offer improved resistance to washout compared to traditional sand, but proper installation and maintenance remain crucial for long-term performance.
Weed Growth
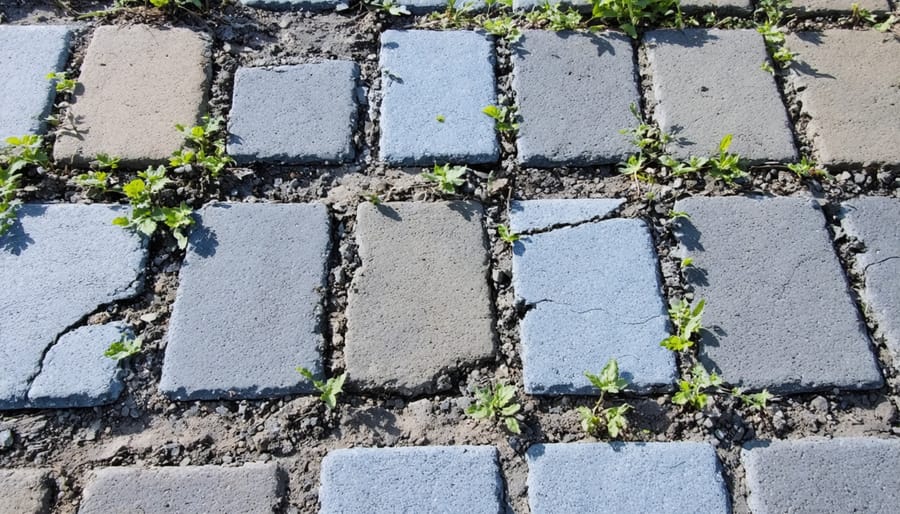
Inadequate joint sand maintenance creates perfect conditions for unwanted vegetation growth between pavers. When joint sand erodes or becomes displaced, tiny gaps form that collect seeds, soil, and moisture – essential elements for weed germination. These spaces also accumulate organic matter damage over time, creating a nutrient-rich environment where weeds thrive. Once established, weed roots can expand joint spaces further, compromising the entire paving system’s stability. The problem compounds as vegetation growth creates additional pathways for water infiltration, accelerating sand erosion and creating more opportunities for weed invasion. Regular inspection and prompt reapplication of appropriate joint sand helps prevent these issues by maintaining tight, properly filled joints that resist weed establishment. Polymeric sand options offer enhanced weed resistance through stabilizing agents that bond the sand particles together, creating a more hostile environment for unwanted plant growth.
Joint Deterioration
Joint deterioration in paving stone installations often begins subtly but can quickly escalate into significant problems. Common signs include widening gaps between stones, sand washing out during rain, and vegetation growth between pavers. When joint sand fails, stones may begin to shift, rock, or become loose, creating potential trip hazards and compromising the pavement’s structural integrity.
Without proper joint sand maintenance, water can penetrate beneath the pavement surface, leading to erosion of the base material and subsequent settling or heaving of stones. This instability can cause stones to become uneven, creating an unsightly appearance and safety concerns. Edge restraints may also fail as stones shift outward, resulting in progressive deterioration of the entire paved area.
Regular inspection can identify early warning signs such as missing joint sand, pavers moving under foot traffic, or pooling water. Addressing these issues promptly helps prevent more extensive damage and costly repairs.
Professional Joint Sand Application
Surface Preparation
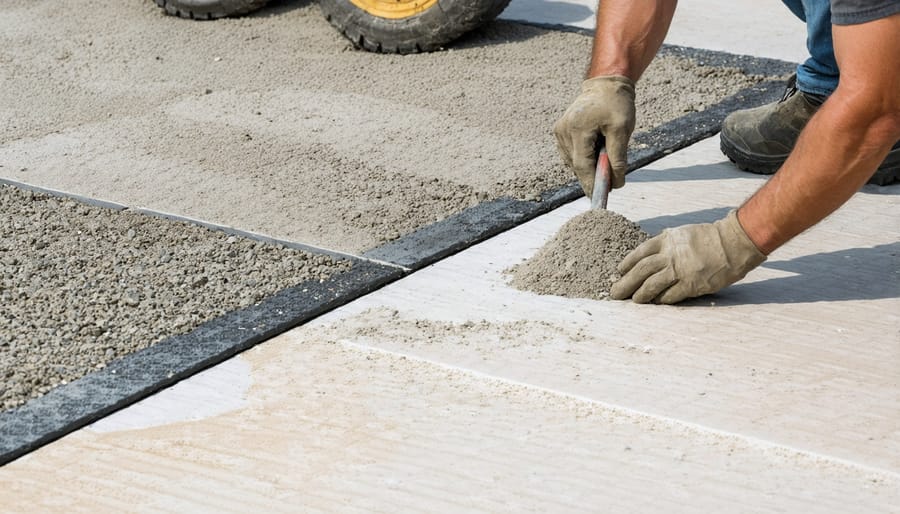
Proper surface preparation is crucial for successful joint sand installation. Begin by thoroughly cleaning the paving stones, removing all debris, weeds, and old joint material. Use a pressure washer to eliminate stubborn dirt and moss, ensuring the joints are completely clear.
Check that the paving stones are completely dry before proceeding, as moisture can prevent proper sand compaction and stabilization. Inspect the joints for proper depth and width – they should typically be between 1/8 inch to 1/4 inch wide and at least 1.5 inches deep for optimal sand performance.
Repair any loose or damaged stones and ensure the base material is stable. If necessary, reset any sunken pavers to maintain proper surface level. Remove any existing joint material that’s deteriorated or contaminated with soil.
For polymeric sand applications, use a leaf blower to remove fine dust from the surface, as this can interfere with the bonding process. Temperature conditions should be checked to ensure they meet manufacturer specifications, typically between 50-90°F (10-32°C) with no rain forecast for at least 24 hours.
Application Techniques
Begin by sweeping the paving stones thoroughly to remove any debris. Pour the joint sand evenly across the surface, ensuring complete coverage of all joints. Using a push broom, sweep the sand diagonally across the joints, working it deep into the gaps between stones. Multiple passes may be necessary to achieve proper fill.
For optimal settling, use a plate compactor with a rubber mat attachment to vibrate the sand into the joints. Work in a systematic pattern, overlapping each pass slightly. The vibration helps consolidate the sand and eliminate voids. After compaction, sweep additional sand over any low spots that appear.
Lightly mist the surface with water to help settle the sand further, being careful not to oversaturate. Allow the area to dry completely before applying a second layer of sand if needed. For polymeric sand applications, follow manufacturer-specific instructions regarding moisture levels and curing times.
Finish by removing excess sand from the paving stone surface with a leaf blower or soft brush. This prevents staining and ensures a clean, professional appearance.
Curing and Protection
After installing paving stone joint sand, proper curing and protection are essential for long-term stability. Allow the sand to settle for 24-48 hours before exposing the surface to water or heavy traffic. During this period, keep the area completely dry to prevent sand displacement and ensure optimal compaction.
For stabilized polymeric sand installations, maintain dry conditions for a minimum of 24 hours after initial water activation. Temperature and humidity levels affect curing time, so in cooler or more humid conditions, extend the protection period to 48-72 hours. Use temporary barriers or covers if rain is forecasted during the curing period.
To protect newly sanded joints, avoid power washing or aggressive cleaning methods for at least 30 days. This allows the sand to fully settle and create strong bonds between pavers. Consider applying a quality sealer after the curing period to enhance joint stability and protect against erosion, weed growth, and ant infestations.
Monitor the joints during the first few weeks and top up any areas where settling has occurred to maintain consistent joint filling and surface stability.
Maintenance Best Practices
Regular Inspection
Regular monitoring of joint sand condition is essential for maintaining the integrity and appearance of your paved surfaces. Implement effective preventive maintenance strategies by inspecting your paving stone joints at least twice a year, particularly after winter and following heavy rainfall periods.
Look for signs of sand loss, which often appears as visible gaps between stones or shallow joint depths. Pay special attention to areas with heavy foot traffic, around drainage features, and locations exposed to strong water flow. A simple test involves running a key or thin object along the joint – if it penetrates more than 1/8 inch below the paver surface, additional sand may be needed.
Also check for weed growth, ant activity, or joint sand washing out, as these issues can quickly compromise the stability of your pavement. Document problem areas with photos and measurements to track changes over time. This systematic approach helps identify maintenance needs before they develop into costly repairs.
Cleaning Methods
When cleaning paving stones with joint sand, it’s crucial to use safe cleaning methods for stone to prevent sand displacement or damage. Start with a gentle sweep using a soft-bristled broom to remove surface debris. For deeper cleaning, use a low-pressure water spray or garden hose with a fan nozzle setting, keeping the water stream at a 30-degree angle to avoid dislodging the joint sand.
Avoid pressure washers or concentrated water streams, as these can erode the sand from between pavers. If dealing with tough stains, use pH-neutral cleaners specifically formulated for natural stone and apply them with a soft brush, working in small sections. Never use acidic cleaners, vinegar, or bleach, as these can deteriorate both the joint sand and the paving stones.
After cleaning, inspect the joints and top up with sand if necessary, ensuring the longevity of your paving installation.
Reapplication Schedule
Regular inspection and maintenance of joint sand is essential for the longevity of your paving stone installation. As a general rule, examine your joints every spring and fall for signs of sand loss or deterioration. Top up polymeric sand every 2-3 years under normal conditions, while traditional sand may require annual replenishment, especially in areas with heavy rainfall or frequent pressure washing.
Monitor your joints after severe weather events, as heavy rains or strong winds can displace sand. Look for signs like widening gaps, weed growth, or ant activity, which indicate it’s time to add more sand. In high-traffic areas or locations exposed to regular water flow, you may need to replenish sand more frequently, potentially every 6-12 months.
For stabilized or polymeric sand installations, complete replacement is typically necessary only if the joints show significant deterioration or if pavers have been reset. Always ensure the surface is completely dry before applying new joint sand.
Proper joint sand maintenance is crucial for the longevity and aesthetic appeal of any paved surface. Throughout this article, we’ve explored the various aspects of paving stone joint sand, from its essential role in stabilizing pavers to the different types available in the market. Whether you choose traditional sand or modern polymeric varieties, the key lies in correct installation and regular maintenance.
Remember that joint sand does more than fill gaps – it creates a robust interlocking system that prevents paver movement, controls weed growth, and manages water drainage. Regular inspection and maintenance of joint sand levels help identify potential issues before they become major problems. When properly maintained, joint sand significantly extends the life of your paving installation while preserving its visual appeal.
For optimal results, always follow manufacturer guidelines during installation, ensure proper sand compaction, and maintain appropriate joint sand levels. Weather conditions, foot traffic, and natural settling will affect your joint sand over time, making periodic maintenance essential. Consider your specific needs, climate conditions, and usage patterns when selecting joint sand type and planning maintenance schedules.
Investment in quality joint sand and proper maintenance practices ultimately saves time and money by preventing common issues like paver shifting, weed growth, and erosion. Whether you’re a homeowner maintaining a backyard patio or a professional overseeing large commercial installations, understanding and implementing proper joint sand practices is fundamental to successful paver installation and maintenance.
By following the guidelines and best practices outlined in this article, you can ensure your paved surfaces remain stable, attractive, and functional for years to come.