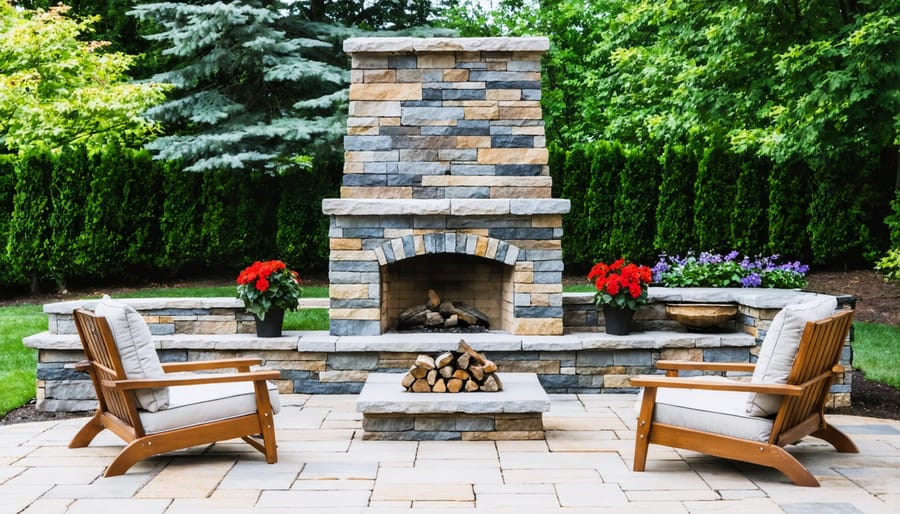
Transform your backyard into a stunning entertainment space by building your own outdoor stone fire features. A DIY stone fireplace creates an elegant focal point while providing warmth and ambiance for year-round outdoor gatherings. Master-level masons charge $8,000-15,000 for custom installations, but dedicated DIY enthusiasts can complete this project for $2,000-4,000 in materials.
Building a stone outdoor fireplace requires careful planning, proper foundation work, and strict adherence to local building codes. The project demands intermediate masonry skills, fundamental understanding of draft principles, and approximately 40-60 hours of labor. Success hinges on selecting appropriate heat-resistant materials, establishing correct proportions for smoke ventilation, and maintaining precise stone placement throughout construction.
This comprehensive guide breaks down the essential steps, material requirements, and critical safety considerations for building a durable, professionally-finished stone fireplace that will serve as your outdoor sanctuary for decades to come. Whether you’re working with natural fieldstone, manufactured veneer, or cut limestone, these proven techniques ensure proper structural integrity while achieving the timeless aesthetic of traditional masonry craftsmanship.
Planning Your Outdoor Stone Fireplace
Design and Location Selection
Selecting the ideal location for your outdoor stone fireplace requires careful consideration of both safety and functionality. Start by checking local building codes and obtaining necessary permits. Choose a spot at least 10 feet away from your home and any overhanging trees or structures. The fireplace should be positioned to avoid smoke blowing toward seating areas or into your house, considering prevailing wind patterns.
When designing your fireplace, factor in the available space and how it will integrate with your existing landscape. A typical outdoor fireplace footprint ranges from 4×4 feet for smaller units to 6×8 feet for larger installations. Consider the height as well, usually between 8-12 feet tall, ensuring it’s proportional to your outdoor space.
The foundation is crucial – you’ll need a level, reinforced concrete pad that extends at least 6 inches beyond the fireplace footprint on all sides. The pad should be 6-8 inches thick to support the substantial weight of stone materials.
Design elements should complement your home’s architectural style. Choose between a rustic stack stone appearance, formal cut stone, or a combination of both. Include practical features like a hearth for seating, wood storage areas, and a mantel for decorative elements. Consider adding a chimney cap to prevent rain and debris from entering, and plan for proper drainage around the base to protect your investment.
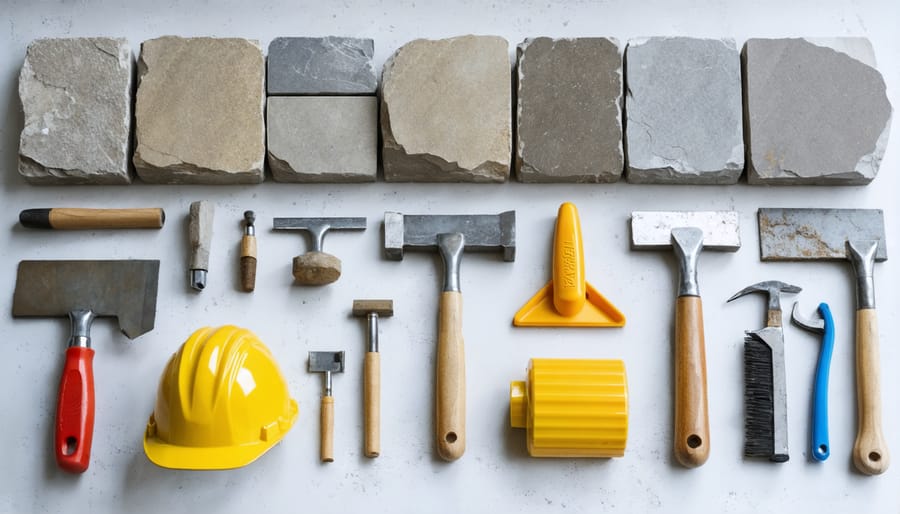
Materials and Tools Checklist
Before beginning construction, gather these essential materials and tools for your DIY stone outdoor fireplace project. For sourcing natural stone materials, consider local suppliers for the best quality and value.
Materials:
– Natural stone or manufactured stone veneer (approximately 100-150 square feet)
– Concrete blocks for foundation and core structure
– Mortar mix and portland cement
– Rebar and wire mesh
– Concrete for foundation (amount depends on size)
– Fire brick for firebox lining
– Chimney cap and flue liner
– Construction adhesive
– Gravel for drainage
– Waterproof membrane
– Metal ties and anchors
Tools:
– Wheelbarrow
– Level (2-foot and 4-foot)
– Trowels (brick and pointing)
– Stone chisel and hammer
– Circular saw with masonry blade
– Safety equipment (goggles, gloves, dust mask)
– Tape measure and chalk line
– Mason’s string and line blocks
– Mixing tools (hoe, bucket, mixing paddle)
– Angle grinder
– Shovel and spade
– Spirit level
– Work platform or scaffolding
– Rubber mallet
– Wire brush
– Cleaning supplies
Optional but recommended:
– Power mixer
– Wet saw for cutting stone
– Concrete vibrator
– Laser level
Foundation and Base Construction
Creating the Concrete Base
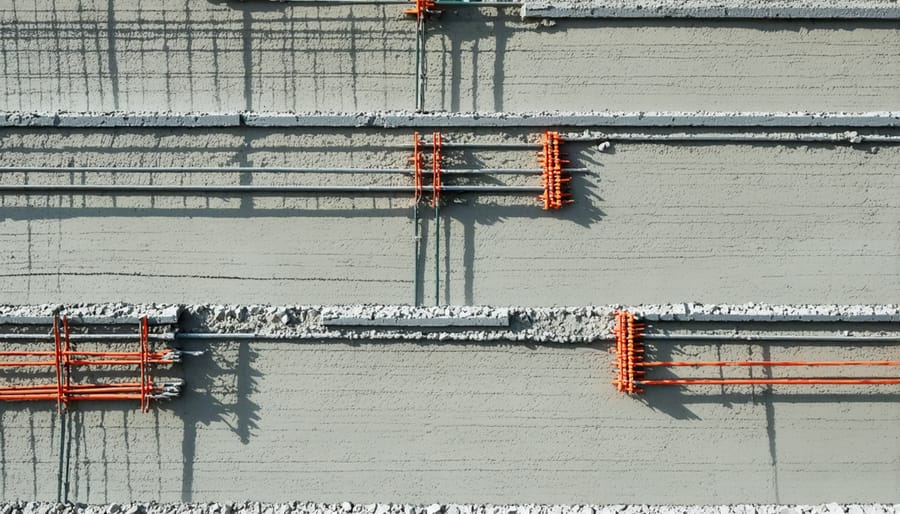
Begin by selecting a level area for your fireplace foundation, ensuring proper drainage and distance from structures. The concrete base should extend at least 6 inches beyond your planned fireplace footprint on all sides. Excavate the area to a depth of 8 inches, removing all organic material and loose soil.
Create a form using 2×8 pressure-treated lumber, securing it with stakes at each corner. Ensure the form is perfectly level using a laser level or traditional bubble level. Line the bottom with 4 inches of compacted gravel for proper drainage and stability.
Install a grid of 1/2-inch rebar, spacing the bars 12 inches apart in both directions. Elevate the rebar grid using concrete spacers to ensure it sits in the middle of your concrete pour. The rebar provides crucial structural support for your fireplace’s weight.
Mix concrete according to manufacturer specifications, aiming for a 4-inch slump consistency. Pour the concrete into your form, maintaining a minimum thickness of 4 inches. Use a screed board to level the surface, followed by a bull float to smooth it. Create a slightly rough texture with a broom finish to enhance grip.
Allow the concrete to cure for at least 72 hours, keeping it moist by misting with water and covering with plastic sheeting. Remove the forms only after the concrete has fully cured to prevent edge damage.
Installing the First Course
Begin by preparing a level foundation using crushed stone or gravel, compacted to create a stable base. Mix your mortar according to manufacturer specifications, aiming for a consistency similar to peanut butter. Starting at one corner, lay your first stone, pressing it firmly into the mortar bed. Use a level to ensure it’s perfectly horizontal, adjusting as needed with small taps from a rubber mallet.
Continue laying stones along the perimeter of your planned fireplace footprint, maintaining consistent mortar joint thickness of about 3/8 to 1/2 inch. Place corner stones first, then fill in between them, using string lines to keep the course straight. For optimal stability, stagger the joints between stones, avoiding long vertical seams that could compromise structural integrity.
Select stones of similar height for this first course to create an even surface. If needed, shape stones using a hammer and chisel or wet saw to achieve proper fit. Remove excess mortar immediately with a pointing tool, and clean any mortar smears from stone faces with a damp sponge before it sets.
Take time to verify that this foundation course is level in all directions, as it will determine the alignment of all subsequent courses. Allow the mortar to cure for at least 24 hours before proceeding with the next layer of construction.
Building the Fireplace Structure
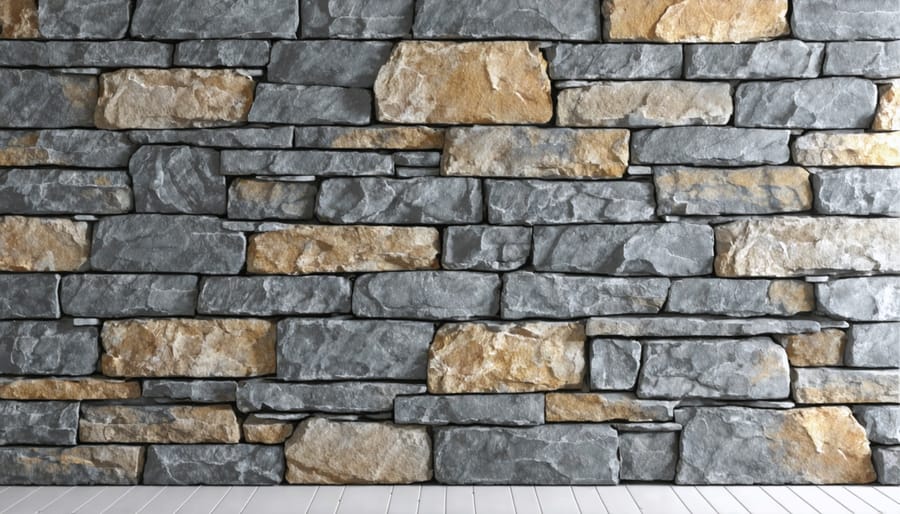
Laying Natural Stone Walls
When building your outdoor fireplace, proper stone placement and mortar application are crucial for both structural integrity and visual appeal. Following established natural stone wall construction techniques will ensure your fireplace stands the test of time.
Begin by sorting your stones by size and shape, creating distinct piles for corner pieces, face stones, and smaller fill stones. Always start laying stones from the corners, working your way toward the center. This approach helps maintain level courses and proper alignment throughout the construction process.
Apply mortar in a consistent 1/2-inch to 3/4-inch layer, using a mason’s trowel to create a bed that extends slightly beyond the stone’s edges. Before placing each stone, butter its back surface with mortar to ensure complete coverage. Position larger stones first, maintaining level courses as you progress upward.
Pay special attention to maintaining proper joints between stones. Aim for joints approximately 3/8 to 1/2 inch wide, keeping them as consistent as possible throughout the wall. Use smaller stones as shims where needed to maintain level courses, but avoid creating long vertical joints that can compromise structural integrity.
As you work, periodically check for plumb (vertical alignment) using a level, and adjust stones as necessary. Clean excess mortar from the face of the stones immediately using a wet brush, as dried mortar can be difficult to remove later without damaging the stone surface.
For maximum stability, stagger vertical joints between courses, ensuring that no joint aligns with those above or below it. This creates an interlocking pattern that strengthens the overall structure. When incorporating larger stones, ensure they span multiple courses to act as throughstones, binding the front and back of the wall together.
Remember to leave appropriate gaps for ventilation and expansion joints where specified in your fireplace plans, as these are essential for safe operation and long-term durability.
Creating the Firebox
The firebox is the heart of your outdoor fireplace, where the actual burning takes place. Begin by laying a concrete foundation pad that extends at least 6 inches beyond your planned firebox dimensions. For a standard outdoor fireplace, aim for interior dimensions of approximately 36 inches wide, 24 inches deep, and 30 inches high.
Using firebricks and refractory mortar, start by laying the first course of bricks in a running bond pattern. Unlike regular masonry mortar, refractory mortar is specifically designed to withstand high temperatures. Apply the mortar in thin, even layers approximately 1/4 inch thick. Continue building up the walls, ensuring each course is level and plumb.
Create the firebox opening by incorporating a steel lintel above to support the weight of the masonry above. The opening should be approximately 24 inches high and 30 inches wide for optimal draft and functionality. Install a steel angle iron across the front to support the facing material that will come later.
As you build the walls, maintain a slight taper toward the back wall – about 1 inch for every 12 inches of height. This design helps direct smoke upward and improves the fireplace’s draw. The back wall should also lean forward slightly, typically about 2 inches over its height.
Include an ash dump in the floor of the firebox by creating a small opening that leads to a cleanout door at the base of the fireplace. This feature makes maintenance much easier over time.
Once the firebox is complete, allow the mortar to cure for at least 48 hours before proceeding with the smoke chamber and chimney construction. During this time, protect the work from rain and extreme temperatures that could affect the curing process.
Remember to check local building codes regarding firebox construction requirements, as specifications may vary by region. This foundation piece must be built correctly to ensure both safety and functionality of your outdoor fireplace.
Chimney Construction and Safety Features
Chimney Assembly
The chimney assembly is a critical component that ensures proper smoke ventilation and draft. Begin by determining the required chimney height – generally, it should extend at least 2 feet above any surrounding structures within a 10-foot radius to ensure proper draw and comply with safety codes.
Start the assembly by installing a chimney liner system, working from the firebox upward. Use high-temperature mortar to secure each section of the liner, ensuring all joints are properly sealed. The liner should be surrounded by at least 4 inches of masonry on all sides for insulation and structural stability.
Layer your stone veneer around the chimney liner, maintaining consistent joints and checking for plumb as you progress upward. Install a spark arrestor at the top to prevent embers from escaping, and crown the chimney with a proper cap to keep out rain and debris.
Pay special attention to the transition points where the chimney passes through any overhanging structures. These areas require proper flashing and waterproofing to prevent moisture penetration. Include an access panel near the base for future cleaning and maintenance.
Test the draft by lighting a small fire once construction is complete. Smoke should draw upward smoothly without any backdraft into the entertaining area. If you notice any issues with the draw, consult a professional chimney specialist for adjustments.
Safety Considerations
Safety should be your top priority when constructing an outdoor stone fireplace. Begin by checking local building codes and obtaining necessary permits. Most jurisdictions require specific clearances from structures and property lines, typically ranging from 10 to 25 feet. Ensure your design includes proper ventilation and a chimney height that meets local requirements, usually extending at least 2 feet above nearby rooflines within a 10-foot radius.
Install a spark arrestor at the chimney top to prevent hot embers from escaping. The foundation must be reinforced concrete, capable of supporting the substantial weight of stone and withstanding freeze-thaw cycles. Include a proper drainage system to prevent water accumulation.
Maintain safe clearances from combustible materials – a minimum of 18 inches for the firebox sides and 36 inches for the front. Line the firebox with fire-rated materials such as fire brick and refractory mortar. Install a steel liner in the chimney for additional safety and proper draft.
Consider installing carbon monoxide and smoke detectors nearby if the fireplace is close to enclosed spaces. Keep a fire extinguisher within easy reach and create a 3-foot safety zone around the fireplace free from furniture and decorative items. Regular inspections and maintenance of mortar joints, chimney caps, and the overall structure are essential for long-term safety and performance.
Finishing Touches
Sealing and Weather Protection
Proper sealing and weather protection are crucial for ensuring your outdoor stone fireplace’s longevity and structural integrity. Begin by applying a high-quality masonry sealer to all stone surfaces, paying special attention to the joints and mortar lines. Choose a penetrating sealer that allows the stone to breathe while providing water resistance.
Apply the sealer using a roller or sprayer, working from bottom to top in overlapping strokes. Two thin coats typically provide better protection than one thick coat. Allow each coat to dry completely according to manufacturer specifications.
For additional weather protection, consider installing a metal cap or crown on top of the chimney to prevent water from entering. This cap should extend slightly beyond the chimney edges and include a mesh screen to keep out debris and animals.
Inspect your fireplace annually for signs of water damage or deteriorating mortar. Reapply sealer every 3-5 years, depending on exposure to elements and manufacturer recommendations. In regions with harsh winters, consider using a breathable fireplace cover during off-seasons to provide extra protection against freeze-thaw cycles.
Decorative Elements
Personalizing your outdoor fireplace with decorative elements can significantly increase your property value while creating a cohesive outdoor living space. Consider incorporating natural stone veneer patterns that complement your home’s exterior architecture. Add a raised hearth using matching stone for comfortable seating, or install built-in benches with stone accents for a seamless look.
Integrate your fireplace design with surrounding landscaping by creating stone pathways that lead to the feature. Plant heat-tolerant ornamental grasses or drought-resistant perennials around the base to soften the structure’s appearance. Install landscape lighting to highlight the stonework and create ambiance during evening gatherings.
Consider adding practical embellishments like a wooden mantel for displaying outdoor-safe décor, or incorporate stone shelving for firewood storage. Metal accents, such as wrought iron grates or copper chimney caps, can add sophisticated touches while serving functional purposes. Remember to maintain proper clearance between any decorative elements and the fire chamber to ensure safety compliance.
Building a DIY stone outdoor fireplace is a rewarding project that can transform your backyard into a cozy gathering space. By following proper construction techniques, selecting appropriate materials, and adhering to safety guidelines, you can create a stunning focal point that will last for years. Remember to check local building codes, obtain necessary permits, and maintain proper clearances from structures and combustible materials.
Regular maintenance is crucial for preserving your outdoor fireplace’s beauty and functionality. Follow these stone maintenance tips to protect your investment: inspect mortar joints annually, clean soot buildup regularly, address water drainage issues promptly, and seal the stone surface every few years. During winter months, consider using a protective cover to prevent moisture damage.
With proper planning, careful execution, and regular upkeep, your DIY stone outdoor fireplace will provide countless memorable evenings of warmth and entertainment for family and friends. The time and effort invested in this project will pay dividends in both property value and outdoor living enjoyment for years to come.