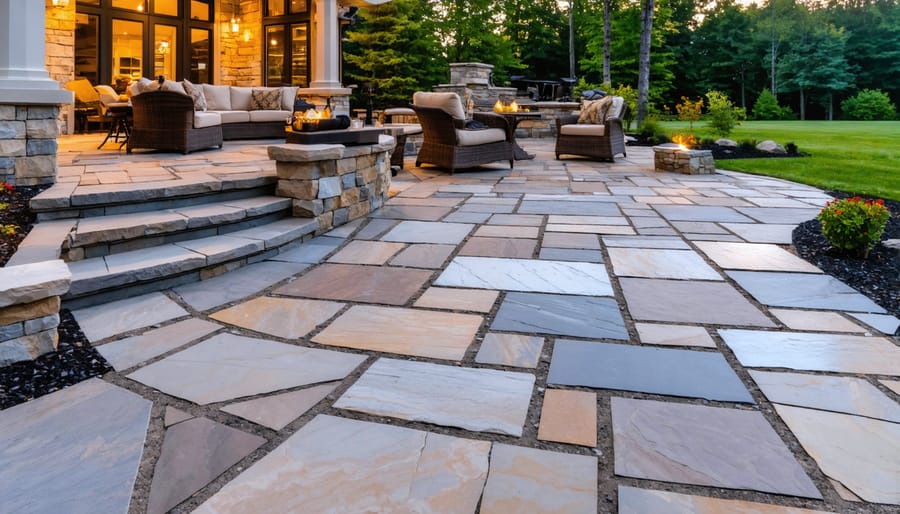
Transform your backyard into a timeless outdoor sanctuary by installing a natural stone patio – a project that can dramatically increase your property value while creating an enduring entertainment space. Natural stone patios blend seamlessly with any landscape design, offering unmatched durability and character that manufactured materials simply cannot replicate. With proper planning and basic DIY skills, laying a natural stone patio becomes an achievable weekend project that delivers professional results.
Select flat stones with consistent thickness and complementary shapes for easier installation. Consider locally sourced flagstone, slate, or limestone – materials that weather beautifully and provide excellent slip resistance. Calculate material needs by adding 10% extra for cuts and waste, ensuring your project stays on budget while providing ample stone for precise fitting. Professional-grade results depend on thorough ground preparation, precise leveling, and proper drainage planning – foundations that distinguish exceptional installations from mediocre attempts.
Planning Your Natural Stone Patio
Choosing the Right Stone
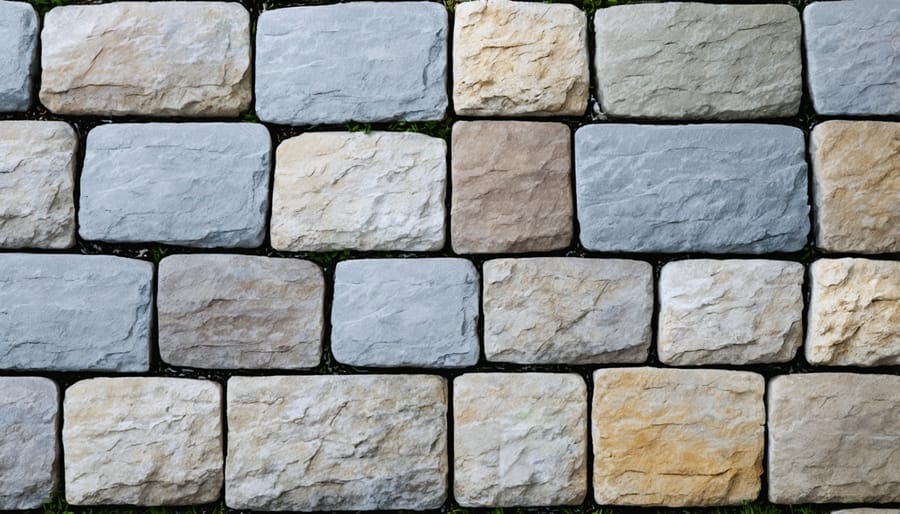
The foundation of a successful DIY patio project lies in proper natural stone selection. Begin by considering your climate; certain stones perform better in specific weather conditions. Bluestone and granite excel in freeze-thaw cycles, making them ideal for colder regions, while limestone and sandstone are better suited for moderate climates.
Durability should be a top priority. Granite offers exceptional hardness and resistance to wear, perfect for high-traffic areas. Slate provides excellent slip resistance when wet, though it may require more maintenance. Travertine strikes a balance between durability and aesthetic appeal but needs regular sealing in outdoor applications.
Consider the stone’s thickness carefully – aim for at least 1.5 inches for pedestrian areas. Thicker stones (2 inches or more) provide better stability and are less likely to crack under pressure. The stone’s surface texture also matters; choose a slightly textured finish for better traction while ensuring comfort underfoot.
Color and pattern variations can dramatically impact your patio’s appearance. Bluestone offers sophisticated gray tones, while sandstone provides warm, earthy hues. Consider how these colors will complement your home’s exterior and existing landscape. Remember that darker stones absorb more heat, which could affect comfort during summer months.
Finally, examine the stone’s absorption rate and density. Lower absorption rates mean better resistance to staining and freeze-thaw damage, ensuring your patio remains beautiful for years to come.
Design and Layout
Begin by measuring your intended patio area using stakes and string to create a precise outline. When planning backyard stone features, accuracy is crucial for material calculations and achieving professional results. Sketch your layout on graph paper, using a scale of 1 inch to represent 4 feet of actual space.
Calculate your total square footage by multiplying the length by width, then add 10% extra for cuts and waste. For irregular shapes, break the area into smaller rectangles and triangles, then add their measurements together. Consider the patio’s relationship to existing structures and ensure a slight slope (about 1 inch per 8 feet) away from your house for proper drainage.
Create a detailed materials list including:
– Base materials (crushed stone and sand)
– Natural stone pavers
– Edge restraints
– Landscape fabric
– Jointing sand
For the base, plan for 4-6 inches of crushed stone and 1 inch of bedding sand. Calculate crushed stone needs by multiplying your square footage by 0.5 (for 6-inch depth). For sand, estimate 1 ton per 100 square feet. Mark utilities before planning your layout, and consider integrating curves or patterns that complement your home’s architecture while minimizing complicated cuts.
Essential Tools and Materials
Before beginning your natural stone patio project, gather these essential tools and materials to ensure a smooth installation process:
Tools:
– Wheelbarrow for material transport
– Shovel and spade for excavation
– Rake for leveling
– Level (both string level and carpenter’s level)
– Rubber mallet
– Tape measure
– Marking paint or string for layout
– Plate compactor for base preparation
– Diamond blade wet saw or angle grinder for cutting stone
– Garden hose with spray nozzle
– Wooden stakes
– String line
– Landscape fabric pins
– Hand tamper
– Concrete mixing tools (if using mortar)
Materials:
– Natural stone pavers or flagstone
– Gravel for base (typically #57 or similar)
– Crushed stone screening or sand for bedding
– Landscape fabric (geotextile)
– Edge restraints
– Polymeric sand for joints
– Construction sand for leveling
– Plastic sheeting (if mixing mortar)
Safety Equipment:
– Safety glasses
– Work gloves
– Steel-toed boots
– Dust mask or respirator
– Ear protection
– Knee pads
– Sun protection
Optional but Recommended:
– Power washer for cleanup
– Concrete saw for precise cuts
– Screeding tools
– Mason’s line
– Square tool for layout
– Brush for sweeping joints
– Laying guides or spacers
Pro Tip: Rent larger equipment like the plate compactor and wet saw from local hardware stores to save on costs. Always calculate material quantities with a 10-15% overage to account for cuts, waste, and potential breakage. Store materials in a dry, covered area until ready for use, and ensure proper drainage around the storage area to prevent moisture damage.
Site Preparation
Ground Excavation
Proper excavation is the foundation of a successful natural stone patio project. Begin by marking your patio area with stakes and string, then remove all grass, vegetation, and topsoil to a depth of 7-8 inches. This depth allows for 4 inches of base material, 1 inch of bedding sand, and the thickness of your stone pavers (typically 2-3 inches).
Use a spade to cut clean edges around your marked area, ensuring straight lines and precise corners. When digging, maintain a slight slope away from your house foundation of approximately 1 inch per 8 feet for proper drainage. This gentle grade prevents water from pooling or flowing toward your home’s foundation.
After excavation, compact the soil using a plate compactor to create a solid foundation. Check the level frequently using a long straight edge and level tool. Pay special attention to corners and edges, as these areas are crucial for the final appearance of your patio.
If you encounter soft spots during excavation, remove the unsuitable soil and replace it with compacted gravel. For clay-heavy soils, consider laying a geotextile fabric at the bottom of your excavation to prevent base material from mixing with the subsoil over time.
Remember to check local utilities before digging and ensure your planned depth won’t interfere with any underground services.
Base Layer Installation
A solid foundation is crucial for a long-lasting stone patio, and proper base preparation is key to preventing settling and shifting. Begin by excavating the area to a depth of 6-8 inches, allowing an additional 2-3 inches beyond your planned patio perimeter. Grade the soil with a slight slope (about 1 inch per 8 feet) away from your house for drainage.
Layer the base materials in stages, starting with 4-6 inches of crushed gravel or stone (¾-inch minus). Spread the gravel evenly using a rake, then dampen it lightly with water. Compact the gravel thoroughly using a plate compactor, making multiple passes in different directions. You’ll know the base is properly compacted when you can walk on it without leaving footprints.
Next, add a 1-inch layer of coarse sand or stone dust, screeding it level using pipes as guides and a straight board. This layer provides a smooth, even surface for stone placement. Compact this layer lightly, being careful not to disturb your screeded surface. The finished base should be firm, level, and uniform, with proper slope maintained throughout for effective drainage.
Stone Installation Process
Setting the First Stones
Starting your first row of stones is crucial as it sets the foundation for your entire patio. Begin by placing your largest, most stable stones along the edge that meets your house or primary structure. These anchor stones should be level both front-to-back and side-to-side, using your mason’s level to check frequently.
Work from one corner, laying stones in a straight line. Use your string lines as guides to maintain proper alignment, and check that each stone sits approximately 1 inch above the compacted base material. This height allowance ensures proper drainage and provides room for the bedding sand.
As you set each stone, wiggle it slightly to ensure good contact with the base. Use rubber mallets rather than metal hammers to tap stones into place, preventing damage to the natural surface. Maintain consistent gaps between stones – typically 1/2 to 1 inch – using spacers if needed.
For stability, avoid placing stones with their joints aligned. Instead, stagger the joints in a running bond pattern, similar to brickwork. This arrangement distributes weight more evenly and creates a stronger overall structure. If a stone rocks or feels unstable, remove it and adjust the base material underneath until it sits firmly.
Remember to periodically step back and assess your work from different angles. This helps identify any alignment issues early when they’re easier to correct.
Pattern Continuation
Maintaining consistent patterns throughout your patio installation is crucial for achieving a professional appearance. Start by laying out your stones in a dry run, arranging them according to your chosen pattern before setting them permanently. This allows you to make adjustments and ensures proper distribution of different-sized stones across the space.
Use spacers or small wooden wedges to maintain uniform gaps between stones. The recommended gap width typically ranges from 1/4 inch to 1/2 inch, depending on your desired look and the stone type. These gaps will later be filled with jointing sand or mortar.
When working with irregular-shaped stones, alternate larger and smaller pieces to create a balanced look. Pay special attention to the edges of your patio, where you might need to cut stones to maintain the pattern. Always measure twice and cut once to avoid waste and ensure proper fit.
For geometric patterns, use string lines as guides to keep rows straight and aligned. Work from one corner outward, regularly checking your progress with a level and measuring tape. If you notice the pattern beginning to drift, make minor adjustments before proceeding further.
Remember to periodically step back and view your work from different angles. This helps identify any inconsistencies in the pattern or spacing that might need correction before the stones are permanently set.
Edge Treatment
A professionally finished edge treatment can transform your DIY natural stone patio from looking amateur to expertly crafted. Start by laying out your border stones first, ensuring they’re slightly elevated from the main patio surface to create proper drainage. For a clean finish, use soldier course edging, where stones are placed vertically along the perimeter, or sailor course edging, where stones are laid horizontally.
To secure the edges, install plastic or metal edge restraints behind the border stones, anchoring them with 10-inch landscape spikes every 12 inches. This prevents stones from shifting over time and maintains the patio’s structural integrity. For a more natural look, consider creating a tapered edge where the stones gradually slope into the surrounding landscape.
When working around curves, cut stones at 45-degree angles to create smooth transitions. Use a masonry saw with a diamond blade for precise cuts. Fill any gaps between edge stones with polymeric sand to prevent weed growth and insect infiltration.
For areas where the patio meets walls or existing structures, install a soldier course with a small gap (about ¼ inch) to allow for natural expansion and contraction. Consider adding decorative elements like stone steps or built-in planters at the edges to create visual interest and practical transitions to other landscape features.
Finish by compacting the edge area thoroughly and applying a penetrating sealer to protect your stonework from weather damage and staining.
Finishing Touches
Joint Filling
Once your stones are properly laid and settled, filling the joints is crucial for stability and aesthetics. Start by sweeping the patio surface clean of debris and ensuring the joints are completely dry. Pour polymeric sand into the joints using a large push broom, working in small sections and ensuring complete coverage. The sand should fill joints to within 1/8 inch of the stone surface.
Sweep the sand diagonally across the joints to achieve thorough filling, then use a leaf blower on low setting to remove excess sand from the stone surfaces. Carefully mist the entire area with a fine spray of water, allowing it to penetrate the polymeric sand. Apply three to four light applications of water, waiting about three minutes between each.
The polymeric sand will harden as it dries, typically taking 24 hours for initial set and 48-72 hours for complete curing. During this time, protect the patio from rain and foot traffic. For wider joints exceeding 1 inch, consider using a mortar mix instead of polymeric sand for better stability and longevity.
Sealing and Protection
Protecting your natural stone patio from the elements is crucial for its longevity and appearance. Start by thoroughly cleaning the surface and allowing it to dry completely for at least 24 hours before applying any sealant. Choose a high-quality penetrating sealer specifically designed for outdoor natural stone surfaces to ensure optimal protection against moisture, stains, and UV damage.
Apply the sealer using a low-nap roller or sprayer, working in small sections and following the manufacturer’s instructions carefully. Two thin coats typically provide better protection than one thick coat. Allow proper drying time between applications, usually 2-4 hours depending on weather conditions.
For ongoing protection, plan to reseal your patio every 2-3 years, though this may vary based on exposure and wear. Regular cleaning and following proper stone maintenance tips will help preserve the sealer’s effectiveness. Watch for signs of water absorption or dulling of the stone’s surface, which indicate it’s time to reseal.
Consider applying an additional anti-slip treatment if your patio becomes slippery when wet, especially around pool areas or in regions with frequent rainfall.
A well-maintained natural stone patio can provide decades of enjoyment and enhance your outdoor living space. To protect your investment, implement a regular maintenance routine that includes sweeping the surface weekly to prevent debris accumulation and staining. Every few months, clean the patio thoroughly with a pH-neutral stone cleaner and soft brush to preserve the stone’s natural beauty.
For long-term protection, apply a high-quality stone sealer every 2-3 years, or more frequently in areas with harsh weather conditions. Pay special attention to any grout lines, as these are typically more vulnerable to wear and may need more frequent maintenance.
If you encounter any loose stones or deteriorating joints, address these issues promptly to prevent more extensive damage. Keep an eye out for drainage issues, as proper water management is crucial for maintaining your patio’s structural integrity.
Looking back at your DIY natural stone patio project, remember that success lies in thorough planning and proper execution. While the installation process may be challenging, the result is a durable, beautiful outdoor space that adds significant value to your home.
For those considering this project, we strongly recommend starting with a smaller area if you’re new to hardscaping. Take time to research local stone options and ensure your selection suits both your climate and aesthetic preferences. Don’t hesitate to consult with professionals for complex aspects like drainage or grade calculations – their expertise can prevent costly mistakes while still allowing you to complete the majority of the work yourself.
Remember, a well-executed natural stone patio is more than just an outdoor feature – it’s an investment in your home’s future and your family’s enjoyment of outdoor living.