Transform your outdoor space with the timeless beauty of natural stone through simple, achievable DIY techniques. Creating stunning stone features doesn’t require professional expertise – just careful planning, the right tools, and attention to detail. Whether you’re building a garden path, crafting a decorative wall, or installing stone veneer, mastering DIY stone work opens up endless possibilities for enhancing your home’s aesthetic appeal and value.
Natural stone projects combine ancient craftsmanship with modern design sensibilities, allowing homeowners to achieve professional-looking results at a fraction of the cost. From selecting weather-resistant materials to mastering basic installation techniques, this guide will walk you through everything needed to successfully complete your stone project. With proper preparation and understanding of fundamental stone-working principles, you’ll be equipped to tackle projects ranging from simple stepping stones to elaborate outdoor living spaces.
The key to successful DIY stone work lies in understanding your material’s unique characteristics and following time-tested installation methods. Let’s explore how to bring the enduring beauty of natural stone to your home through practical, step-by-step guidance designed for both beginners and experienced DIY enthusiasts.
Essential Materials for DIY Stone Finishing

Selecting Your Natural Stone
When selecting natural stone materials, consider both aesthetics and practicality. Start by examining the stone’s density and durability – harder stones like granite and quartzite are ideal for high-traffic areas, while softer materials like limestone work better in low-impact spaces. Pay attention to the stone’s coloring and pattern variations, as natural stones can differ significantly even within the same type.
Measure your project area carefully and add 10% extra for cuts and potential mistakes. Inspect each piece for cracks, chips, or inconsistencies before purchasing. For outdoor projects, choose stones rated for exterior use and consider their slip resistance when wet. Indoor applications should focus on maintenance requirements and compatibility with existing décor.
Remember to check the stone’s thickness and weight capacity for your intended application. Most DIY projects work best with stones between 3/8 inch to 3/4 inch thick. Always request samples to test how the stone reacts to different sealers and cleaning products before making your final selection.
Tools and Supplies Checklist
Before starting your DIY nature stone project, gather these essential tools and materials:
Essential Tools:
– Trowel (notched and flat)
– Level
– Measuring tape
– Safety goggles
– Dust mask
– Heavy-duty gloves
– Mixing bucket
– Drill with mixing paddle
– Rubber mallet
– Sponge and clean cloths
– Grout float
– Utility knife
– Tile spacers
– Chalk line
– Pencil for marking
Required Materials:
– Natural stone pieces
– Stone adhesive or mortar
– Grout (suitable for natural stone)
– Sealer (penetrating type)
– Cleaning solution
– Water for mixing and cleaning
– Drop cloths
– Plastic sheeting
– Painter’s tape
– Joint compound (if needed)
Optional but Recommended:
– Wet saw or tile cutter
– Spirit level
– Knee pads
– Grouting bag
– pH-neutral stone cleaner
– Buffer pads
– Sand paper (various grits)
Store all materials in a dry, temperature-controlled environment until ready for use. Check manufacturer recommendations for specific storage requirements of adhesives and sealers.
Step-by-Step Stone Finishing Process
Surface Preparation
Proper surface preparation is crucial for achieving a successful DIY natural stone finish. Begin by thoroughly cleaning the surface to remove any dirt, dust, or debris. Use a stiff brush and mild detergent solution to scrub the area, paying special attention to corners and crevices. Rinse thoroughly with clean water and allow the surface to dry completely.
For previously sealed or painted surfaces, you’ll need to remove the existing coating. Use an appropriate stripper or sandpaper to remove old sealants, ensuring you create a clean, bare surface that will allow proper adhesion. Address any cracks, holes, or damage in the substrate by filling them with suitable patching compound and allowing it to cure fully.
Next, inspect the surface for levelness using a long level or straight edge. Any significant irregularities should be corrected to ensure even application of the stone finish. For concrete surfaces, check for moisture by taping down a clear plastic sheet for 24 hours – if condensation forms underneath, the surface needs more time to dry.
Finally, mask off adjacent areas with painter’s tape and protective sheeting to prevent overspray or splatter. For outdoor applications, check the weather forecast and plan your project during a period of dry, mild conditions. The surface temperature should be between 50-90°F (10-32°C) for optimal results.

Application Techniques
To achieve professional-looking results with DIY nature stone applications, mastering the proper stone finishing techniques is essential. Begin by thoroughly cleaning the surface to remove any dust, debris, or oils that could interfere with adhesion. Use a pressure washer for outdoor applications or a gentle cleaner for indoor surfaces, ensuring the area is completely dry before proceeding.
For a natural-looking finish, apply your chosen stone material in sections, working from bottom to top. Use a notched trowel to spread the adhesive evenly, creating ridges that will ensure proper bonding. Press each stone piece firmly into place, wiggling slightly to establish good contact. Maintain consistent spacing between pieces, using plastic spacers if needed for uniformity.
When creating textures, consider these proven methods:
1. Rough Split: Use a hammer and chisel to create a naturally broken edge effect
2. Bush Hammered: Achieve a stippled texture using a specialized hammer
3. Smooth Honed: Sand progressively with different grits for a sleek finish
4. Tumbled: Create an aged look by gently weathering edges
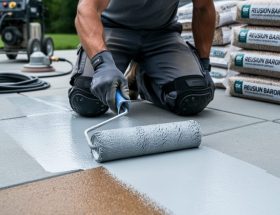
For sealing and protecting your stone work, apply a penetrating sealer using a foam roller or brush. Work in small sections, ensuring even coverage without allowing the sealer to pool. Two thin coats typically provide better protection than one thick application. Allow proper drying time between coats as specified by the manufacturer.
Weather conditions significantly impact application success. Ideal conditions include:
– Temperature between 50-80°F (10-27°C)
– Humidity below 85%
– No direct sunlight during application
– No rain forecast for 24-48 hours post-installation
For vertical applications, start with a scratch coat of modified thinset mortar. Allow this base layer to cure for 24 hours before applying stones. Use temporary support boards for larger pieces to prevent slipping while the adhesive sets.
Remember to step back periodically during installation to assess the overall pattern and make adjustments as needed. This helps maintain a natural, balanced appearance throughout the project. Clean any excess adhesive or mortar immediately with a damp sponge to prevent staining.
Sealing and Protection
Proper sealing is crucial for protecting your DIY nature stone project and ensuring its longevity. Begin by thoroughly cleaning the stone surface and allowing it to dry completely for at least 24 hours. Choose a high-quality natural stone sealer appropriate for your specific stone type – penetrating sealers work best for most applications, offering protection while maintaining the stone’s natural appearance.
Apply the first coat of sealer using a foam brush or roller, working in small sections and following the stone’s natural grain. Ensure even coverage without allowing the sealer to pool on the surface. Wait 15-20 minutes, then wipe away any excess with a clean, lint-free cloth. Most stones require two coats for optimal protection; allow the first coat to dry for 2-3 hours before applying the second.
For outdoor applications, consider using a UV-resistant sealer to prevent fading and weathering. In high-moisture areas like bathrooms or kitchens, opt for a water-resistant variant. Reapply sealer every 12-18 months, or sooner if you notice water no longer beading on the surface.
To maintain protection, clean sealed surfaces regularly with pH-neutral stone cleaners, avoiding acidic or abrasive cleaning products that can damage the sealer. Address spills immediately to prevent staining, and use coasters or protective pads under items that could scratch or stain the surface.

Common Patterns and Textures
Natural Rock Face
Creating a natural rock face finish involves techniques that mimic the weathered appearance of stones found in nature. Start by selecting stones with varied textures and irregular surfaces, as these provide the best foundation for achieving an authentic look. Using a combination of bush hammering and chiseling techniques, work the stone surface to create subtle irregularities and natural-looking patterns.
For optimal results, strike the stone at different angles using varying degrees of force. This creates micro-fractures that replicate natural erosion patterns. Pay special attention to the edges, where natural stones typically show more wear. A pneumatic bush hammer can speed up this process, but hand tools offer more control for detailed work.
To enhance the weathered appearance, consider applying an acid wash solution. This treatment subtly etches the surface and brings out the stone’s natural variations in color and texture. After treatment, seal the stone to protect it while maintaining its natural-looking finish. Remember that the most convincing results often come from combining multiple techniques and working gradually, allowing the stone’s natural character to emerge rather than forcing a particular pattern.
Smooth and Polished
The final step in creating your DIY nature stone project is achieving that coveted glossy, professional finish. Begin by thoroughly cleaning the stone surface with a pH-neutral cleaner and allowing it to dry completely. Apply a high-quality stone sealer using a foam brush or roller, working in small sections to ensure even coverage. For optimal results, apply two to three thin coats rather than one thick layer, waiting 24 hours between each application.
To achieve a mirror-like finish, consider wet-polishing with progressively finer diamond pads, starting at 50-grit and working your way up to 3000-grit. This process requires patience but yields stunning results. For enhanced shine, use a stone-specific polishing compound after the final grit.
Maintain the polished finish by regularly dusting with a microfiber cloth and avoiding acidic cleaners. Apply a fresh coat of sealer annually to protect your stone’s lustrous appearance. For daily maintenance, use only stone-safe cleaning products to prevent dulling or etching of the surface. Remember that different stone types may require slightly different polishing techniques, so always verify the specific requirements for your stone variety.
Troubleshooting and Maintenance
Common Issues and Solutions
During the DIY nature stone finishing process, several common issues may arise, but most can be resolved with proper techniques and common stone repair solutions. One frequent problem is uneven coloration, which typically occurs due to inconsistent sealer application. To fix this, strip the affected area and reapply the sealer using consistent, overlapping strokes.
Efflorescence, appearing as white, powdery deposits on the stone surface, can be addressed by thoroughly cleaning the area with a specialized stone cleaner and ensuring proper drainage to prevent moisture accumulation. If you notice bubbling or peeling in the finish, this usually indicates moisture trapped beneath the sealer. Remove the affected coating, allow the stone to dry completely, and reapply the sealer in thin, even layers.
Scratches and small chips are inevitable but manageable. Light scratches can often be buffed out using fine-grit sandpaper, while deeper damages may require stone filler matching your stone’s color. Always test repairs in an inconspicuous area first.
For staining issues, immediate action is crucial. Different stains require specific treatments – oil-based stains need a poultice with a degreasing agent, while organic stains respond well to hydrogen peroxide solutions. Remember to always seal the stone after any repair work to prevent future issues.

Long-term Care Tips
To ensure your natural stone surfaces maintain their beauty and durability, proper long-lasting stone maintenance is essential. Clean your stone surfaces regularly with pH-neutral cleaners specifically designed for natural stone. Avoid acidic or abrasive cleaning products, as these can damage the stone’s surface and compromise its protective sealant.
Reapply a high-quality stone sealer every 12-18 months, or more frequently in high-traffic areas. Before resealing, thoroughly clean the surface and ensure it’s completely dry. Test the need for resealing by dropping water on the stone – if it doesn’t bead up, it’s time to reseal.
Address any spills immediately to prevent staining, particularly with acidic substances like wine, citrus juices, or vinegar. Use stone poultice for stubborn stains, applying it according to manufacturer instructions. Regularly inspect your stone surfaces for signs of wear, chips, or cracks, and address these issues promptly to prevent further damage.
In outdoor applications, ensure proper drainage to prevent water accumulation, which can lead to erosion and discoloration. During winter months, avoid using de-icing salts near stone surfaces, as these can cause pitting and deterioration. Instead, use sand or cat litter for traction on icy surfaces.
Creating your own DIY nature stone projects is an enriching and rewarding experience that can transform your living spaces while maintaining a strong connection to the natural world. As we’ve explored throughout this guide, working with natural stone is both accessible and achievable for DIY enthusiasts of all skill levels.
Remember the key principles we’ve discussed: proper material selection is crucial for success, thorough preparation prevents common issues, and patience during the installation process ensures lasting results. The versatility of natural stone means you can start small with simple projects like garden stepping stones or decorative accents before moving on to more ambitious undertakings.
The investment in time and materials is well worth the outcome, as natural stone features add timeless beauty and significant value to your property. By following the steps and techniques outlined in this guide, you’ll be well-equipped to tackle your DIY nature stone project with confidence.
Don’t be afraid to experiment with different stone types and patterns to create unique designs that reflect your personal style. Take photos of your progress, learn from any challenges you encounter, and enjoy the process of bringing natural elements into your living space.
Ready to begin? Gather your materials, review the safety guidelines, and start transforming your space with the enduring beauty of natural stone. Your perfect DIY nature stone project awaits!