Transform raw gemstones and minerals into stunning jewelry pieces through one of today’s most rewarding cost-effective DIY projects. Natural stones offer limitless creative possibilities, from delicate pendant necklaces to bold statement rings, while connecting artisans to Earth’s ancient geological heritage.
Select stones based on their Mohs hardness rating – anything above 7 ensures durability for everyday wear. Quartz varieties like amethyst and citrine provide excellent starting points, combining beauty with resilience. Softer stones like turquoise and malachite require protective settings but reward crafters with vibrant colors and distinct patterns.
Begin with basic wire-wrapping techniques using sterling silver or gold-filled wire to create secure stone settings without specialized equipment. Master simple bezels and prong settings before progressing to more complex metalsmithing methods. Consider each stone’s unique characteristics – crystal structure, cleavage planes, and sensitivity to chemicals – when designing settings that both protect and showcase the material.
Whether creating personal pieces or launching a jewelry business, natural stone work demands attention to detail, respect for materials, and continuous learning about geological properties and preservation techniques.
Essential Natural Stones for Jewelry Making
Beginner-Friendly Stones
For those just starting their journey in jewelry making, certain stones offer the perfect combination of durability, affordability, and ease of handling. Working with quartz is an excellent starting point, as this versatile stone family includes varieties like amethyst, citrine, and rose quartz. These stones are relatively hard (7 on the Mohs scale), making them resistant to scratches while remaining manageable for beginners to shape and polish.
Agate is another beginner-friendly option, offering beautiful banding patterns and a hardness suitable for various jewelry applications. Its availability in multiple colors and patterns allows newcomers to experiment with different designs while working with a stone that’s forgiving during the cutting and polishing processes.
Jasper, with its earthy tones and opaque appearance, provides an ideal introduction to working with denser stones. Its consistent texture makes it easier to achieve a smooth finish, and its widespread availability means beginners can practice their techniques without worrying about costly mistakes.
These stones share several beneficial characteristics for beginners: they’re readily available at reasonable prices, tough enough to withstand basic handling errors, and respond well to standard polishing techniques. Their natural beauty requires minimal enhancement, allowing novice jewelers to create attractive pieces while developing their skills.
Advanced Stone Options
For jewelry makers ready to expand their expertise, working with more challenging stones requires additional skills and considerations. Turquoise, while beautiful, is relatively soft and porous, requiring stabilization treatment before use. When working with turquoise, use gentle pressure and avoid excessive heat which can alter its distinctive blue-green coloring.
Jade presents its own unique challenges, primarily due to its exceptional toughness. This stone requires diamond-tipped tools and significant patience during cutting and shaping. Both nephrite and jadeite varieties demand different approaches – nephrite responds better to grinding techniques, while jadeite typically requires more precise cutting methods.
Labradorite, known for its stunning flash of colors (labradorescence), needs careful orientation during cutting to maximize its optical effects. This feldspar variety is prone to cleavage, so avoid sharp impacts and extreme pressure changes during working. When polishing labradorite, work gradually through grits to achieve the high shine that best displays its characteristic play of light.
For all these advanced stones, proper tool selection is crucial. Invest in high-quality diamond bits and keep them well-lubricated during use. Always wear appropriate safety gear, including eye protection and a dust mask, as these harder stones can produce fine particles during working. Start with small, simple projects to develop your technique before attempting more complex designs.
Tools and Materials You’ll Need
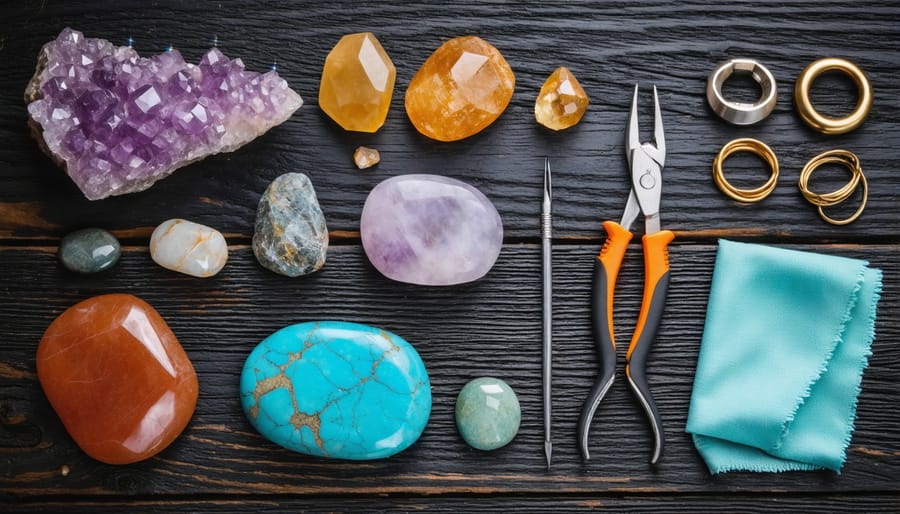
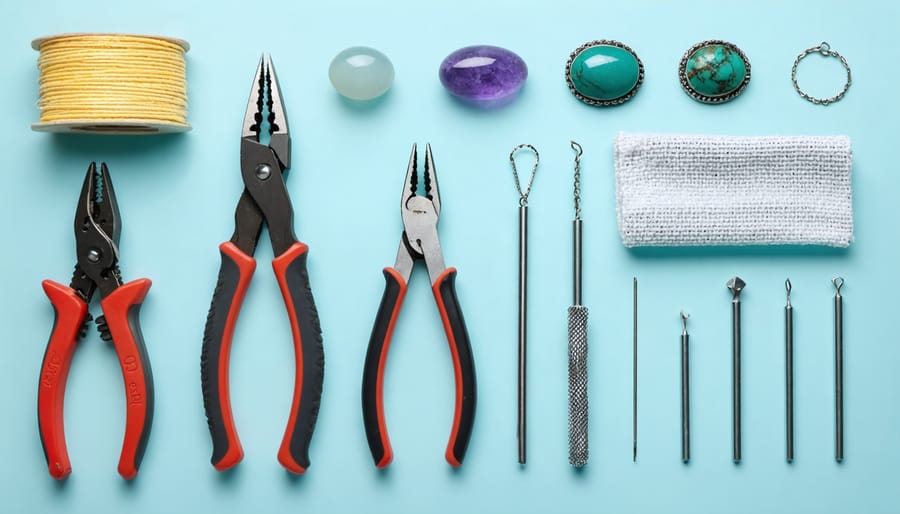
To begin creating natural stone jewelry, you’ll need a well-equipped workspace with the right tools and materials. Here’s a comprehensive list of essential items:
Basic Tools:
– Flat-nose pliers
– Round-nose pliers
– Wire cutters
– Jeweler’s files (various sizes)
– Magnifying glass or loupe
– Soft cloth or polishing cloth
– Measuring tape or ruler
– Small hammer
– Bench block or anvil
– Safety glasses
– Dust mask
Stone Working Tools:
– Diamond-coated drill bits (various sizes)
– Rotary tool with accessories
– Stone grinding wheels
– Polishing pads
– Lubricating oil or water
– Stone cleaning brushes
– Ultrasonic cleaner (optional)
Wire and Findings:
– Sterling silver wire (various gauges)
– Gold-filled wire
– Copper wire for practice
– Jump rings
– Clasps
– Ear wires
– Bail findings
– Chain (various styles)
Stone-Specific Materials:
– Natural stones (various types)
– Cabochons
– Rough stones
– Beads
– Stone adhesive
– Mounting bezels
– Setting tools
Storage and Organization:
– Compartmented storage boxes
– Zip-lock bags
– Stone sorting trays
– Tool organizer
– Work surface protection mat
– Task lighting
Safety Equipment:
– First aid kit
– Eye wash station
– Heat-resistant gloves
– Protective apron
– Non-slip mat
Optional Advanced Tools:
– Flex shaft machine
– Tumbler for polishing
– Stone cutting saw
– Lapidary equipment
– Stone wrap tools
– Metal forming tools
Keep your tools clean and organized, and always store natural stones in appropriate conditions to prevent damage. Start with basic tools and expand your collection as you develop your skills and tackle more complex projects.
Stone Preparation Techniques
Cutting and Shaping
Working with natural stones requires specific tools and techniques to achieve the desired shapes safely. A combination of manual and powered tools allows jewelers to create stunning natural stone transformations for their pieces.
Start with a diamond blade saw or lapidary saw for initial cutting. Always wear protective eyewear and a dust mask, and work in a well-ventilated area. Keep the stone and blade cool with water while cutting to prevent dust and protect the stone from thermal shock.
For shaping, use diamond files and wet/dry sandpaper in progressively finer grits. Begin with coarse grits (around 80-100) and work your way up to fine grits (600-800) for smooth surfaces. Silicon carbide wheels on a lapidary grinder offer precise shaping control for harder stones.
Cabochon forming requires a specific technique: mark your design, rough out the shape, then dome the top surface using graduated grinding wheels. Work in stages, checking your progress frequently. Don’t rush the process – proper shaping ensures the stone will fit securely in its setting.
For detailed work, utilize diamond-tipped burrs in a flex shaft or Dremel tool. Always maintain steady, gentle pressure to avoid cracking the stone. Remember that different stones have varying hardness levels, so adjust your technique accordingly.
Polishing and Finishing
The final stage of creating natural stone jewelry involves careful polishing and finishing to bring out the stone’s inherent beauty and ensure a professional appearance. Begin with progressively finer grits of sandpaper, starting at 400-grit and working up to 3000-grit for optimal smoothness. Work in a consistent direction and maintain even pressure to avoid creating scratches or uneven surfaces.
For achieving a high gloss finish, use a rotary tool with felt polishing wheels and appropriate polishing compounds. Start with coarser polishing paste and gradually move to finer grades. Pay special attention to curved surfaces and edges, as these areas often require extra care to achieve a uniform shine.
Water-based polishing can enhance results for certain stones, particularly softer varieties. Keep the stone wet during this process to prevent dust and ensure better polishing action. For harder stones like jasper or agate, dry polishing techniques using diamond-based compounds may yield better results.
The final step involves applying a protective sealant or wax to preserve the finish and enhance the stone’s natural luster. Choose a product specifically formulated for natural stone jewelry, and apply it in thin, even coats. Allow each coat to dry completely before handling or wearing the piece. Regular maintenance with a soft polishing cloth will help maintain the stone’s brilliance over time.
Setting and Mounting Techniques
Wire Wrapping
Wire wrapping is a versatile technique that transforms natural stones into stunning jewelry pieces without drilling or altering the stone itself. Begin by selecting the appropriate gauge wire – 20 or 22 gauge is ideal for most pendant designs, while 26 gauge works well for delicate details and binding.
Start by creating a base wrap around your stone’s widest point using square or half-round wire. Form a secure foundation by making 2-3 tight wraps, ensuring the wire lies flat against the stone. Next, create anchor points by bringing the wire up and over the stone’s top edge, forming small loops on either side.
For the decorative framework, weave thinner gauge wire around your base structure in patterns that complement the stone’s shape. Popular techniques include spiral wraps, figure-eights, and crossed wire designs. Pay special attention to the bail (the loop where your chain will pass through), making it sturdy enough to support the pendant’s weight.
Secure all loose ends by wrapping them tightly around existing wire structures and tucking them away from view. Avoid sharp edges by using chain-nose pliers to fold under any wire tips. For added stability, consider adding support wraps across the back of larger stones.
Remember that each stone’s unique shape requires slightly different wrapping approaches. Practice with simple designs before attempting more complex patterns, and always ensure your wire wraps are snug but not so tight that they risk damaging the stone.
Bezel Settings
Bezel settings are among the most secure and elegant ways to showcase natural stones in jewelry making. This traditional technique involves creating a metal rim that completely encircles the stone, holding it firmly in place while protecting its edges from damage.
To create a professional bezel setting, start by measuring your stone’s dimensions and adding 1mm to account for the overlap. Cut your bezel wire to this length, ensuring a clean, straight cut. Form the wire into a circle or your desired shape, and solder the ends together using a torch and silver solder.
File the top edge of the bezel until it’s even, then attach it to your base plate using solder. The fit should be snug against your stone. Create a seat inside the bezel by filing at a 45-degree angle, which provides support for the stone while allowing the top edge to be pushed over.
After setting your stone, use a bezel pusher to carefully work the metal over the stone’s edge in small increments, moving around the piece systematically. Finish by burnishing the metal smooth with a polished burnisher, ensuring even pressure to achieve a professional appearance.
For irregular stones, consider creating a custom-cut bezel that follows the stone’s unique contours. This requires additional skill but results in a more distinctive piece.
Care and Maintenance
Natural stone jewelry requires regular attention and maintenance to preserve its beauty and durability. Following proper stone care techniques will ensure your pieces remain stunning for years to come.
Store your stone jewelry separately from other pieces to prevent scratching. Use soft fabric-lined jewelry boxes or individual pouches to protect each item. Avoid exposing stone jewelry to harsh chemicals, including cleaning products, perfumes, and cosmetics, as these can damage the stone’s surface or alter its color.
Clean your stone jewelry regularly using a soft, lint-free cloth. For deeper cleaning, use mild soap and lukewarm water, gently scrubbing with a soft brush. Avoid ultrasonic cleaners unless you’re certain your stone type is compatible. After cleaning, dry thoroughly with a soft cloth to prevent water spots.
Some stones are sensitive to sudden temperature changes or prolonged sun exposure. Store your pieces away from direct sunlight and extreme temperatures. Before swimming or engaging in activities involving chemicals, remove your stone jewelry to prevent damage.
Regular inspection of your pieces can help identify potential issues early. Check settings and clasps for security, and look for any signs of wear or damage. If you notice any concerns, consult a professional jeweler for repairs or maintenance advice.
Natural stone jewelry making offers a rewarding creative outlet that combines the beauty of Earth’s treasures with personal artistic expression. Whether you’re drawn to the healing properties of crystals or simply love the aesthetic appeal of gemstones, creating your own pieces allows you to craft unique, meaningful jewelry that stands out from mass-produced alternatives. Armed with the knowledge of proper tools, techniques, and safety measures, you’re now ready to begin your journey into stone jewelry crafting. Start with simple projects using basic wire-wrapping techniques, then gradually progress to more complex designs as your confidence grows. Remember to always source your stones from reputable suppliers and handle them with care to preserve their natural beauty. The possibilities are endless – from elegant pendant necklaces to stunning statement rings, your creativity is the only limit. Take that first step today and transform beautiful natural stones into wearable works of art.