Transform your home’s comfort and energy efficiency with underfloor heating – a sophisticated heating solution that delivers consistent warmth from the ground up. Modern underfloor heating systems not only eliminate cold spots and unsightly radiators but can reduce energy costs by up to 25% compared to traditional heating methods.
Installing underfloor heating represents a significant home improvement investment that enhances both living comfort and property value. Whether you’re considering water-based systems for whole-house heating or electric mats for individual room upgrades, proper installation is crucial for optimal performance and longevity.
This comprehensive guide walks you through the essential aspects of underfloor heating installation, from selecting the right system for your space to understanding subfloor preparation requirements and professional installation techniques. Whether you’re a homeowner planning a renovation or a professional seeking detailed specifications, you’ll find actionable insights to ensure a successful installation.
Learn how your choice of flooring material, insulation requirements, and control systems work together to create an efficient heating solution that delivers years of reliable performance. Our expert guidance helps you navigate common installation challenges while ensuring compliance with current building regulations and energy efficiency standards.
Planning Your Underfloor Heating Installation
System Types and Selection
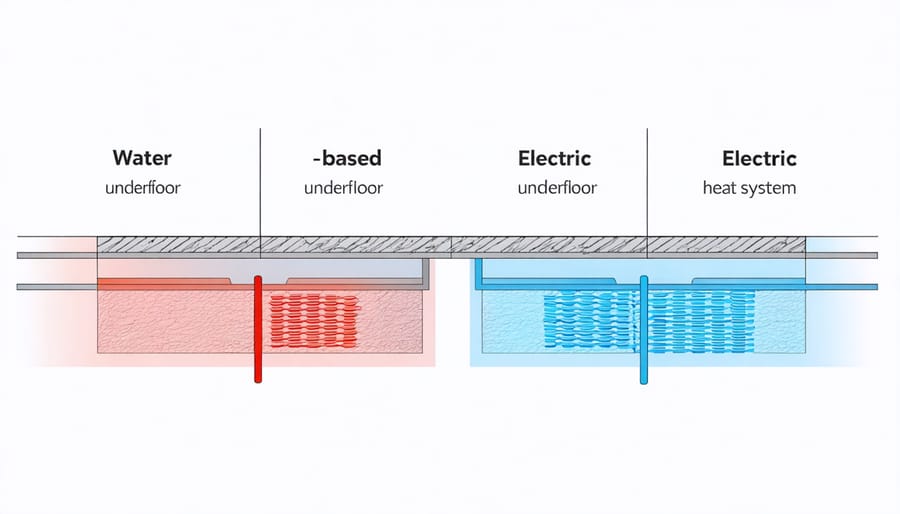
When choosing an underfloor heating system, homeowners typically decide between water-based (hydronic) and electric systems. Water-based systems circulate heated water through a network of pipes beneath the floor, offering efficient whole-house heating and lower running costs over time. These systems work particularly well with natural stone and tile flooring due to their excellent heat conductivity.
Electric systems, consisting of heating cables or mats, are generally easier and less expensive to install. They’re ideal for smaller areas like bathrooms or individual rooms, and their thin profile means minimal floor height adjustment is needed. While operating costs are typically higher than hydronic systems, they offer precise zone control and rapid heat-up times.
Consider these key factors when selecting your system:
– Installation context: New build or renovation
– Available floor height
– Primary heat source requirement or supplementary heating
– Running costs versus initial investment
– Floor covering material
– Room size and purpose
Water-based systems are recommended for new builds or major renovations where floor height isn’t critical, and long-term efficiency is priority. Electric systems suit retrofit projects, especially in single rooms or where minimal disruption is desired. Both systems work effectively with stone flooring, though response times may vary depending on the stone type and thickness.
Floor Compatibility Assessment
Before installing underfloor heating, it’s crucial to assess your flooring materials for compatibility and thermal conductivity. Natural stone and ceramic tiles are excellent conductors of heat, making them ideal choices for underfloor heating systems. When planning a natural stone flooring installation, ensure the material thickness doesn’t exceed 30mm for optimal heat transfer.
Your subfloor must be properly insulated and structurally sound to support both the heating system and final flooring. Concrete subfloors should be fully cured and level, while wooden subfloors may require additional reinforcement to prevent flexing. The maximum recommended tog rating for floor coverings is 2.5 to ensure efficient heat transfer.
Compatible flooring materials include:
– Natural stone (marble, granite, slate)
– Ceramic and porcelain tiles
– Engineered hardwood (up to 18mm thickness)
– Luxury vinyl tiles
– Polished concrete
Materials to avoid:
– Solid hardwood (due to moisture sensitivity)
– Thick carpets with heavy underlay
– Cork flooring
– Rubber tiles
Always check with your flooring manufacturer for specific compatibility guidelines and recommended installation methods with underfloor heating systems. Consider the room’s purpose and traffic levels when selecting your final flooring material to ensure long-term performance and satisfaction.
Professional vs. DIY Installation
The decision between professional and DIY installation of underfloor heating largely depends on your experience level, system type, and project scope. While DIY installation can reduce installation costs, it’s not always the best choice for every situation.
Professional installation is strongly recommended for wet (water-based) systems due to their complexity and the need for specialized plumbing knowledge. These systems require precise connection to your home’s heating system, careful pressure testing, and expert integration with your existing plumbing. Additionally, professional installers bring valuable expertise in determining optimal pipe layouts and ensuring proper heat distribution.
DIY installation is more feasible with electric systems, particularly when using mat-based solutions in single rooms. These systems typically come with detailed instructions and require basic electrical knowledge. However, final connections to the power supply must always be performed by a certified electrician to meet safety regulations and building codes.
Consider professional installation if:
– You’re installing a wet system
– The project covers multiple rooms or large areas
– You’re working with natural stone or sensitive flooring materials
– Your subfloor requires significant preparation
– You lack experience with electrical or construction work
DIY installation might be suitable when:
– Installing an electric mat system in a small area
– You have relevant DIY experience
– The subfloor is in good condition
– You’re comfortable following technical instructions
– Time constraints aren’t a major concern
Remember that improper installation can lead to system inefficiency, floor damage, or safety hazards. Professional installers also typically provide warranties and ongoing support, offering peace of mind for this significant investment. If choosing the DIY route, thoroughly research the process and ensure you understand local building regulations before beginning.
Step-by-Step Installation Process
Subfloor Preparation
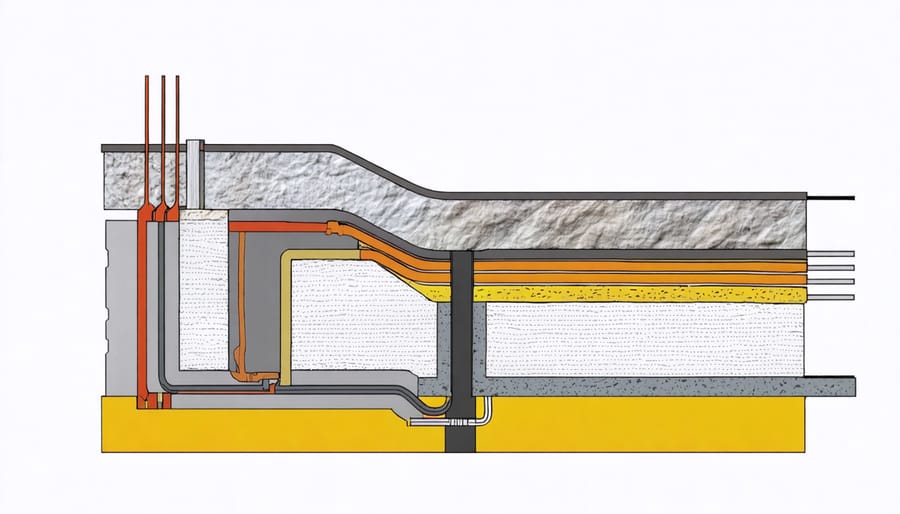
Before installing underfloor heating, proper subfloor preparation is crucial for ensuring optimal performance and creating durable foundation solutions. Start by thoroughly inspecting the subfloor for any damage, cracks, or uneven areas. The surface must be clean, dry, and structurally sound to support the heating system.
For concrete subfloors, repair any cracks and level uneven areas using a self-leveling compound. Allow sufficient drying time according to the manufacturer’s instructions. Wooden subfloors should be checked for loose boards, which must be secured to prevent movement. Install a suitable moisture barrier to protect against dampness, particularly important when working with natural stone flooring.
Ensure the subfloor meets the minimum thickness requirements for your chosen heating system. For electric systems, this is typically 18mm for timber and 65mm for concrete. Insulation boards are recommended beneath the heating system to maximize efficiency by directing heat upward rather than being lost through the subfloor.
Take accurate measurements of the room and mark the positions of fixed furniture or kitchen units, as heating elements shouldn’t be installed beneath these areas. This planning stage is essential for determining the optimal layout of your heating system and ensuring even heat distribution throughout the space.
System Layout and Installation
The foundation of an effective underfloor heating system lies in proper layout planning and precise installation. Begin by creating a detailed floor plan that maps out heating zones, taking into account room sizes and thermal requirements. For optimal heat distribution, position the heating elements uniformly across the floor area, maintaining consistent spacing between pipes or cables.
For water-based systems, ensure manifolds are positioned centrally to allow even distribution across heating zones. Pipes should be laid in a serpentine pattern, maintaining a minimum bend radius to prevent kinking. When installing stone floor tiles or other flooring materials, mark clear reference points to avoid damaging heating elements during the process.
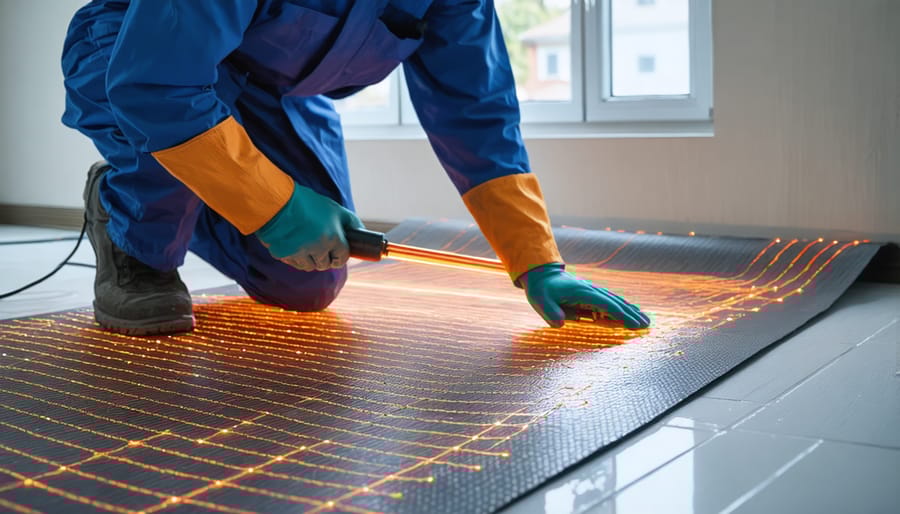
For electric systems, heating mats or cables should be secured to the subfloor using manufacturer-approved fixings. Maintain even spacing between heating elements, typically 3-4 inches apart, to ensure uniform heat distribution. Install the temperature sensor in a representative location, away from other heat sources and external walls.
Critical installation considerations include:
– Ensuring the subfloor is clean, level, and structurally sound
– Installing appropriate insulation beneath the heating system
– Maintaining minimum clearances around fixed furniture and fixtures
– Using appropriate fixing methods for your chosen floor covering
– Testing the system thoroughly before final flooring installation
Always follow manufacturer guidelines for specific spacing requirements and installation methods. Use appropriate tools for securing elements, and document the layout with photos and diagrams for future reference. This documentation proves invaluable for subsequent flooring work or system maintenance.
Remember to pressure test water-based systems and conduct electrical resistance tests for electric systems before proceeding with floor covering installation. This ensures system integrity and optimal performance throughout its lifespan.
Final Testing and Connection
Before activating your underfloor heating system, thorough testing is essential to ensure safe and efficient operation. Begin by pressure testing the pipework using compressed air or water at 6 bar pressure for at least 24 hours. Monitor for any pressure drops that might indicate leaks.
For water-based systems, flush the pipework thoroughly to remove any debris or air pockets. Connect the manifold to the heat source and primary flow, ensuring all connections are properly tightened. Fill the system gradually, venting each circuit individually until all air is removed.
For electric systems, verify all connections are secure and properly insulated. Test the resistance of heating cables using a multimeter – readings should match manufacturer specifications. Install the thermostat according to instructions, ensuring correct wiring between the heating elements, sensors, and power supply.
Perform a preliminary system test by running at low temperature for 2-3 hours. Check for even heat distribution and monitor for any unusual noises or performance issues. Gradually increase the temperature over several days to allow the screed or floor structure to acclimate.
Document all test results and maintain records of pressure readings, resistance measurements, and system settings. Provide this information to the homeowner along with operating instructions and warranty documentation. Schedule a final inspection with a qualified electrician or heating engineer to certify the installation meets all relevant safety standards.
Maintenance and Troubleshooting
Regular maintenance and proper troubleshooting are essential for ensuring your underfloor heating system operates efficiently for years to come. Perform monthly visual inspections of your thermostat and control panel for any error messages or unusual readings. Check for even heat distribution across your floors, as cold spots may indicate potential issues requiring attention.
For maintenance, flush your wet underfloor heating system annually to remove any accumulated debris or air pockets. This process involves running water through the system while opening the bleed valves. Keep manifold pressure between 1 and 2 bar, adjusting as needed. For electric systems, test the resistance readings annually to ensure all heating elements are functioning correctly.
Common issues include uneven heating, which often results from trapped air in wet systems or damaged heating elements in electric systems. If you notice cold spots, professional bleeding of the system may be necessary. For electric systems, use a multimeter to test for continuity in the heating elements.
System pressure drops typically indicate a leak in wet systems. Monitor pressure readings regularly and contact a professional if you notice consistent decreases. Thermostat issues often stem from incorrect programming or sensor failures. Check battery levels and ensure temperature sensors are properly positioned and functioning.
If your system stops working entirely, first check your circuit breaker or fuse box. For wet systems, verify that your boiler is operating correctly and that all valves are open. Should problems persist, contact a qualified heating engineer, as attempting complex repairs yourself may void your warranty and could be dangerous.
Remember to keep detailed maintenance records and always refer to your manufacturer’s guidelines for specific maintenance requirements and troubleshooting procedures.
Underfloor heating installation represents a significant investment in home comfort and energy efficiency. When properly planned and executed, it can provide years of reliable warmth while potentially reducing energy costs. The success of your installation depends largely on careful preparation, choosing the right system for your needs, and ensuring compatibility with your chosen floor covering.
Remember to always work with qualified professionals for electrical connections and complex installations. While DIY installation is possible for some systems, particularly electric ones, professional expertise often proves invaluable for ensuring optimal performance and longevity. Regular maintenance and proper control system programming will help maximize efficiency and comfort levels.
Before proceeding with installation, double-check all measurements, verify floor heights, and ensure your insulation meets current building regulations. Consider future maintenance access points and plan accordingly. Whether choosing a wet or dry system, the key to success lies in thorough preparation and attention to detail during every installation phase.
By following these guidelines and working with qualified professionals when needed, you can enjoy the comfort and efficiency of underfloor heating for years to come.