Excavate your pathway bed to a depth of 8-10 inches, ensuring consistent depth across the entire route to prevent settling and drainage issues that plague amateur installations. Remove all organic material, roots, and debris—even small amounts of decomposing matter will compromise your foundation over time. Compact the exposed soil firmly using a plate compactor or hand tamper, making multiple passes until the surface shows no visible movement under pressure.
Install landscape fabric directly on the compacted soil to create a barrier against weed penetration while allowing water drainage. Overlap fabric edges by at least six inches and secure with landscape staples every 12-18 inches. This single step prevents 90% of future maintenance headaches.
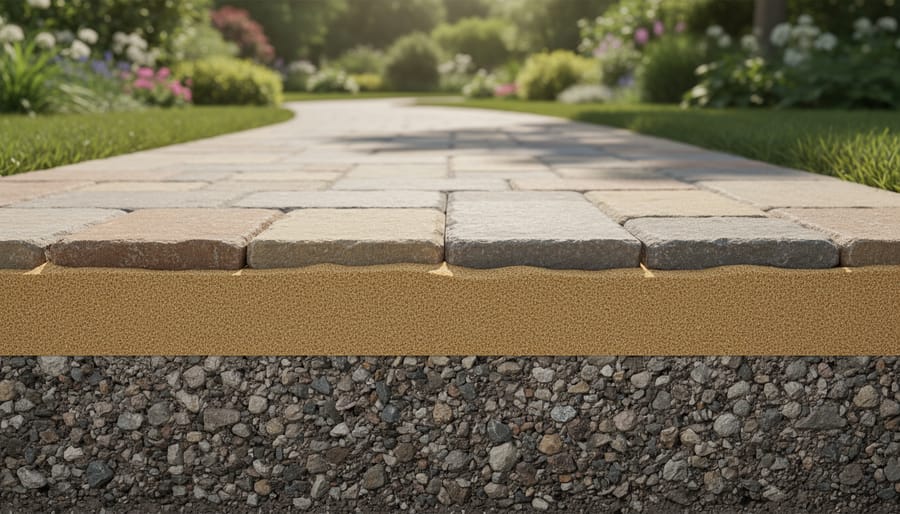
Add a 4-6 inch base layer of crushed gravel or road base, spreading it evenly and compacting in 2-inch lifts. The angular edges of crushed stone interlock to create stability that rounded pea gravel cannot provide. Test compaction by walking across the surface—your footprints should barely be visible.
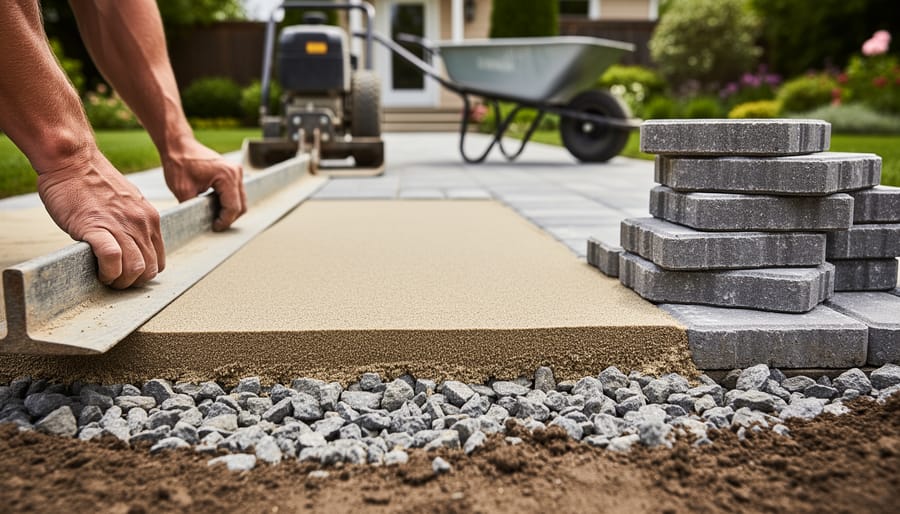
Top the gravel base with 1-2 inches of coarse sand or stone dust as your setting bed. This layer allows for minor adjustments during stone pathway construction while providing immediate support. Screed the sand level using a straight board, maintaining consistent depth to ensure your finished pathway has uniform stone height and proper surface drainage away from structures.
Understanding Why Substrate Preparation Makes or Breaks Your Stone Pathway
The Weight and Movement Challenge
Natural stone pathways face three primary challenges that undermine their stability when substrate preparation is inadequate: the considerable weight of the stones themselves, constant foot traffic, and inevitable seasonal ground movement.
Individual pathway stones typically weigh between 15 to 50 pounds, depending on size and stone type. This weight alone creates downward pressure that causes stones to sink into unprepared soil, especially after rain softens the ground. Without a proper compacted base, heavier stones will settle at different rates, creating an uneven, hazardous walking surface within just a few months.
Regular foot traffic compounds this issue. Each step applies concentrated pressure to the stone surface, gradually pushing stones deeper into soft substrate. High-traffic areas near doorways or garden features deteriorate fastest, developing noticeable depressions and wobbling stones.
Seasonal ground movement presents the most persistent challenge. Freeze-thaw cycles cause soil to expand and contract, lifting stones during winter and dropping them in spring. Clay-rich soils are particularly problematic, shrinking during dry periods and swelling when wet. This constant movement breaks apart poorly constructed pathways, creating gaps between stones and causing edges to tilt upward, becoming trip hazards.
These combined forces explain why proper substrate preparation with adequate depth, drainage layers, and compaction is not optional but essential for pathway longevity and safety.
Drainage: The Hidden Factor in Stone Pathway Success
Water is the silent destroyer of stone pathways. When moisture penetrates beneath your carefully laid stones, it creates a cascade of problems that undermine structural integrity over time. During freeze-thaw cycles, trapped water expands, heaving stones upward and creating uneven surfaces. In warmer climates, poor drainage leads to soil erosion, causing stones to sink or shift as the ground beneath them washes away.
The most common mistake DIYers make is placing stones directly on native soil without proper substrate preparation. This approach guarantees failure because untreated ground cannot manage water flow effectively. Rain and irrigation water pool beneath stones, softening the base and creating voids where settling occurs.
Your primary defense against water damage begins below the surface. A properly constructed substrate acts as a drainage system, channeling water away from the pathway rather than allowing it to accumulate. This requires excavating to adequate depth and installing layers of carefully selected materials that work together to shed moisture.
The base layer typically consists of crushed rock or gravel, which provides both structural support and drainage channels. Above this, a layer of coarse sand creates a stable setting bed while still permitting water passage. This layered approach ensures water moves downward and outward, never pooling where it can cause damage. Proper substrate preparation may require extra effort upfront, but it delivers pathways that remain level and attractive for decades.
Assessing Your Site: What Your Soil and Terrain Tell You
Conducting a Simple Soil Test
Understanding your soil composition before installing pathway stones ensures proper drainage and long-term stability. Here are simple DIY methods that require no specialized equipment.
The jar test is your most reliable indicator for soil composition. Fill a clear quart jar one-third full with soil from your pathway site, removing debris and breaking up clumps. Add water until the jar is nearly full, plus a teaspoon of dish soap to separate particles. Shake vigorously for one minute, then let it settle undisturbed for 24 hours. The soil will separate into distinct layers: sand settles first at the bottom, silt forms the middle layer, and clay creates the top layer. Measure each layer’s height and divide by the total settled soil height to determine percentages. Ideal pathway soil contains 40-60% sand for drainage, with balanced silt and clay content.
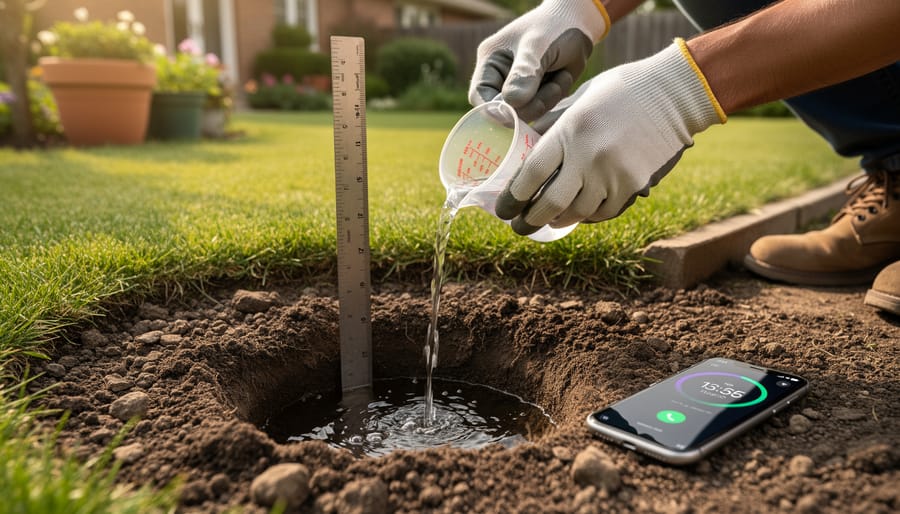
The drainage test reveals how water moves through your soil. Dig a hole 12 inches deep and wide at your pathway location. Fill it completely with water and let it drain. Once empty, fill it again and measure how many inches drain per hour. Drainage rates of 1-3 inches per hour indicate adequate drainage for most pathway installations. Rates below 1 inch suggest clay-heavy soil requiring amendments, while rates above 6 inches indicate excessively sandy soil that may shift over time.
The ribbon test provides quick tactile assessment. Take moist soil and roll it between your palms into a snake shape. Sandy soil won’t hold together, loam forms a short ribbon before breaking, and clay creates a long, flexible ribbon exceeding 2 inches.
Identifying Problem Areas Before You Dig
Before breaking ground, conduct a thorough site assessment to identify conditions that could compromise your pathway’s stability. Start by observing your chosen location after heavy rain. Water pooling or standing more than a few hours indicates poor drainage that will eventually shift your stones and create an uneven surface. Look for areas where water naturally flows across your planned route, as these require additional drainage solutions like French drains or increased gravel depth.
Test your soil composition by digging a small hole approximately 12 inches deep. Clay-heavy soil, which clumps together and feels sticky when wet, retains excessive moisture and expands when frozen, pushing stones upward over time. Sandy soil that feels gritty and doesn’t hold shape may require geotextile fabric to prevent settling. The ideal scenario reveals loamy soil with good drainage characteristics, though proper substrate preparation can compensate for less-than-perfect conditions.
Check for signs of ground instability including cracks in nearby concrete, tilting fence posts, or existing pavers that have shifted significantly. These red flags suggest soil movement that demands deeper excavation and more substantial base materials. Pay attention to tree roots in your pathway zone, as they continue growing and will eventually lift stones. Plan your route to avoid major root systems or consider alternative locations.
Examine the pathway’s grade using a simple level. Slopes exceeding a 2 percent gradient require terracing or retention features to prevent erosion beneath your stones. Document these findings before purchasing materials, as problem areas directly impact the quantity of gravel, sand, and drainage components you’ll need for successful installation.
Essential Materials for Natural Stone Pathway Substrate
Base Layer Materials: Crushed Stone and Gravel Options
Selecting the right base layer material creates the foundation for pathway longevity and stability. Three primary options serve different applications and budgets.
Crushed stone, available in sizes ranging from 3/4-inch to fine dust, provides excellent drainage and compaction. The angular edges interlock when compacted, creating a stable base that resists shifting. Grade specifications include 3/4-inch minus (also called three-quarter clean) for primary base layers and 1/4-inch crushed granite or limestone for leveling beds. Expect compaction rates of 20-30 percent, so order accordingly.
Road base, a blend of crushed stone and fines, offers superior compaction properties. This engineered material typically contains 60-70 percent aggregate and 30-40 percent binding fines. When moistened and compacted, it forms a cement-like surface ideal for high-traffic pathways. Standard depth ranges from 4 to 6 inches after compaction.
Pea gravel and river rock, while aesthetically pleasing, work better as decorative top layers rather than structural bases. Their rounded shape prevents proper interlocking and compaction.
For optimal results, match base materials to your pathway’s intended use. Heavy foot traffic demands road base, while lighter garden paths succeed with crushed stone. When sourcing natural stone and base materials, request material specifications sheets to verify grade consistency and compaction ratings before purchase.
Leveling and Bedding Materials
The final bedding layer sits directly beneath your pathway stones and plays a critical role in stability and drainage. Three primary materials offer distinct advantages for different installation scenarios.
Coarse sand remains the most popular choice for DIY pathway installations. Select concrete sand or coarse builder’s sand rather than fine play sand, which compacts poorly and retains excessive moisture. A 1-2 inch layer provides adequate cushioning while allowing water to percolate through to lower drainage layers. Sand accommodates minor settling and makes leveling individual stones straightforward during installation.
Stone dust, also called quarry fines or crusher dust, consists of finely crushed rock particles. This material compacts more firmly than sand, creating a stable surface that resists shifting under foot traffic. Stone dust works particularly well for flagstone installations where you need minimal movement between stones. When moistened and tamped, it forms a semi-rigid bed that holds stones securely in place.
Decomposed granite offers an attractive, natural-looking option that complements rustic pathway designs. This weathered granite material contains particles ranging from sand-size to small pebbles, providing excellent drainage while compacting to a stable surface. Decomposed granite stabilizes particularly well in dry climates and creates a permeable bed that prevents water pooling around your stones. Apply a 2-3 inch layer for optimal performance with natural stone pathways.
Geotextile Fabric: When and Why You Need It
Geotextile fabric, commonly called landscape fabric, serves as a critical barrier layer in pathway construction. This woven or non-woven material prevents the migration of soil particles upward into your gravel base while allowing water to drain freely through the substrate. Without it, the fine soil beneath will gradually work its way up through the aggregate, compromising your base stability and creating drainage problems over time.
Installing landscape fabric is essential when building pathways over native soil, particularly in areas with clay or silty soils that are prone to mixing with base materials. The fabric also provides secondary weed suppression benefits by blocking light and creating a physical barrier, though it should not replace proper base preparation.
Place the fabric directly over excavated and compacted soil before adding your gravel base. Overlap seams by at least six inches and secure with landscape staples. Choose a permeable, commercial-grade fabric rated for pedestrian traffic rather than thin, plastic-based options that tear easily and deteriorate quickly. This small investment protects your entire pathway system and extends its functional lifespan significantly.
Step-by-Step Substrate Preparation Process
Excavation: Getting the Depth Right
Proper excavation depth determines whether your pathway remains level and stable for years or becomes an uneven headache. The basic formula is straightforward: excavation depth equals stone thickness plus substrate layers minus desired height above grade.
For a typical installation, calculate as follows: if you’re using 2-inch thick stepping stones with a 2-inch sand base and 4-inch gravel base, you’ll need 8 inches total depth. However, if you want the stones to sit 1 inch above the surrounding lawn for drainage and mower clearance, subtract that inch—your excavation depth becomes 7 inches.
Always measure from the lowest point in your pathway area to ensure consistent depth across the entire route. Mark your target depth on a story pole or measuring stick for easy reference during digging.
The surrounding grade matters significantly. Pathways should sit slightly higher than adjacent soil or turf to prevent water pooling and allow proper drainage away from the stones. For areas with heavy clay soil or poor drainage, add an extra inch to your gravel base layer and adjust excavation depth accordingly.
Remember that compaction reduces substrate height by roughly 10-15 percent, so many professionals excavate an additional half-inch deeper to compensate. Test your depth at multiple points before proceeding with base installation to avoid costly corrections later.
Creating Proper Slope for Drainage
Proper drainage prevents water pooling, frost heaving, and premature pathway failure. Establishing a consistent 1-2% slope away from buildings and structures is essential during excavation. To visualize this gradient, aim for a 1-2 inch drop for every 10 feet of pathway length.
Begin by identifying the highest point of your pathway, typically where it meets your home’s foundation or other structures. Using stakes and string lines, mark the desired slope across the entire pathway route. A line level or laser level ensures accuracy throughout the excavation process.
As you dig, continuously check your slope with a 4-foot level and measuring tape. Place the level at multiple points along the pathway, measuring the gap beneath the lower end to confirm your gradient. Remove or add base material as needed to maintain consistency.
During substrate installation, compact your base material in layers while preserving the established slope. Each layer should follow the same drainage angle. Remember that your final stone surface must also maintain this slope, so account for stone thickness when calculating excavation depth. This foundational drainage work protects your investment and ensures decades of pathway performance.
Installing the Base Layer
Begin by spreading crushed stone base material across your excavated pathway area in manageable sections. The ideal lift height for each layer should not exceed 3-4 inches of loose material. Working in these thinner lifts ensures proper compaction throughout the entire base depth, preventing future settling that could compromise your pathway’s stability.
Using a square-edged shovel or landscape rake, distribute the crushed stone evenly, maintaining consistent depth across the entire width. Check your grade frequently with a level or straightedge to ensure proper drainage slope away from structures. The principles outlined in stone patio installation apply equally to pathway construction.
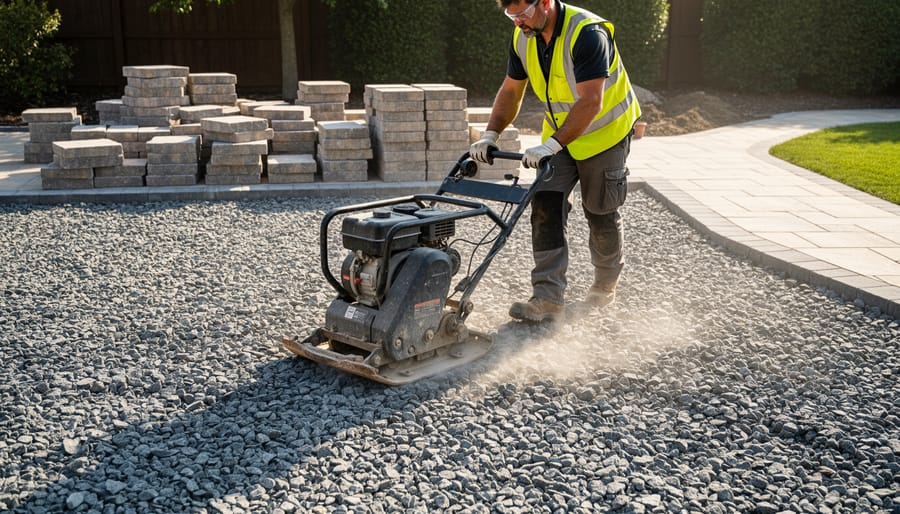
Once each lift is spread uniformly, compact the material using a plate compactor or hand tamper for smaller projects. Make multiple passes over the entire surface, overlapping each pass by several inches. The compactor should leave visible marks indicating adequate pressure application. You’ll know compaction is sufficient when you can walk across the surface without leaving footprints or experiencing noticeable movement.
For pathways requiring deeper bases, repeat the spreading and compacting process in successive lifts until reaching your target depth. Each layer must be compacted before adding the next. A properly compacted base will feel solid underfoot and resist displacement when pressure is applied.
Compaction Techniques and Equipment
Proper compaction is essential for preventing pathway settlement and maintaining a stable surface. For most DIY projects, manual tamping works well for smaller areas. A hand tamper—a flat steel plate with a handle—delivers concentrated force to compact each lift of base material. Apply the tamper in overlapping passes, working systematically across the entire surface.
For larger pathways, consider renting a plate compactor. These vibratory machines significantly reduce labor while providing superior compaction. Walk-behind plate compactors weighing 100-150 pounds suit most residential projects. Make multiple passes in different directions, overlapping each run by several inches.
Compact base material in lifts no deeper than 4 inches. Thicker layers won’t compact properly throughout their depth, leaving weak spots beneath the surface. After each lift, lightly moisten the material if it’s too dry—moisture aids compaction without causing saturation.
To verify adequate compaction, walk across the surface. Properly compacted base shouldn’t shift or leave footprints. Another test involves driving a screwdriver into the material; it should require considerable force to penetrate. The surface should feel firm and produce a solid sound when struck with the tamper. For critical applications, a soil density gauge provides precise measurements, though this level of testing typically exceeds DIY requirements.
Final Bedding Layer Application
The final bedding layer is your pathway’s immediate foundation and requires precision for optimal results. Apply a uniform 1-inch layer of coarse sand or stone dust over your compacted base. This thickness provides adequate cushioning while allowing stones to settle properly without excessive movement.
For leveling, use two parallel screed rails set at the desired height, typically PVC pipes or wooden boards. Place these guides approximately 6 feet apart, checking them with a 4-foot level to ensure consistent grade. Pull a straight 2×4 screed board across the rails using a sawing motion to create a perfectly level surface. Work in manageable sections to prevent disturbing completed areas.
Stone dust offers superior compaction and stability compared to sand, making it ideal for high-traffic pathways. However, standard concrete sand works well for lighter-use applications and provides better drainage in wetter climates.
Avoid walking on the screeded bedding layer before placing stones, as footprints create low spots that compromise your level surface. If you must cross screeded areas, lay down temporary plywood sheets to distribute weight evenly and preserve your carefully prepared surface.
Substrate Variations for Different Natural Stone Types
Irregular Flagstone Substrate Considerations
Working with irregular flagstone presents distinct challenges compared to uniform pavers. The varying thicknesses—ranging from one to three inches within a single pallet—require careful substrate planning to achieve a level walking surface.
Start by dry-laying your stones and measuring the thickness of each piece. Group similar thicknesses together to minimize excavation adjustments. For stones with significant variation, you’ll need to create different substrate depths across your pathway. Mark the bottom of your tallest stone as your reference point, then adjust the base material depth accordingly for thinner pieces.
The irregular shapes of flagstone also affect spacing and joint planning. Unlike geometric pavers, flagstone edges rarely align perfectly, creating organic joint patterns that require flexible spacing. Leave 1-2 inch gaps between stones to accommodate pointing material while maintaining stability. Larger gaps may compromise structural integrity, especially in high-traffic areas.
Consider using a sand setting bed rather than direct compacted gravel placement for irregular stones. This allows fine-tuning of individual stone height by adding or removing sand beneath each piece. Apply the same principles used for natural stone steps, where precise leveling ensures safety and longevity. Test each stone by walking across it before final placement—any rocking motion indicates inadequate substrate support that needs correction.
Uniform Pavers and Cut Stone Requirements
Unlike irregular flagstone, uniform pavers and cut stone require more exacting substrate preparation due to their consistent thickness and defined edges. When stones are precisely calibrated—typically ranging from 1.25 to 2 inches thick—even minor variations in the base layer become immediately visible, resulting in uneven surfaces or lippage between adjacent pavers.
For cut stone installations, your compacted aggregate base should maintain elevation tolerances within plus or minus one-quarter inch across the entire pathway. This precision ensures uniform joint spacing and prevents individual pavers from sitting higher or lower than their neighbors. Use a straightedge or string line frequently during compaction to verify consistent grading.
The bedding layer becomes equally critical. A one-inch layer of coarse sand or stone dust provides the fine-tuning mechanism for final adjustments. Screen this material carefully using screed rails set to exact heights, creating a perfectly level surface before placing your pavers.
Unlike irregular stone that can accommodate substrate variations through varying mortar depths, uniform pavers reveal every imperfection. Take extra time during base preparation—proper screeding and multiple compaction passes will prevent the frustration of resetting stones later. Professional installers often use laser levels or transit equipment for large uniform paver projects, though careful DIYers can achieve excellent results using traditional leveling tools and patience.
Common Substrate Preparation Mistakes and How to Avoid Them
Insufficient Depth and Poor Compaction
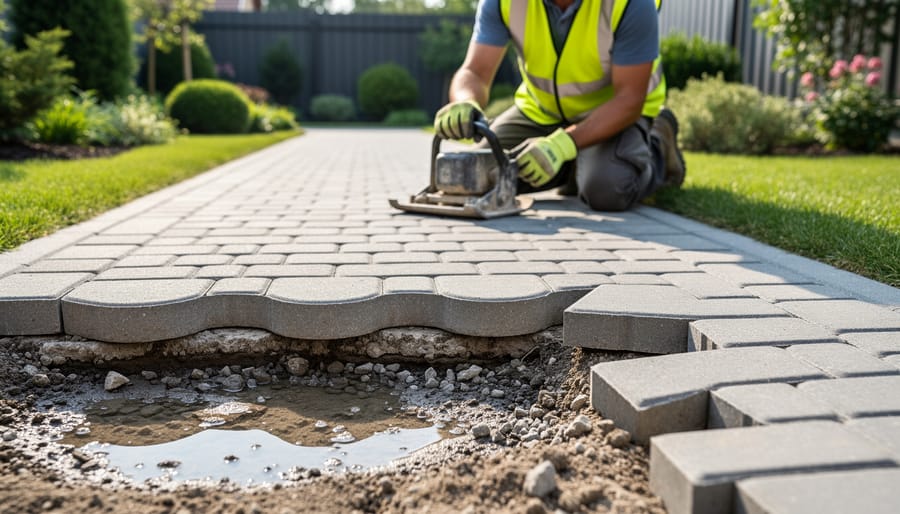
Taking shortcuts on excavation depth and compaction creates a domino effect of pathway failures that typically manifest within the first year. When homeowners excavate only 3-4 inches instead of the recommended 6-8 inches, they eliminate the space needed for proper base layers, forcing stones to rest on unstable native soil.
Consider a recent case where a DIY installer in Portland excavated just 4 inches to save time. Within eight months, their bluestone pathway developed a pronounced wave pattern, with stones sinking up to 2 inches in high-traffic areas. The repair required complete removal and reinstallation, costing three times the original project budget.
Poor compaction produces equally devastating results. Base material must be compacted in 2-3 inch lifts to achieve 95% compaction density. Skipping this step or using only hand tamping on thick layers leaves air pockets that collapse under weight and weather cycles. A Massachusetts homeowner learned this lesson when their flagstone path developed a 6-inch depression after the first winter freeze-thaw cycle.
The consequences extend beyond aesthetics. Inadequate substrate preparation causes trip hazards from uneven surfaces, accelerates stone cracking from uneven support, and creates water pooling that damages both stones and surrounding landscaping. Professional-grade compaction equipment rentals cost approximately $50-75 daily but prevent thousands in future repairs while ensuring your pathway performs as intended for decades.
Ignoring Edge Restraints
Edge restraints serve as the unsung heroes of pathway installation, yet they’re frequently overlooked by DIY enthusiasts eager to see finished results. Without proper edging, your carefully prepared substrate and precisely placed stones will gradually migrate outward under foot traffic and weather conditions, compromising the entire pathway structure within months.
The physics are straightforward: lateral forces from walking push stones outward, while freeze-thaw cycles and water infiltration displace substrate material at the pathway edges. Without containment, your compacted base spreads horizontally, creating voids beneath stones and allowing them to shift, tilt, and eventually become hazardous trip points.
Effective edge restraints include commercial-grade plastic edging, metal landscape borders, concrete haunching, or mortared natural stone borders. The restraint must extend below the base material depth and be secured with stakes or anchored into undisturbed soil. Simply placing decorative rocks alongside your pathway provides zero structural support.
Consider this real-world scenario: A homeowner installed beautiful flagstone without edging, and within six months, the outer stones had shifted three inches outward, creating gaps that filled with weeds and destabilized adjacent stones. Professional reinstallation with proper aluminum edging cost double the original project budget. Investing fifteen percent more initially in quality edge restraints protects your entire investment and ensures decades of stable performance.
Tools and Equipment You’ll Actually Need
Successful pathway installation begins with having the right tools on hand. You won’t need a professional contractor’s arsenal, but certain equipment makes the difference between frustrating struggle and smooth execution.
For excavation and site preparation, you’ll need a square-edged spade for cutting clean edges and a round-point shovel for removing soil. A garden rake helps level the excavation, while a wheelbarrow transports materials efficiently. A hand tamper or plate compactor is essential for compacting base layers—this is where rental options make sense. Hand tampers work for small pathways under 50 square feet and cost $20-30, but plate compactors ($60-80 daily rental) save hours on larger projects and provide superior compaction.
For leveling and measuring, invest in a 4-foot level, measuring tape, and mason’s string with stakes. A torpedo level helps check individual stones. Professional landscapers use laser levels for extensive projects, but string lines work perfectly well for straight or gently curved residential pathways.
You’ll need landscape fabric scissors or a utility knife for cutting fabric and edging materials. A stiff-bristled broom sweeps jointing sand into gaps, while a rubber mallet sets stones without damage. For cutting stones to fit, a basic brick chisel and hammer handle most tasks, though a masonry blade on a circular saw or angle grinder speeds the process for extensive cutting.
Budget-friendly alternatives exist for nearly everything. Borrow or rent compactors rather than purchasing. Use a length of 2×4 lumber as a screed board instead of buying specialized tools. Many home improvement stores offer free tool loans with material purchases, making professional-grade equipment accessible without significant investment. Focus your budget on quality base materials rather than accumulating tools you’ll rarely use after project completion.
Maintaining Your Substrate Over Time
Proper substrate maintenance ensures your pathway remains stable and attractive for decades. Conduct annual inspections each spring, checking for areas where stones have settled unevenly or substrate has eroded. Walking the entire pathway systematically helps identify problem spots before they worsen.
Address settling issues promptly by lifting affected stones and adding additional base material. Minor depressions of less than half an inch can often be corrected by working extra sand into the gaps, while more significant settling requires removing stones, adding compacted base material, and releveling the sand bed. This proactive approach prevents water pooling and further deterioration.
Joint sand naturally washes away over time, particularly in high-traffic areas or locations exposed to heavy rainfall. Plan to refresh polymeric or regular sand between stones every two to three years. Sweep new sand across the pathway surface, working it into joints with a stiff broom, then mist lightly to settle it in place. This simple maintenance step prevents stone shifting and weed growth.
Monitor drainage systems biannually, especially before rainy seasons. Clear any debris from drainage channels, inspect French drains for blockages, and ensure water continues flowing away from the pathway. If you notice standing water after storms, reassess your drainage strategy and add additional outlets if necessary.
Edge restraints should remain firmly anchored. Check for loose spikes or shifted borders annually, repositioning and resecuring as needed. Well-maintained edges prevent base material migration and keep your pathway looking crisp and professionally installed for years to come.
The foundation you create beneath your natural stone pathway isn’t just important—it’s everything. Without proper substrate preparation, even the most beautiful stones will shift, settle, and crack over time, turning your dream pathway into a frustrating maintenance problem. The good news? This critical groundwork is entirely within reach for dedicated DIYers willing to invest the time and effort upfront.
Think of substrate preparation as insurance for your pathway. Those hours spent excavating, grading, and compacting base materials might not be glamorous, but they’re what separate pathways that last decades from those requiring expensive repairs within just a few years. The process demands physical effort and attention to detail, yet it requires no specialized skills beyond careful measurement and methodical execution.
By following proper substrate preparation techniques—establishing adequate depth, ensuring proper drainage, using quality base materials, and achieving thorough compaction—you’re building a pathway that will withstand freeze-thaw cycles, foot traffic, and time itself. This is an investment that pays dividends for years to come, maintaining both the beauty and functionality of your outdoor space.
Remember, cutting corners during preparation inevitably leads to reinstallation costs that far exceed the time and materials you might have saved initially. Like other DIY home projects, success comes from respecting the fundamentals. Your natural stone pathway deserves a foundation that matches its timeless beauty—and now you have the knowledge to create exactly that.