Transform your outdoor space with natural stone pavers by mastering the foundation work that separates professional-quality installations from those that crack, sink, or shift within months. The difference between a patio that lasts decades and one that fails in its first winter comes down to what happens beneath the surface, before you ever set the first stone.
Excavate to a depth of 8-12 inches below your finished paver height to accommodate the complete base system. Remove all organic material, roots, and unstable soil that will decompose and create voids. Compact the native soil at the bottom of your excavation using a plate compactor, making multiple passes until the surface shows no footprints when walked upon.
Install a geotextile fabric directly on the compacted soil to prevent base materials from migrating into the subgrade over time. This barrier maintains the integrity of your layered foundation system and prevents the settling that causes uneven surfaces.
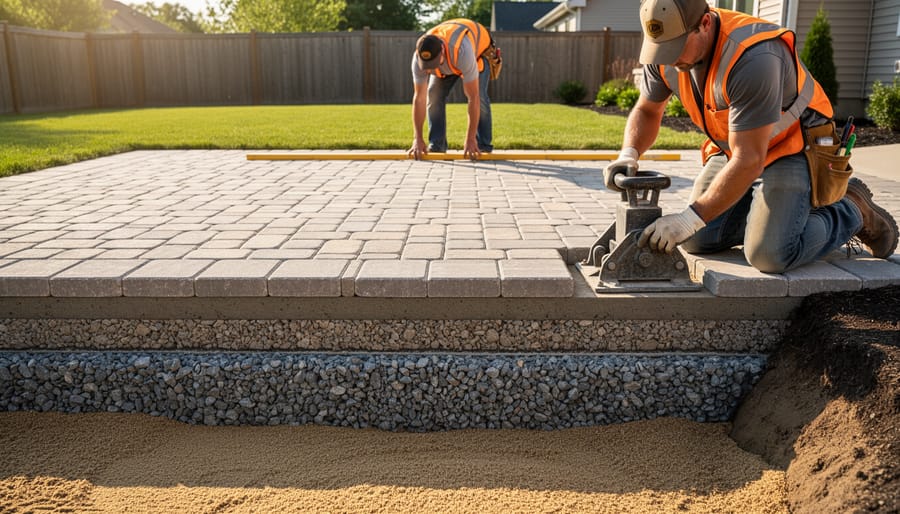
Build your base layer with 4-6 inches of crushed angular stone, typically three-quarter-inch minus material. Spread in two-inch lifts, compacting each layer thoroughly before adding the next. Angular edges lock together far more effectively than rounded gravel, creating a stable platform that resists movement.
Crown your base with a one-inch setting bed of coarse sand, screeded level to accommodate your pavers at the desired final height. This layer allows for minor adjustments during stone patio installation while providing the immediate support each paver needs.
The substrate preparation phase represents 70% of your total installation time but prevents 90% of common failures. Rush this foundation work, and even premium natural stone will eventually disappoint. Invest the time in proper preparation, and your paver installation will withstand freeze-thaw cycles, heavy rainfall, and decades of foot traffic without compromise.
Understanding the Substrate: Why It’s the Most Important Part of Your Installation
What Happens When You Skip Proper Substrate Prep
Cutting corners on substrate preparation inevitably leads to costly failures that compromise both the appearance and longevity of your natural stone installation. Understanding these common problems can save you from expensive repairs down the road.
Settlement and Sinking: Without proper compaction and adequate base depth, pavers gradually sink into the ground, creating uneven surfaces and tripping hazards. One homeowner’s flagstone patio developed two-inch depressions within six months because the installer skipped the crushed stone base entirely, placing pavers directly on soil. The resulting damage required complete removal and reinstallation.
Cracking and Breaking: Natural stone pavers need uniform support from below. When the substrate contains soft spots or insufficient compaction, individual stones rock under foot traffic and eventually crack. Bluestone steps installed over poorly compacted fill developed hairline fractures within the first winter freeze-thaw cycle, requiring replacement of 40% of the stones.
Weed Infiltration: Inadequate pathway stone foundations without proper weed barrier fabric allow persistent growth between joints. One residential walkway became overrun with grass and weeds within eight months because the installer omitted landscape fabric and used insufficient base material.
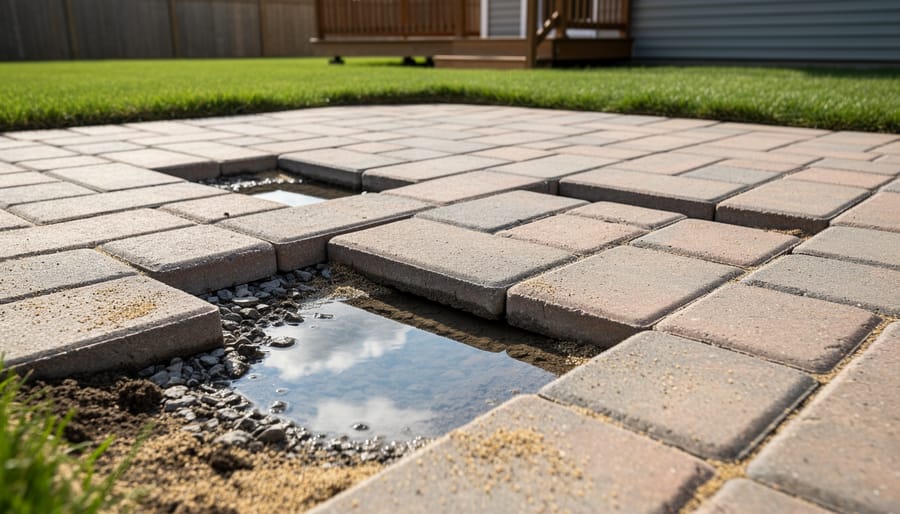
Drainage Failures: Poor substrate grading traps water beneath pavers, leading to frost heave, efflorescence staining, and accelerated deterioration. A courtyard installation without proper slope developed standing water that froze, causing vertical displacement of multiple stones each winter.
These real-world failures demonstrate that proper substrate preparation is not optional—it’s the foundation of a successful, long-lasting natural stone installation.
Essential Tools and Materials for DIY Substrate Preparation
Choosing the Right Base Materials for Your Stone Type
The success of your natural stone paver installation depends heavily on selecting appropriate base materials that match your specific stone type and intended use. Different pavers require different substrate compositions to ensure long-term stability and prevent common failures like settling, cracking, or displacement.
For pedestrian applications such as patios and walkways, a typical base structure consists of 4-6 inches of crushed stone (3/4-inch minus angular aggregate) topped with 1-2 inches of coarse sand or stone dust. This combination provides adequate drainage and stability for foot traffic while supporting lighter-weight pavers like flagstone or slate. The angular crushed stone compacts tightly, creating a solid foundation that resists movement.
Vehicular applications, including natural stone driveways and parking areas, demand more robust base preparation. Increase the crushed stone layer to 8-12 inches, using larger aggregate sizes for the bottom layers and graduating to smaller sizes as you approach the surface. Consider using road base or Class II aggregate, which contains a blend of stone sizes that compact into an extremely stable platform capable of supporting vehicle weight without shifting.
The bedding layer material should align with your stone characteristics. Dense stones like granite or basalt perform well over concrete sand, which provides firm support and precise leveling. More porous stones such as limestone or sandstone benefit from stone dust or decomposed granite, which allows better drainage while preventing efflorescence. For irregular or naturally cleft stones, polymeric sand in the joints adds stability and prevents weed growth.
Climate considerations also influence material selection. In freeze-thaw regions, prioritize drainage by using open-graded crushed stone and avoiding materials that retain water, which can cause heaving and displacement during winter months.
Step-by-Step Substrate Preparation Process
Site Assessment and Layout Planning
Before breaking ground, a thorough site assessment prevents costly mistakes and ensures long-term paver performance. Start by evaluating soil conditions. Dig a test hole approximately 12 inches deep to examine the soil composition. Clay-heavy soils retain water and require deeper excavation with enhanced drainage measures, while sandy soils typically drain well but may need additional compaction. If you encounter extremely soft or organic-rich soil, consider consulting a professional about soil stabilization.
Establishing proper drainage is critical for preventing water damage and frost heave. Your paver surface should slope away from buildings at a minimum grade of 2 percent, which translates to a 1/4-inch drop per foot of length. Use a line level and measuring tape to mark these slope lines with stakes and string, ensuring water flows toward designated drainage areas.
Next, calculate your excavation depth by adding three components: paver thickness, base material depth, and bedding layer. For pedestrian applications, plan for 4-6 inches of compacted aggregate base plus 1 inch of bedding sand. Vehicular areas require 8-12 inches of base. For example, if installing 2-inch thick pavers for a walkway, excavate 7-9 inches total depth.
Mark your layout lines using stakes, string, and marking paint. Square corners using the 3-4-5 triangle method: measure 3 feet along one line, 4 feet along the perpendicular line, and verify the diagonal measures exactly 5 feet. This geometric principle ensures perfectly square layouts for professional-looking results.
Excavation: Depth, Grading, and Soil Removal
Proper excavation sets the foundation for a long-lasting paver installation. The process involves removing soil to the correct depth, establishing proper drainage slope, and preparing a stable base for your natural stone pavers.
Begin by determining the required excavation depth, which typically ranges from 7 to 9 inches below the finished paver surface. This depth accommodates several critical layers: 4 to 6 inches of compacted gravel base, 1 inch of bedding sand, and the thickness of your pavers (usually 1.5 to 2 inches). Areas with heavy vehicle traffic or poor soil conditions may require deeper excavation to ensure adequate support.
Creating the proper slope is essential for effective water drainage and preventing pooling that can cause pavers to settle or shift over time. Establish a grade of 1/4 inch per foot sloping away from any structures. Use a string line and line level to mark your desired slope, or employ a laser level for larger projects to ensure accuracy across the entire excavation area.
Soil type significantly impacts your excavation approach. Clay soils retain water and expand when wet, requiring deeper excavation and potentially adding landscape fabric to prevent base material migration. Sandy soils drain well but may need additional compaction. Rocky soil can be advantageous for drainage but may require more effort to achieve the proper depth.
Remove all organic material, roots, and debris during excavation, as decomposing matter creates voids that lead to settling. For larger projects, consider renting a plate compactor to firm the subgrade before adding base materials. Compact the exposed soil to create a solid foundation that resists future movement.
Take time to verify your measurements throughout the excavation process. Inconsistent depth or improper slope are difficult to correct after base materials are installed and represent the most common causes of paver installation failure.
Installing Landscape Fabric and Edge Restraints
Before laying your pavers, installing landscape fabric and edge restraints creates a stable foundation that prevents common installation failures. These components work together to maintain the integrity of your paver system for years to come.
Geotextile landscape fabric serves two essential purposes: it blocks weed growth from below while preventing the migration of your base materials into the underlying soil. Without this barrier, base aggregates can gradually sink into softer subsoil, creating uneven surfaces and drainage problems. Choose a non-woven, permeable landscape fabric rated for paver applications, avoiding standard weed barrier cloth which tears easily under heavy loads.
Install the fabric directly over your compacted subgrade before adding base materials. Overlap seams by at least 12 inches to prevent soil intrusion at joints. For areas with particularly problematic soil conditions or high weed pressure, some installers place an additional fabric layer between the base and bedding sand, though this is optional for most residential projects.
Edge restraints are equally critical, as they prevent your pavers from spreading outward over time due to traffic and settling. Without proper edging, even perfectly installed pavers will shift, creating gaps and uneven surfaces. Options include plastic paver edging, aluminum restraints, or concrete edge courses.
Install edge restraints along all perimeter edges, securing them with 10-inch galvanized spikes driven through pre-drilled holes every 12 to 18 inches. The top of the restraint should sit slightly below the finished paver height to remain hidden. For curved edges, use flexible plastic edging designed to bend smoothly, staking more frequently to maintain the desired shape.
Creating the Base Layer: Crushed Stone Installation
The crushed stone base layer serves as the foundation for your paver installation, directly influencing its longevity and performance. This critical step requires precision and patience to achieve professional results.
Begin by spreading crushed stone aggregate evenly across your prepared subgrade. For pedestrian walkways, a 4-inch compacted depth suffices, while driveways and high-traffic areas require 6 inches. Use angular, crushed stone rather than rounded gravel, as the irregular edges interlock better during compaction. Limestone or granite screenings work exceptionally well for this purpose.
Distribute the stone in 2-inch layers using a rake or shovel, working systematically across the entire area. This layered approach ensures superior compaction compared to spreading the full depth at once. Pay special attention to edges and corners where material tends to thin out.
Before compacting, verify your slope gradient using a string line and level. The base should maintain the same drainage pitch established during excavation, typically a minimum 2 percent grade away from structures. This translates to a 1/4-inch drop per foot of horizontal distance.
Compact each layer thoroughly using a plate compactor, making three to four passes in different directions. The machine should leave no footprints when you walk across the surface, indicating proper density. For projects involving elevation changes, similar techniques apply as when building natural stone steps, where base stability proves equally crucial.
After compacting the first layer, add the second layer and repeat the process. Check the final grade frequently using a straightedge and level, making adjustments before compaction sets the material. The completed base should sit firm and level, showing no movement when subjected to the compactor’s force. A properly installed crushed stone base creates an unyielding platform that prevents future settling and maintains your pavers’ alignment for decades.
The Bedding Layer: Sand Application and Screeding
The bedding layer is your final opportunity to create the level, stable surface that determines how well your natural stone pavers will perform over time. This critical 1-inch layer of sand sits directly beneath the pavers and requires careful attention to achieve professional results.
Start by selecting the right sand. Coarse, angular sand works best for the bedding layer. Avoid fine play sand or mason sand, as these compact too densely and don’t allow proper drainage. Look for concrete sand or bedding sand specifically labeled for paver installation, with particles ranging from 1/16 to 1/8 inch in diameter.
To achieve a uniform 1-inch depth, you’ll need to set up screed rails. Use 1-inch diameter metal pipes or wooden rails placed parallel to each other across your prepared base, spaced about 6 feet apart. These rails should rest directly on your compacted base and run the full length of your project area. Check that the rails are level with each other using a straight 2×4 and level, adjusting as needed to match your desired slope for drainage.
Once your rails are positioned, spread sand between them, adding slightly more than you think necessary. Using a straight 2×4 or screed board that’s longer than the distance between rails, drag the board across the top of the rails in a sawing motion. This screeding process removes excess sand and creates a perfectly uniform surface. Work in small sections to prevent disturbing the screeded areas.
After screeding each section, carefully remove the rails and fill the voids with sand, smoothing with a hand trowel. Avoid walking on or compacting the screeded sand before laying pavers. The sand should remain loose and level, ready to accept the stone pavers and allow for minor adjustments during installation. Never pre-compact the bedding layer, as the sand needs to settle naturally under the weight of the pavers.
Common Substrate Preparation Mistakes and How to Avoid Them
Compaction Issues That Cause Long-Term Problems
Inadequate compaction ranks among the most common installation failures, leading to settling, lippage, and cracked pavers within months of installation. The foundation of a successful natural stone paver project depends on achieving proper density at every layer of the base structure.
Start with the subgrade, compacting native soil to 95% density using a plate compactor for small areas or a vibratory roller for larger projects. For most residential installations, a plate compactor weighing at least 200 pounds provides adequate force. Make multiple passes in different directions, overlapping each pass by several inches. Similar to substrate preparation techniques for other applications, thorough compaction prevents future settling.
Apply the aggregate base in lifts no thicker than 3 inches. Thicker layers prevent compaction equipment from reaching the bottom material, creating weak spots. Compact each lift before adding the next, checking for movement by walking across the surface. Properly compacted base feels firm underfoot with no visible deflection.
The bedding sand layer requires gentler treatment. Use a hand tamper or lightweight plate compactor to settle the sand without over-compacting, which can create an unstable surface. The goal is a firm yet workable bed that allows for minor paver adjustments during installation.
Verify compaction quality by performing a simple screwdriver test: if a long screwdriver penetrates more than half an inch into the compacted base with moderate hand pressure, additional compaction is necessary. This straightforward verification prevents costly problems down the road.
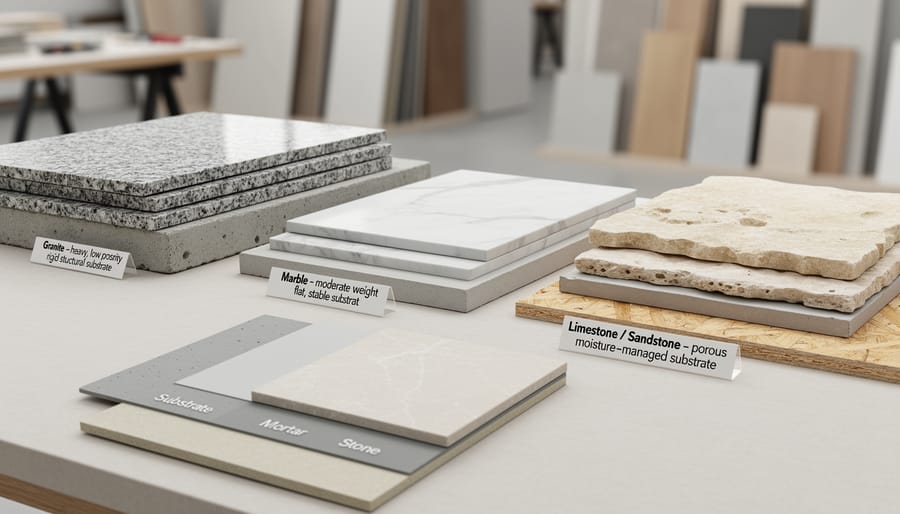
Special Considerations for Different Natural Stone Types
Not all natural stone pavers behave the same way, which means your substrate requirements must adapt to the specific material you’re installing. Understanding these differences prevents common failures like cracking, settling, or moisture damage.
Travertine is highly porous and relatively lightweight, making it susceptible to moisture absorption and freeze-thaw damage in cold climates. The substrate for travertine requires exceptional drainage, typically incorporating a minimum 6-inch gravel base with proper grading. Because travertine can range from 1.25 to 2 inches thick, thinner pavers need a more stable, finely compacted setting bed to prevent flexing and cracking. Always use polymeric sand in joints to reduce water infiltration.
Granite represents the opposite end of the spectrum. This dense, non-porous stone is significantly heavier and requires a more robust substrate to support its weight, particularly for thicker pavers exceeding 2 inches. A well-compacted 8-inch aggregate base is standard for high-traffic applications. Granite’s low porosity makes it ideal for areas with standing water concerns, though proper slope for surface drainage remains essential.
Limestone falls somewhere between travertine and granite in porosity and weight. Its moderate absorption rate means the substrate must balance stability with drainage. A 6 to 8-inch compacted base works well, but the stone’s softer composition demands careful compaction techniques to avoid damaging pavers during installation. Limestone is particularly sensitive to acidic conditions, so avoid substrates containing reactive materials.
Slate’s natural cleft surface and tendency to delaminate require special attention. The substrate must be perfectly level since slate cannot conform to irregularities without risking breakage along its natural layers. Use a thick sand setting bed (1.5 to 2 inches) and check each paver individually for level placement. Slate’s varying thickness within a single pallet also means you’ll need to adjust the setting bed depth continuously during installation.
A beautiful natural stone paver installation begins long before the first stone is laid. As we’ve explored throughout this guide, proper substrate preparation is the single most important factor determining whether your paver project will stand the test of time or require costly repairs within just a few years.
The difference between a decades-long installation and premature failure comes down to the foundation work that no one sees. Investing adequate time in excavation, establishing proper drainage, creating stable base layers, and ensuring accurate leveling will reward you with a durable, low-maintenance surface that enhances your property’s value and beauty for generations.
Remember the key takeaways: excavate to the correct depth accounting for all layers, install geotextile fabric to prevent base migration, use quality aggregate materials compacted in lifts, and never skip the bedding layer that cushions your pavers. Pay special attention to drainage planning, as water management prevents the vast majority of paver failures.
While many homeowners successfully complete paver installations as DIY projects, recognize when professional expertise may be warranted. Complex drainage situations, large-scale projects exceeding 500 square feet, installations requiring significant grading or retaining walls, or sites with challenging soil conditions often benefit from professional assessment and execution. There’s no shame in consulting with experienced installers for guidance, even if you complete most of the work yourself.
By following the substrate preparation principles outlined in this guide, you’re setting yourself up for installation success that will last for decades to come.