Clean the concrete substrate thoroughly with a degreaser and pressure washer, removing all oils, dirt, and loose debris that would prevent proper resin adhesion. Any contamination left behind creates weak points where the resin stone coating will eventually delaminate or fail. Allow the surface to dry completely for at least 24 hours before proceeding.
Repair all cracks, holes, and surface imperfections using a high-quality concrete patching compound rated for outdoor use. Resin stone installations magnify rather than hide substrate flaws, so address even minor damage now. Grind down high spots and fill low areas to create a level surface with consistent slope for drainage.
Test the substrate’s porosity by sprinkling water across different sections. Water should absorb gradually rather than bead up or soak in instantly. Dense, non-porous concrete may require acid etching or mechanical grinding to open the surface pores and ensure the primer can penetrate properly. Overly porous surfaces need a penetrating sealer to prevent excessive resin absorption that drives up material costs.
Apply a moisture barrier primer specifically formulated for resin systems. This critical step prevents moisture vapor transmission from below, which causes bubbling, clouding, and bond failure in resin coatings. Follow manufacturer specifications for application rate and curing time, typically 12-24 hours depending on temperature and humidity conditions.
The difference between a professional-grade resin stone installation and a failed DIY project often comes down to substrate preparation quality. Rushing this phase to save a few hours of work leads to costly repairs within months. Proper preparation ensures your resin stone surface delivers the durability and aesthetic appeal you’re investing time and money to achieve.
Understanding Resin Stone and Its Substrate Requirements
What Makes Resin Stone Different from Natural Stone
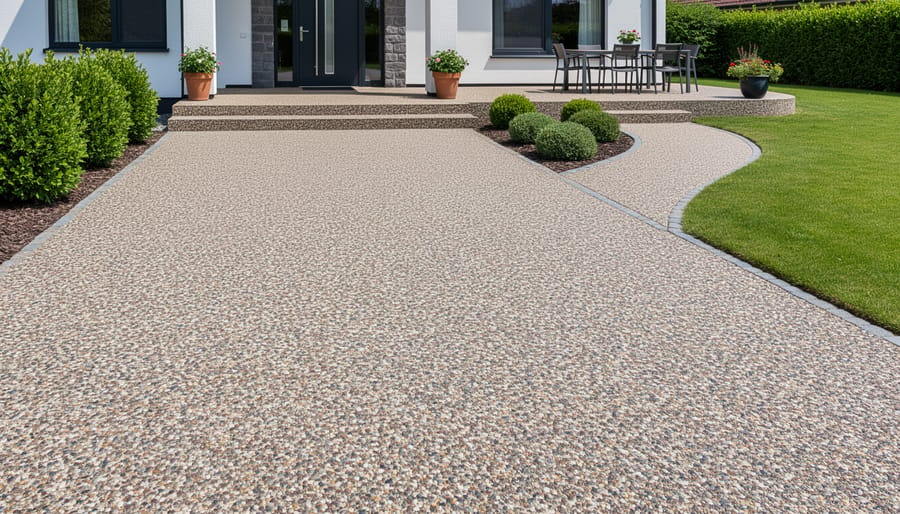
Resin stone represents a distinct departure from traditional natural stone installations, offering unique characteristics that make it particularly suitable for DIY applications. At its core, resin stone is a composite material combining natural stone aggregates with a polymer resin binder, creating a product that bridges the gap between authentic stone and synthetic materials.
The composite nature of resin stone delivers several practical advantages. Unlike solid natural stone slabs, resin stone contains crushed or small pieces of genuine stone held together by epoxy or polyurethane resin. This construction makes it significantly lighter, typically weighing 50-70% less than comparable natural stone pieces. For DIYers, this weight reduction translates to easier handling, reduced structural load requirements, and simpler installation without specialized equipment.
Flexibility is another key differentiator. While natural stone is rigid and prone to cracking under stress, resin stone exhibits slight flexibility, making it more forgiving during installation and less susceptible to damage from minor substrate movement. This characteristic proves especially valuable for DIY projects where perfect substrate preparation may be challenging.
Adhesion properties also set resin stone apart. The resin backing creates superior bonding with adhesives compared to natural stone’s smooth or porous surfaces. This enhanced adhesion often allows for thinner adhesive applications and more reliable bonds, even for vertical installations. Additionally, resin stone typically requires less specialized cutting tools and techniques than natural stone, making it more accessible for home improvement enthusiasts tackling their first stone projects.
Critical Substrate Characteristics for Resin Stone Success
Successfully installing resin stone depends fundamentally on proper substrate preparation. Unlike traditional stone patio installation, resin stone requires exceptionally precise surface conditions to achieve long-lasting results.
Flatness stands as your primary concern. The substrate must maintain flatness within 3mm over a 3-meter span. Any deviations beyond this tolerance will telegraph through the finished resin stone surface, creating visible imperfections and potential weak points. Use a long straightedge to identify high and low spots before proceeding.
Structural stability is equally critical. The substrate must be completely rigid with zero flex or movement. Wooden subfloors require additional reinforcement, while concrete slabs should be fully cured for at least 28 days. Any substrate movement after installation will cause cracking or delamination in your resin stone surface.
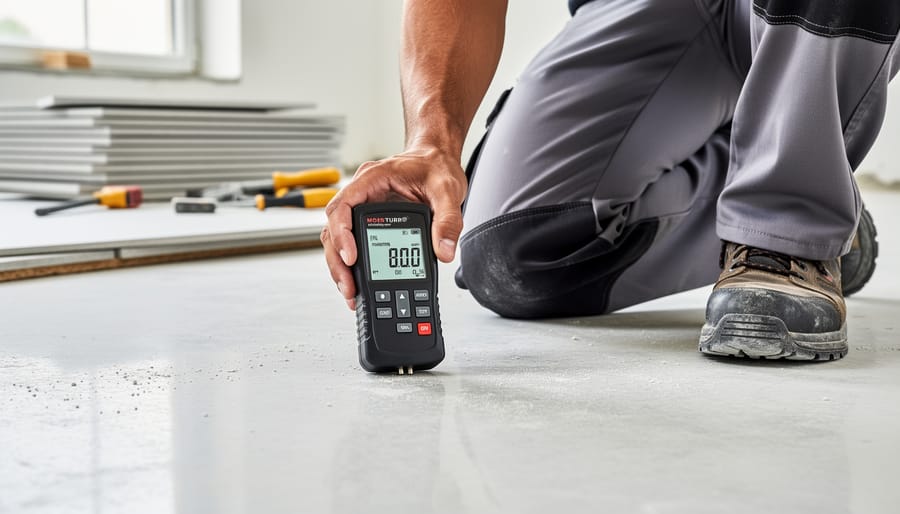
Moisture content demands careful attention. Concrete substrates should register below 4 percent moisture on a reliable moisture meter. Excessive moisture prevents proper adhesive bonding and can cause discoloration or bubbling in the resin. Always conduct moisture testing before beginning your project.
Surface porosity directly affects bonding strength. The substrate must be neither too smooth nor excessively porous. Smooth surfaces like polished concrete require mechanical scarification or acid etching to create adequate bonding texture. Conversely, highly porous surfaces need primer application to prevent excessive adhesive absorption. A properly prepared surface should feel slightly rough to the touch while remaining dust-free and clean of all contaminants, oils, or previous coatings.
Assessing Your Existing Surface: The Pre-Preparation Checklist
Testing for Structural Soundness and Load Capacity
Before applying resin stone, verify your substrate can support the additional weight and resist flexing that causes cracking. Start with a simple tap test: use a rubber mallet or the handle of a screwdriver to gently tap across the entire surface in a grid pattern. Listen for hollow sounds indicating voids or delamination beneath the surface. Solid, intact concrete produces a consistent, dull thud, while compromised areas sound hollow or drum-like.
Check for structural flex by applying firm pressure with your foot or hand across different sections. Any noticeable movement or bounce signals weakness requiring reinforcement. Concrete substrates should have zero deflection under normal pressure.
Inspect for visible cracks wider than hairline thickness. While minor surface cracks can be filled, structural cracks that penetrate deep or span large distances indicate foundation issues needing professional assessment before proceeding.
For wooden substrates, verify thickness meets minimum requirements of 3/4-inch plywood or equivalent. Check for soft spots, water damage, or excessive bounce by walking the entire area. Floors should feel completely rigid with proper joist support underneath.
Document weak areas with photos and measurements. Substrates failing these basic tests require reinforcement with additional support layers, crack repair systems, or complete replacement to ensure your resin stone installation remains durable and crack-free for years.
Moisture and Contamination Detection
Before applying resin stone coatings, identifying moisture and contamination issues is essential for long-term adhesion success. Even minor problems can lead to coating failure, delamination, or discoloration.
Start with a simple moisture test by taping a 2-foot square piece of plastic sheeting to your substrate using duct tape around all edges. Wait 24 hours, then check for condensation or darkening underneath. This indicates moisture vapor transmission that must be addressed before proceeding. For concrete slabs, a more precise calcium chloride test kit is available at most hardware stores and provides measurable moisture emission rates.
To detect oil or chemical contamination, sprinkle water droplets across the surface. If water beads up rather than absorbing slightly, contamination is likely present. Oil stains, hydraulic fluid, or chemical spills create invisible barriers that prevent proper bonding. Clean contaminated areas with an appropriate degreaser, then retest.
Surface porosity assessment is equally important. Pour a small amount of water on different areas and observe absorption rates. Highly porous surfaces may require a primer or sealer coat before resin application to prevent excessive material consumption and ensure uniform coverage. Conversely, very dense surfaces with low porosity might need mechanical abrading to create adequate tooth for adhesion.
Document your findings with photos, particularly in commercial projects where future reference may prove valuable. Professional moisture meters provide precise readings if your project demands higher assurance levels. Address all identified issues before moving forward with resin stone installation to ensure a durable, professional finish.
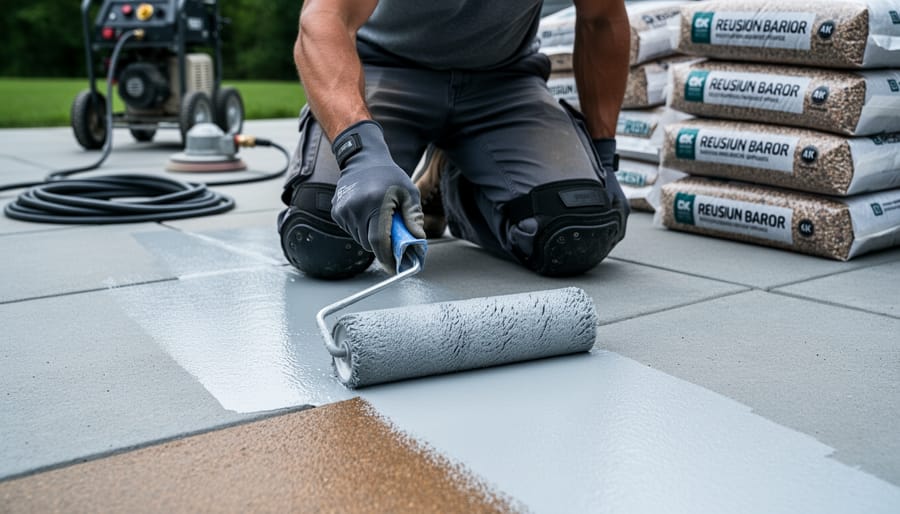
Step-by-Step DIY Substrate Preparation Process
Surface Cleaning and Contaminant Removal
A chemically clean surface is essential for proper resin adhesion. Begin by thoroughly degreasing the substrate using a commercial degreaser or TSP (trisodium phosphate) solution. Apply the degreaser with a stiff brush, working it into the surface texture to lift oils, waxes, and contaminants. Rinse thoroughly with clean water and allow complete drying.
Old adhesives require mechanical removal using a scraper or grinder, followed by solvent cleaning for residual traces. For stubborn adhesive residue, use acetone or mineral spirits applied with a clean cloth, ensuring adequate ventilation during application.
Efflorescence, the white crystalline deposit common on concrete and masonry, must be completely removed before resin application. Treat affected areas with a diluted muriatic acid solution (1 part acid to 10 parts water), following manufacturer safety guidelines. Scrub the surface, rinse extensively with clean water, and neutralize any remaining acid with a baking soda solution.
After all cleaning procedures, perform a final water break test: spray clean water on the surface. If water beads up instead of spreading evenly, contaminants remain and additional cleaning is necessary. The surface should appear uniformly damp without water pooling or beading.
Repairing Cracks, Holes, and Surface Defects
Successfully addressing damage in your substrate ensures optimal adhesion for your resin stone installation. Understanding which repair products work best for different situations will save you time and prevent future failures.
For concrete substrates, cement-based patching compounds work best for cracks wider than 1/8 inch and larger holes. These products bond chemically with the existing concrete, cure at similar rates, and won’t create differential movement issues. Clean debris from cracks using a wire brush or compressed air before applying the patch. For hairline cracks under 1/8 inch, liquid crack sealers designed for concrete penetrate deeply and flex with minor substrate movement.
Epoxy-based fillers excel when repairing non-porous surfaces or situations requiring rapid cure times. They create incredibly strong bonds and work well on previously sealed concrete, stone, or composite substrates. Use epoxy products when filling holes or gouges in surfaces that won’t accept cement-based materials, or when you need to complete repairs and proceed with installation within hours rather than days.
Wood substrates require proper repair techniques using wood filler or epoxy specifically formulated for timber. Fill knotholes, gouges, and gaps completely, allowing adequate drying time before sanding flush.
Regardless of filler type, overfill slightly and sand level after curing. Test the repaired area for stability by pressing firmly—any flex or movement indicates insufficient repair. Large damaged areas exceeding 6 inches in diameter may require cutting out and replacing the affected section entirely rather than patching, ensuring structural integrity for your resin stone application.
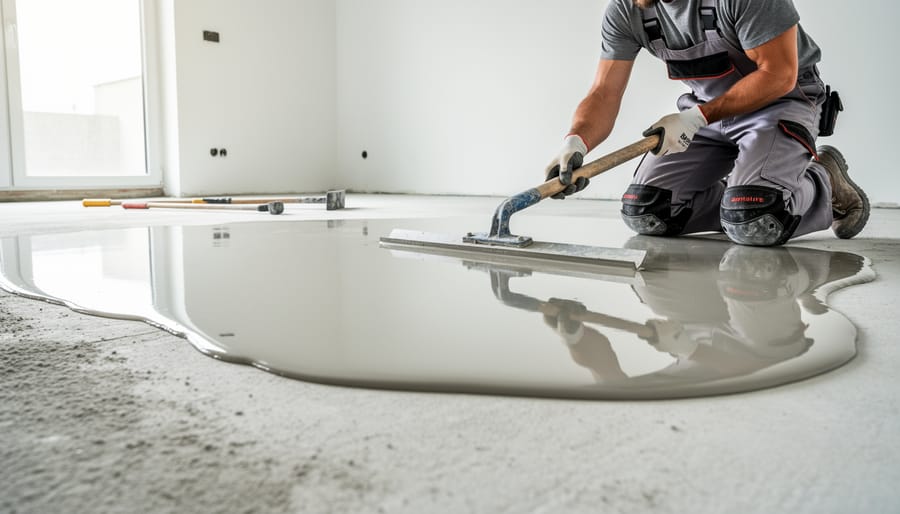
Leveling and Flattening the Substrate
Achieving a perfectly level substrate is critical for resin stone success. Even minor deviations can cause pooling, uneven thickness, and a compromised final appearance. The acceptable tolerance for resin stone installations is typically 3mm over a 3-meter span, though stricter standards (2mm over 2 meters) are ideal for high-quality results.
Begin by assessing your substrate with a long straightedge and spirit level, marking high and low spots with a pencil or chalk. High spots must be ground down using a concrete grinder with diamond pads or a hand-held angle grinder for smaller areas. Work systematically across the surface, checking progress frequently with your straightedge to avoid over-grinding.
For low spots and general leveling, self-leveling compounds provide the most reliable solution. Choose a product rated for the substrate type and thickness required. Mix according to manufacturer specifications, ensuring the right consistency—too thick won’t self-level properly, while too thin may crack. Pour the compound from the furthest point working toward your exit, using a gauge rake to control thickness. A spiked roller helps release air bubbles and promotes even distribution.
Allow proper curing time as specified by the product manufacturer, typically 24-48 hours before proceeding. For exterior applications or areas exposed to moisture, select compounds with moisture-resistant properties. After curing, perform a final levelness check. Any remaining minor imperfections under 1mm can usually be addressed with a thin skim coat of appropriate filler, then mechanically abraded once dry to ensure proper resin adhesion.
Priming and Sealing for Optimal Adhesion
Selecting the appropriate primer is fundamental to achieving a durable resin stone installation. The primer type depends on your substrate material: concrete and cement substrates require epoxy-based or polyurethane primers that penetrate porous surfaces, while wood substrates need moisture-barrier primers to prevent water damage. Metal surfaces benefit from rust-inhibiting primers that prevent corrosion beneath the resin layer.
Before application, ensure the substrate is completely clean, dry, and free of contaminants. Apply primer using a brush or roller in thin, even coats, working in sections to maintain a wet edge. Most primers require 4-24 hours of curing time depending on temperature and humidity conditions. Check manufacturer specifications carefully, as applying resin too early can compromise adhesion, while waiting too long may reduce bonding effectiveness.
Primers improve bond strength by creating a chemical bridge between the substrate and resin system. They seal porous surfaces, preventing air bubbles from escaping during resin application, and stabilize substrates that might otherwise release moisture or oils. For outdoor installations, use UV-resistant primers to prevent degradation. Always perform a test patch on a small area to verify compatibility and adhesion quality before proceeding with the full installation.
Final Inspection and Quality Control
Before proceeding with resin stone installation, conduct a thorough final inspection to ensure optimal results. Begin by verifying surface flatness using a straightedge or level—check for deviations exceeding 3mm over a 2-meter span, which can compromise adhesion and create visible irregularities. Test substrate strength by scratching the surface with a coin; it should resist marking without powdering or flaking.
Perform a simple adhesion test by applying small resin patches in several locations, allowing them to cure, then attempting removal. Proper preparation yields strong bonding that resists lifting. Confirm moisture levels are below 4% using a moisture meter, particularly critical for concrete substrates. Excessive moisture causes bonding failure and discoloration.
Inspect for surface contaminants—dust, oils, or residues—by running a clean hand across the area. Any transfer indicates inadequate cleaning requiring re-treatment. Check that repairs have fully cured per manufacturer specifications and are flush with surrounding surfaces. Document your inspection with photographs for reference, especially on larger projects. This systematic verification prevents costly installation failures and ensures your resin stone flooring performs beautifully for years.
Common Substrate Preparation Mistakes That Ruin Resin Stone Installations
Rushing the Curing Process
Patience during the curing process is essential for successful resin stone installations, yet it’s one of the most frequently rushed steps. When repairs, leveling compounds, or primers don’t receive adequate curing time, they compromise the entire installation’s structural integrity, leading to common substrate foundation issues that become apparent only after completion.
Concrete repairs require a minimum 28 days for full curing before applying resin stone systems. While surface-dry concrete may appear ready within days, internal moisture content remains too high for proper adhesion. Leveling compounds typically need 24-72 hours depending on thickness and environmental conditions, though manufacturer specifications should always take precedence.
Primers demand particular attention to timing. Most epoxy primers require 4-8 hours of curing before accepting resin stone, while moisture-blocking primers may need up to 24 hours. Applying resin stone to tacky or incompletely cured primers creates delamination risks and adhesion failure.
Temperature and humidity significantly impact curing times. Cold conditions below 50°F can double required waiting periods, while high humidity extends drying times for cement-based products. Always verify curing completion using manufacturer-recommended methods rather than visual assessment alone.
Ignoring Moisture and Temperature Conditions
Environmental conditions during substrate preparation play a crucial role in resin stone installation success. Temperature and moisture levels directly impact adhesion quality and long-term durability, yet many DIYers overlook these critical factors.
Substrate temperature should ideally range between 50°F and 85°F during preparation and installation. Cold surfaces below 50°F prevent proper adhesive curing, while excessive heat accelerates curing too quickly, compromising bond strength. Use an infrared thermometer to verify surface temperature before proceeding.
Moisture content presents an equally important consideration. Concrete substrates should have moisture levels below 4% as measured by a moisture meter. Installing resin stone over damp surfaces traps moisture beneath, leading to delamination, discoloration, and potential mold growth. Allow new concrete to cure for at least 28 days before installation.
Seasonal timing matters significantly. Spring and fall typically offer optimal conditions with moderate temperatures and lower humidity. Avoid installation during extreme weather, as thermal expansion and contraction during the curing period can cause adhesive failure. If working in humid conditions, allow extra drying time after cleaning and priming. Winter installations require climate-controlled environments or specialized cold-weather adhesives. Planning your project around favorable environmental conditions prevents costly failures and ensures your resin stone surface performs beautifully for years.
Tools and Materials: Your DIY Substrate Preparation Kit
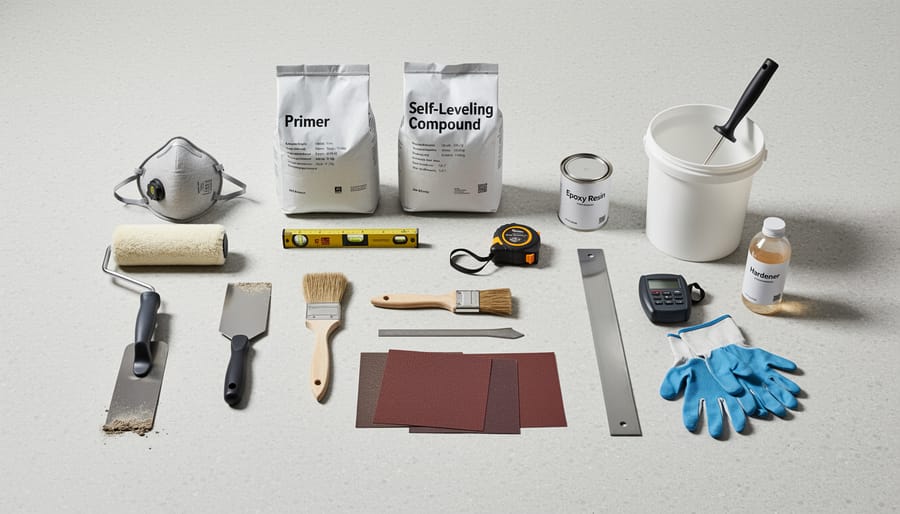
Essential Tools and Equipment
Before beginning your resin stone project, gather the right tools to ensure professional results. For surface preparation, you’ll need industrial-strength cleaning supplies including degreaser ($15-25), TSP cleaner ($10-15), and stiff-bristle brushes ($8-12). A quality concrete grinder or scarifier ($150-400 rental, $800+ to purchase) is essential for creating proper surface texture and removing existing coatings.
Leveling equipment includes a 4-foot spirit level ($25-40), laser level ($60-150), and self-leveling compound ($30-50 per bag). For moisture testing, invest in a reliable moisture meter ($40-200) to prevent future adhesion problems. Application tools should include mixing paddles ($15-25), notched trowels ($12-20), and spike rollers for removing air bubbles ($20-35).
Safety equipment is non-negotiable: respirator masks with organic vapor cartridges ($35-60), chemical-resistant gloves ($10-20), and safety goggles ($8-15). A vacuum system with HEPA filtration ($100-300) ensures thorough dust removal before resin application. Budget approximately $400-600 for basic tools if starting from scratch, though many items like levels and cleaning supplies may already be available. Quality equipment pays for itself through superior results and time savings.
Choosing the Right Primers, Fillers, and Leveling Compounds
Selecting appropriate primers, fillers, and leveling compounds depends entirely on your substrate material and condition. For concrete substations, choose epoxy-based primers that penetrate porous surfaces and create strong mechanical bonds. Look for products rated for moisture vapor transmission if working with newer concrete that hasn’t fully cured. Acrylic or urethane primers work well on existing tile, provided the surface is properly cleaned and lightly abraded.
Plywood substrates require flexible primers that accommodate slight movement without cracking. Water-based polyurethane primers offer good adhesion while remaining breathable enough to prevent moisture entrapment beneath the resin stone layer.
When selecting leveling compounds, prioritize products with low shrinkage rates and working times that match your skill level. Self-leveling compounds should flow easily but set firm within 2-4 hours for efficient workflow. Check the manufacturer’s specifications for maximum thickness per application, typically ranging from 1/8 inch to 1 inch.
For crack filling, opt for flexible epoxy or polyurethane-based fillers rather than rigid cement products. These accommodate minor substrate movement and prevent stress fractures from telegraphing through your finished resin stone surface. Always verify chemical compatibility between your chosen primer system and the resin binder you’ll use for installation, as incompatible products can cause delamination or adhesion failure.
The success of your resin stone installation rests entirely on the quality of your substrate preparation. While it may be tempting to rush through this phase and move straight to the exciting application process, the hours invested in proper surface preparation will determine whether your finished project lasts for decades or begins deteriorating within months. Every principle covered in this guide—from moisture testing and crack repair to achieving the correct surface profile and ensuring structural stability—works together as an integrated system that creates the ideal foundation for resin stone adhesion.
Remember that even the highest-quality resin and premium stone aggregate cannot compensate for a poorly prepared substrate. Clean, dry, level, and structurally sound surfaces are non-negotiable requirements, not optional recommendations. By following the step-by-step preparation protocols outlined here, testing thoroughly at each phase, and addressing issues before they become permanent problems, you’re setting yourself up for results that match or exceed professional standards.
As with any DIY home improvement project, patience and attention to detail during preparation pay substantial dividends. The beautiful, durable resin stone surface you create will serve as lasting proof that proper groundwork transforms good intentions into exceptional outcomes. Invest the time now, and enjoy your professionally-caliber installation for years to come.