Installing granite countertops with undermount sinks demands precision at the planning stage: measure your cabinet layout three times, accounting for the sink’s precise dimensions plus the required lip overhang of typically 1.5 to 2 inches. Order your granite slab with cutouts templated by a professional, as DIY sink hole cutting risks catastrophic cracking in this brittle material that can exceed thousands of dollars in replacement costs.
Secure the undermount sink to the granite underside using a two-part epoxy specifically formulated for stone, applying support brackets every 6 to 8 inches around the sink perimeter to distribute the weight of a water-filled basin. The sink must be attached before the granite countertop installation onto cabinets, as post-installation attachment creates accessibility challenges and compromises structural integrity.
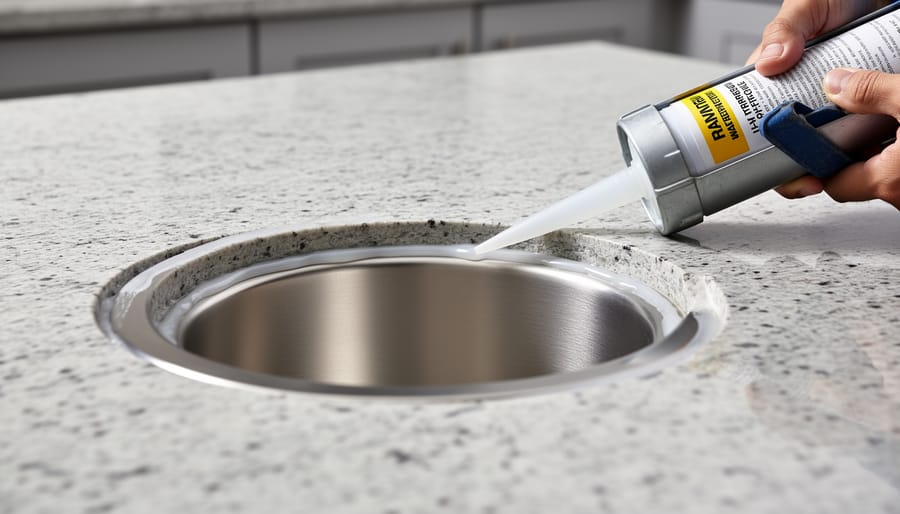
Seal the junction between sink and granite with 100% silicone caulk rated for kitchen and bath applications, running a continuous bead around the entire perimeter. This waterproof barrier prevents moisture infiltration that causes mold growth and cabinet deterioration beneath your investment.
Level your base cabinets within 1/8 inch tolerance across their entire span using shims, as granite will not flex to accommodate uneven surfaces. Unlevel cabinets create stress points in the stone that manifest as cracks within months of installation, particularly near sink cutouts where material strength is already compromised. Professional installers use laser levels and digital measuring tools to achieve this precision, though careful DIY work with quality spirit levels produces acceptable results for patient homeowners.
Planning Your Granite Countertop and Undermount Sink Installation
Choosing the Right Undermount Sink for Granite
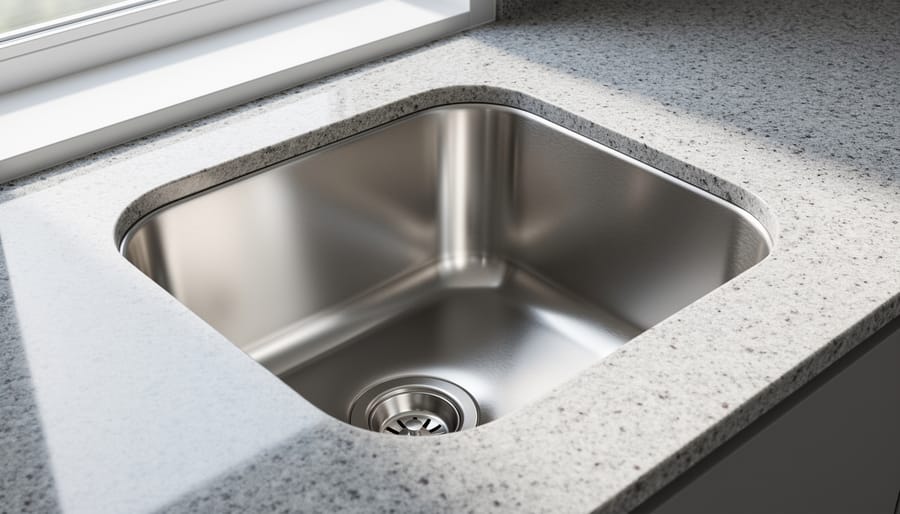
Selecting the appropriate undermount sink ensures both functional performance and structural integrity with your granite installation. The sink material directly impacts weight distribution, installation requirements, and long-term durability.
Stainless steel sinks remain the most popular choice for granite countertops due to their lightweight construction, affordability, and resistance to chips and cracks. They typically weigh 15-25 pounds, making them easier to support during installation. Composite granite sinks offer superior aesthetic coordination with granite countertops and excellent durability, though they weigh significantly more at 30-50 pounds, requiring additional support structures. Porcelain and fireclay sinks provide timeless elegance but demand careful handling due to their susceptibility to chipping and substantial weight of 40-60 pounds.
Size considerations extend beyond cabinet dimensions. Your sink bowl depth and overall dimensions must account for granite thickness, which typically ranges from 2cm (3/4 inch) to 3cm (1-1/4 inch). Standard 3cm granite provides better structural support for larger, heavier sinks and creates a more substantial edge profile. Ensure your chosen sink’s rim width accommodates the reveal distance between the cutout edge and sink edge, typically 1/8 to 1/4 inch, which remains visible from below and affects the finished appearance. Always verify that your sink’s weight rating and mounting hardware specifications align with your granite thickness before finalizing your selection.
Template Creation and Measurements
Precise templating forms the foundation of a successful undermount sink installation. Professional fabricators typically create templates after cabinets are installed but before countertop fabrication begins, using thin plywood or digital laser measuring systems to capture exact dimensions. This critical step determines not only the countertop fit but also the sink cutout location and size.
Sink positioning significantly impacts kitchen functionality and requires careful consideration during the templating phase. The sink should sit centered on the cabinet base for proper weight distribution, while maintaining adequate distance from edges—typically 3 to 4 inches from the front and back edges of the countertop. Consider workflow patterns when determining placement, ensuring comfortable access to adjacent work zones and appliances.
When working with your fabricator, clearly communicate your sink model and mounting preferences before template creation. Provide the actual sink unit rather than relying on manufacturer specifications, as dimensions can vary slightly. Discuss drain and faucet hole locations, ensuring they align with existing plumbing or planned modifications. Request a template review session where you can verify measurements and visualize the final layout. The fabricator will create the cutout slightly smaller than the sink rim to provide adequate support surface for mounting clips while ensuring the granite lip extends properly over the sink edge for a seamless appearance.
Understanding the Fabrication Process
After selecting granite slabs, the fabrication process transforms raw stone into a precision-fitted countertop. At the fabrication shop, technicians create a template of your cabinet layout, then use computerized cutting equipment or manual tools to shape the granite precisely. The undermount sink cutout requires meticulous measurement, typically cut 1/8 inch smaller than the sink’s outer rim to ensure proper support. Fabricators then polish all exposed edges to your chosen profile, whether eased, beveled, or ogee. Most fabricators apply sink clips and support brackets during this phase, though final sink mounting occurs during installation. They also seal the cutout edges to prevent water infiltration. This controlled shop environment ensures accuracy before the heavy stone ever reaches your home, minimizing on-site complications and reducing installation time.
Essential Tools and Materials
Adhesives and Sealants
Selecting the right adhesives and sealants is critical for a secure, long-lasting granite countertop installation with an undermount sink. Three primary adhesive types are essential for this project.
Epoxy-based adhesives provide the strongest bond for securing granite slabs to cabinets. Two-part epoxies like Akemi Akepox 5010 or Tenax Tefill create structural bonds that support the substantial weight of granite while allowing minimal adjustment time during positioning. Apply epoxy in dollar-sized dollops every 8-10 inches along cabinet perimeters and cross braces.
For undermount sink attachment, specialized silicone adhesives designed for stone applications are necessary. Products like Kerdi-Fix or GE Silpruf 2000 offer excellent adhesion to both granite and sink materials while maintaining flexibility to accommodate thermal expansion. Apply a continuous 3/8-inch bead around the entire sink rim perimeter before pressing it firmly against the underside of the granite.
100% silicone sealants are required for waterproofing the sink-to-granite junction. Clear or color-matched silicone like Dow Corning 795 creates a watertight barrier that prevents moisture infiltration and potential damage. Some professionals recommend Laticrete Latasil for its superior mold resistance in high-moisture environments.
Always verify product compatibility with your specific granite type, as certain adhesives may cause discoloration on lighter stones. Purchase more adhesive than calculated needs, as running short mid-installation creates unnecessary complications and potential bonding inconsistencies.

Support and Installation Hardware
Proper undermount sink installation requires specialized hardware to ensure the sink remains securely fastened to the granite while supporting its weight when filled with water and dishes. Sink clips form the foundation of this support system, typically requiring eight to twelve clips depending on sink size. These metal brackets attach to the underside of the countertop and hook onto the sink rim, creating tension that holds the sink firmly in place.
Epoxy adhesive works in conjunction with clips to create a waterproof bond between the sink and granite. Professional-grade two-part epoxy ensures long-term adhesion and prevents water infiltration. Wood supports or plywood bracing installed within the cabinet structure provide additional reinforcement, particularly for larger or heavier sinks. These supports distribute weight across the cabinet frame rather than relying solely on the granite and clips.
Shims prove essential for achieving perfect sink alignment before the epoxy cures. Plastic or wooden shims allow micro-adjustments to ensure the sink sits level and flush with the countertop opening. A quality level helps verify proper positioning from multiple angles. Some installers also use temporary support bars or adjustable jacks to maintain sink position during the curing process, which typically takes 24 hours. Investing in proper installation hardware prevents future issues like sink drooping or separation from the countertop.
Preparing the Cabinet Base
Structural Reinforcement
Before installation begins, your cabinet structure must be properly assessed and reinforced to support granite’s substantial weight of approximately 18-20 pounds per square foot. Standard cabinets designed for laminate countertops typically lack the necessary strength for natural stone applications.
Start by inspecting existing cabinets for any damage, warping, or weak joints. The cabinet frame should be level and securely anchored to wall studs. Any structural issues must be addressed before proceeding with reinforcement.
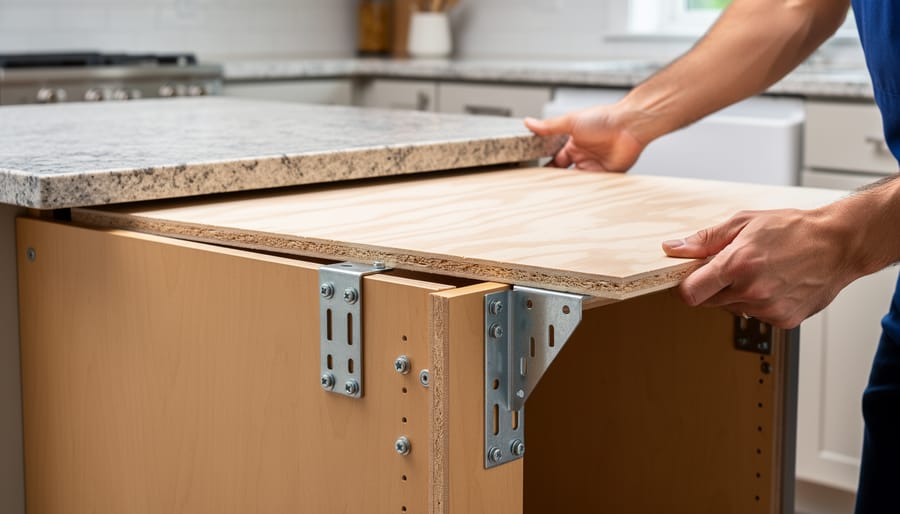
The primary reinforcement involves adding a three-quarter-inch plywood layer across the entire cabinet top. This plywood substrate distributes the granite’s weight evenly and provides a stable mounting surface. Secure the plywood to cabinet frames using construction adhesive and screws spaced every six to eight inches.
For spans exceeding 24 inches or cabinets without center support, install additional support brackets. These L-shaped metal or wooden brackets should be positioned every 18-24 inches along the cabinet’s interior perimeter. Pay special attention to areas where the undermount sink will be located, as this creates a cutout that removes structural support from the granite itself.
Corner cabinets and areas supporting cooktops require extra reinforcement due to increased stress points. Consider adding diagonal bracing or additional vertical supports in these locations. Proper structural preparation prevents sagging, cracking, and potential catastrophic failure of your granite investment.
Leveling and Alignment
Before installing granite, verify that your cabinets provide a stable, level foundation. Use a 4-foot level to check both front-to-back and side-to-side alignment across all cabinet surfaces. Any variation exceeding 1/8 inch over 10 feet can cause stress fractures in granite or prevent proper seating of the slabs.
Address low spots by inserting plastic shims between cabinets and the floor, never at mounting points where granite will rest. For high spots, sand or plane the cabinet tops carefully. Check that all adjacent cabinets are flush at the same height, as uneven surfaces will telegraph through to visible gaps or lippage in seamed countertops.
Pay special attention to corner cabinets where granite sections will meet. These junction points bear significant weight and require perfect alignment to ensure seamless mitered corners or proper L-shaped seam placement. Place a straightedge across multiple cabinets to identify any twisting or bowing that could compromise the granite installation.
Once level, secure cabinets firmly to wall studs and to each other, creating a rigid support system that won’t shift under the granite’s weight or during undermount sink use.
Undermount Sink Installation Methods
Pre-Fabrication Sink Mounting (Recommended Method)
Pre-fabrication sink mounting represents the industry standard for undermount sink installation with granite countertops, and for good reason. This method involves attaching the sink to the granite slab at the fabricator’s workshop before the countertop arrives at your home. The process typically uses professional-grade two-part epoxy specifically formulated for stone applications, along with mechanical fasteners like sink clips or brackets that provide additional support.
The advantages of this approach are substantial. Fabricators work with the granite positioned face-down on a flat surface, allowing gravity to help seat the sink perfectly against the stone while the epoxy cures. This controlled environment ensures proper alignment and eliminates the awkward overhead positioning required during field installation. The fabricator can also apply even pressure across the entire sink rim and allow adequate curing time, typically 24 to 48 hours, before any stress is placed on the bond.
Professional fabricators have specialized equipment, including jigs and templates, that guarantee precise sink placement relative to cabinet configurations. They can verify that faucet holes align correctly and that the sink doesn’t interfere with cabinet structures or plumbing rough-ins.
Before your countertop arrives, confirm several critical details with your fabricator. Verify that the sink model matches your original selection and that all cutout dimensions correspond to your cabinet layout. Request documentation of the adhesive products used and their cure times. Ask about the weight capacity and whether additional support brackets were installed. Finally, inspect photographs of the completed assembly if possible, ensuring the sink is centered properly within the cutout and that the polished edge finish meets your expectations.
Field Installation Method
Once the granite countertop is securely in place with fully cured adhesive, you can proceed with mounting the undermount sink. This process requires precision and patience to ensure a watertight, structurally sound installation.
Begin by positioning the sink upside down beneath the cutout opening. Most professionals use a sink template or the sink itself to mark attachment points on the underside of the granite. Apply painter’s tape around the cutout perimeter on top of the countertop to protect the granite surface from excess adhesive. With a helper supporting the sink from below, perform a dry fit to verify proper alignment and clearance, checking that the rim sits flush against the granite underside without gaps.
Clean both the sink rim and granite contact area thoroughly with denatured alcohol to remove any dust, oils, or debris that could compromise adhesion. Apply a generous bead of two-part epoxy specifically designed for granite or a high-quality silicone adhesive formulated for stone applications around the entire sink rim. Some installers prefer using epoxy tabs or clips in addition to adhesive for extra security, particularly with heavier cast iron or fireclay sinks.
Position the sink carefully against the granite underside, pressing firmly to ensure full contact. Install the support system immediately while the adhesive is still workable. The most common approach involves using adjustable support brackets or wooden braces that extend from the sink bottom to the cabinet floor or walls. These supports must remain in place for 24 to 48 hours until the adhesive fully cures. Some installers use quick-setting epoxy putty at strategic points for immediate hold while the primary adhesive cures.
Apply a final bead of silicone caulk around the sink-to-granite junction after cure time, creating a waterproof seal that protects the cabinet below from moisture infiltration.
Step-by-Step Granite Countertop Installation Process
Delivery and Material Inspection
Upon delivery, immediately inspect the granite slabs for chips, cracks, or surface damage before signing any paperwork. Verify that the color and veining match your approved samples, as natural stone variations can occur between slabs. Check that all pieces are present according to your order specifications.
Handle granite with extreme care using proper lifting techniques and a minimum of two people for larger sections. Always carry slabs vertically on edge, never flat, to prevent cracking from their own weight. Use padded A-frame carts or dollies designed specifically for stone transport.
Critically examine the sink cutout before installation begins. Place your undermount sink into the opening to confirm proper fit, checking for adequate clearance around all edges. The cutout should allow approximately one-eighth to one-quarter inch of overhang for the sink rim to rest against the granite underside. Measure the distance from the cutout edge to the front and back of the countertop to ensure proper positioning. If discrepancies exist, address them immediately with your fabricator, as corrections after installation become significantly more complex and costly.
Dry Fitting and Test Positioning
Before applying any adhesive, carefully position the granite slab on the base cabinets to verify proper fit and alignment. This crucial step allows you to identify potential issues without permanent commitment.
Begin by enlisting at least two helpers, as granite slabs are extremely heavy and awkward to maneuver. Gently lift the countertop and place it onto the cabinet base, ensuring the back edge aligns flush against the wall. Check for gaps exceeding 1/8 inch, which may indicate unlevel cabinets or wall irregularities requiring shims or filler strips.
Next, verify the undermount sink cutout positioning. Place a level across the surface to confirm the slab sits flat without rocking. If movement occurs, identify high spots on the cabinets and mark them for sanding or shimming. Pay special attention to the sink area, ensuring adequate clearance between the sink bowl and cabinet walls below.
Test the sink by temporarily positioning it in the cutout to verify proper depth and access for plumbing connections. Measure the reveal, the granite edge overhanging the sink rim, confirming it matches your specifications, typically between 1/4 to 3/8 inch around the perimeter.
Mark any adjustment points with painter’s tape and remove the slab carefully. Address all identified issues before proceeding to permanent installation, as corrections become significantly more difficult once adhesive is applied.
Applying Adhesive and Setting the Granite
Apply adhesive in strategic locations rather than covering the entire cabinet surface. Place 100% silicone or epoxy-based adhesive in quarter-sized dollops spaced 6-8 inches apart along cabinet edges and support structures. Focus additional adhesive around the sink cutout perimeter to ensure proper support for the undermount fixture. Avoid excessive adhesive that could squeeze out and create cleanup challenges.
With assistance, carefully lift the granite slab and position it over the cabinets, aligning it with your reference marks. Lower the stone slowly and deliberately, allowing the adhesive to make initial contact. Apply even pressure across the surface, working from the center outward to prevent trapping air pockets. Use a level to verify the granite sits perfectly horizontal in all directions.
Check the reveal around your undermount sink immediately after setting the granite. The sink rim should sit flush against the underside without gaps. Make any necessary adjustments within the first few minutes before the adhesive begins curing. Press down firmly on areas requiring better contact, and use shims if needed to achieve uniform support. Allow the adhesive to cure for 24 hours before proceeding with plumbing connections or applying stress to the installation.
Securing the Undermount Sink
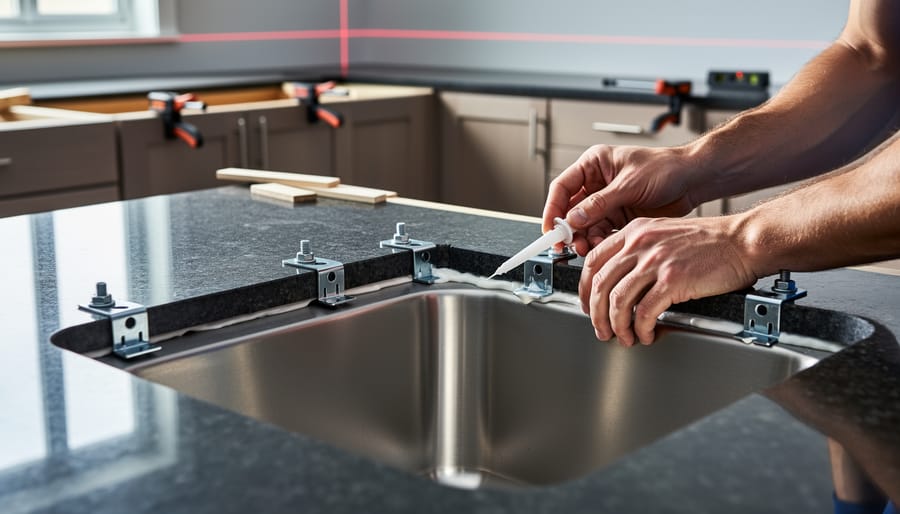
Proper sink securement prevents leaks and ensures long-term performance. Begin by installing support brackets underneath the countertop at strategic points around the sink perimeter, typically spaced 6-8 inches apart. These metal brackets provide essential reinforcement, as granite alone cannot hold the sink’s weight.
Apply a continuous bead of silicone adhesive around the entire sink rim where it contacts the granite underside. Use a high-quality, 100% silicone sealant rated for kitchen applications to ensure water resistance and durability. The bead should be approximately 1/4 inch thick and uniform throughout.
Position the sink carefully against the granite opening, ensuring even contact with the adhesive. Working from underneath, tighten the mounting clips gradually in a crosswise pattern to distribute pressure evenly. Avoid over-tightening, which can crack the granite or distort the sink. Each clip should be snug but not forced.
Allow the adhesive to cure according to manufacturer specifications, typically 24 hours, before connecting plumbing. Check for any gaps between the sink and granite by running your finger along the seam. A proper installation will show consistent contact with slight adhesive squeeze-out, which can be carefully trimmed once cured.
Sealing and Finishing
Sealing the Granite Surface
Proper granite sealing protects your investment and ensures long-lasting beauty after installation. Wait at least 24 hours after completing the installation before applying sealer, allowing adhesives and caulk to cure fully.
Begin by thoroughly cleaning the surface with a pH-neutral stone cleaner and allowing it to dry completely. Test the granite’s porosity by placing a few drops of water on the surface. If the water absorbs within 4-5 minutes, sealing is necessary. Most granite requires sealing, though some dense varieties may need less frequent application.
Choose a penetrating or impregnating sealer specifically formulated for natural stone. Quality products from manufacturers like DuPont StoneTech, Aqua Mix, or Miracle Sealants provide excellent protection. Apply the sealer evenly using a clean, lint-free cloth or foam applicator, working in small sections. Allow the sealer to penetrate for the recommended time, typically 15-20 minutes, then buff away excess product with a clean cloth.
Most granite countertops require resealing every 1-3 years, depending on use and granite density. Perform the water drop test annually to determine when reapplication is needed.
Sink Edge Sealing and Plumbing Connections
After the sink is securely mounted, proper edge sealing becomes critical for preventing water damage and ensuring long-term durability. Apply a continuous bead of 100% silicone waterproof caulk around the entire perimeter where the sink rim meets the granite underside. This creates a watertight barrier that protects the substrate and cabinetry from moisture infiltration.
Work carefully to ensure complete coverage without gaps, paying special attention to corners and seams where water tends to accumulate. Use a caulk tool or moistened finger to smooth the bead and remove excess material. Some installers prefer to apply caulk before setting the sink, while others seal afterward—both methods work effectively when executed properly.
Once the adhesive has fully cured according to manufacturer specifications (typically 24 hours), verify seal integrity by running water in the sink and inspecting the underside for any signs of leakage. Check all connection points, including the drain assembly and faucet mounting areas.
Coordinate with your plumber for final hookup of water supply lines, drain connections, and garbage disposal if applicable. Professional plumbers understand the unique considerations of undermount installations and can ensure proper P-trap alignment without stressing the granite or sink mounting. Avoid using the sink until all connections are complete and tested, preventing potential damage to your newly installed countertop.
Common Mistakes to Avoid
Structural and Support Errors
Proper structural support is essential for granite countertops with undermount sinks, as inadequate reinforcement accounts for a significant percentage of installation failures. Standard cabinets designed for laminate countertops typically cannot support the combined weight of granite slabs and undermount sinks without modification.
Cabinet reinforcement should include cross-bracing installed beneath the sink area, with plywood supports increasing surface contact and distributing weight evenly across cabinet frames. The substrate must be solid wood or marine-grade plywood, as particleboard lacks the strength to hold fasteners under continuous stress. Many installers make the critical mistake of relying solely on perimeter cabinet walls for support, which concentrates weight at stress points and can lead to cracking.
Undermount sinks require dedicated support beyond adhesive and clips alone. A proper installation includes brackets or corbels positioned strategically beneath the sink bowl to transfer weight directly to the cabinet structure rather than relying on the granite-to-sink bond. Weight distribution becomes particularly critical at inside corners and cutout edges where granite is most vulnerable to stress fractures.
Case studies reveal that installations without proper reinforcement often develop hairline cracks within the first year, especially in high-use kitchens. Professional fabricators recommend consulting structural specifications before installation, as retrofitting support after countertop installation proves costly and sometimes impossible without complete removal.
Sealing and Adhesive Mistakes
Selecting the wrong adhesive represents one of the most critical errors in undermount sink installation. Many installers mistakenly use standard construction adhesive or inadequate epoxy formulations not designed for granite’s weight and moisture exposure. Always specify 100% solids epoxy or specialized stone adhesive rated for your sink’s weight capacity—typically requiring support for 50-100 pounds depending on sink size and material.
Insufficient curing time creates equally problematic scenarios. Most quality epoxies require 24-48 hours to achieve full strength, yet rushed installations often proceed with plumbing connections after just a few hours. This premature stress can compromise the bond, leading to eventual sink detachment and catastrophic water damage. Temperature and humidity also affect curing rates, so follow manufacturer specifications precisely.
Improper sealing around the sink rim allows water infiltration into cabinetry below, creating ideal conditions for mold growth and wood deterioration. Apply a continuous bead of silicone sealant specifically formulated for kitchen applications along the entire perimeter where granite meets sink. Pay special attention to corners and seams where water tends to accumulate. Remember that granite itself requires periodic sealing to prevent staining, though the sink junction needs moisture-resistant silicone rather than stone sealer. Regular inspection of these seals prevents minor issues from becoming expensive repairs.
Maintenance and Long-Term Care
Regular Cleaning and Resealing
Maintain your granite countertops with pH-neutral cleaners specifically formulated for natural stone. Avoid acidic products like vinegar or lemon-based cleaners, as these can etch the surface and degrade the sealant over time. For daily cleaning, warm water and mild dish soap work effectively. Wipe spills immediately to prevent staining, particularly from wine, coffee, or oils.
Reseal your granite countertops every 12 to 18 months, though frequency depends on usage and the stone’s porosity. Test seal integrity by placing a few drops of water on the surface—if it beads up, the seal is intact. If water absorbs within minutes, resealing is necessary.
Pay special attention to the sink edge seal where silicone meets granite. Inspect this junction quarterly for cracks, gaps, or water damage. Deteriorating caulk can allow moisture infiltration, potentially causing mold growth or adhesive failure beneath the sink. Remove old caulk completely and reapply high-quality silicone sealant as needed to maintain a watertight barrier and protect your installation investment.
Monitoring for Water Damage
Regular monitoring helps catch water damage early, preventing expensive repairs to cabinetry and subfloors. Check the area beneath your sink monthly for signs of moisture accumulation or standing water. Look for discoloration, warping, or soft spots in the cabinet base, which indicate seal failure between the sink and granite.
Inspect the silicone seal around the sink rim for cracks, gaps, or separation from either the granite or sink surface. A failed seal allows water to seep through during normal use, especially around heavily used areas near the faucet and drain. Run your fingers along the seal’s edge to detect any separation that may not be visible.
Pay attention to musty odors when opening cabinet doors, as this often signals hidden moisture problems. If you notice condensation on plumbing pipes, insulate them to prevent water droplets from forming and pooling in the cabinet.
Address any issues immediately by removing old sealant, thoroughly drying all surfaces, and reapplying fresh silicone. For persistent leaking, the sink may require remounting with new epoxy and proper support clips. Early intervention prevents mold growth, cabinet replacement, and potential damage to adjacent cabinetry or flooring.
Successfully installing granite countertops with an undermount sink requires careful attention to each phase of the process. From initial measurements and sink selection through template creation, support structure reinforcement, and final sealing, every step plays a crucial role in achieving a professional, long-lasting result.
The key to success lies in thorough planning before beginning installation. Taking accurate measurements, selecting appropriately sized sinks, and ensuring adequate cabinet support prevents the most common installation failures. Remember that granite’s weight and rigidity demand proper substrate preparation and reinforcement, particularly around sink cutouts where structural integrity is most critical.
While DIY installation is possible for those with advanced home improvement skills and the right tools, many homeowners benefit from professional assistance. Consider hiring experienced fabricators and installers if you lack specialized equipment like diamond-blade saws, have limited experience working with natural stone, or face complex layout challenges. The cost of professional installation often proves worthwhile when weighed against the risk of damaging expensive granite slabs or creating leak-prone sink installations.
Proper installation delivers significant long-term value. A correctly installed granite countertop with undermount sink can last decades with minimal maintenance, providing both functional benefits and aesthetic appeal. The seamless integration of sink and countertop not only enhances your kitchen’s visual appeal but also creates a more hygienic, easily maintained surface that stands up to daily use. Investing time in proper installation techniques or selecting qualified professionals ensures you’ll enjoy these benefits for years to come.