The rising popularity of quartz countertops has transformed modern kitchen design, but their installation demands precision and expertise. Installing these engineered stone surfaces requires specialized tools, careful measurements, and professional-grade fabrication equipment to ensure perfect seams and long-lasting durability. Unlike traditional countertop materials, quartz slabs weigh approximately 25 pounds per square foot and require robust support structures and precise cabinet leveling before installation can begin.
Professional installers begin by creating detailed templates of your space, accounting for sinks, cooktops, and other fixtures. These measurements are then used to fabricate the quartz slabs in a controlled workshop environment using computer-guided cutting tools and diamond-tipped blades. The installation process itself typically takes 4-6 hours for an average kitchen, involving careful transportation of the pre-cut pieces, permanent adhesive application, and seam joining using color-matched epoxy.
Understanding this complex process helps homeowners make informed decisions about their kitchen renovation projects and ensures they partner with qualified professionals who have the right equipment and expertise to handle these premium surfaces properly.
Pre-Installation Planning and Preparation
Site Evaluation and Measurements
Accurate measurements are crucial for a successful quartz countertop installation, directly impacting both fit and quartz countertop cost considerations. Professional installers begin by taking detailed measurements of the existing cabinetry and space, using laser measuring tools and templates to ensure precision. They measure the length and width of all cabinet runs, accounting for any angles, corners, or curves in the design.
Special attention is paid to obstacles like walls, appliances, and plumbing fixtures that might affect the countertop installation. Installers also verify cabinet leveling and structural integrity, as uneven surfaces can compromise the final result. They document specific details such as sink placement, faucet holes, and any desired overhang measurements.
The evaluation includes checking for proper support requirements, especially around areas that will house heavy appliances or require seams. Digital templating technology is often used to create a precise layout, which is then reviewed with the homeowner to confirm all specifications before fabrication begins.

Material and Tool Requirements
To ensure a successful quartz countertop installation, you’ll need the following materials and tools:
Essential Materials:
– Quartz countertop slabs
– Silicone adhesive
– Epoxy
– Seam adhesive
– Shims
– Cleaner and degreaser
– Mounting brackets
– Clear tape for seam protection
Required Tools:
– Circular saw with diamond blade
– Level (both standard and laser)
– Measuring tape
– Pencil and marker
– Caulking gun
– Vacuum
– Clamps
– Seam setters
– Router with appropriate bits
– Safety squares and straight edges
Safety Equipment:
– Safety glasses
– Dust masks or respirators
– Work gloves
– Ear protection
– Steel-toed boots
– Knee pads
– First aid kit
Additional Equipment:
– A-frame or storage rack for transport
– Support beams
– Work tables
– Lifting straps
– Shop vacuum with HEPA filter
– Extension cords
– Proper ventilation equipment
Having these items ready before beginning the installation ensures a smooth, efficient process and helps maintain safety standards throughout the project.
Professional Installation Process
Cabinet Preparation
Proper cabinet preparation is crucial for a successful quartz countertop installation. First, remove all existing countertops, ensuring the cabinet tops are completely clear of debris and old adhesive. Use a putty knife and solvent if necessary to clean any remaining residue.
Inspect the cabinet boxes thoroughly for any structural issues. The cabinets must be level and sturdy enough to support the significant weight of quartz, which typically ranges from 20 to 25 pounds per square foot. Repair or reinforce any weak spots in the cabinet structure.
Using a level, check that all cabinet tops are perfectly flat and aligned. Shim the cabinets where necessary to achieve a completely level surface – even minor variations can cause problems with the final installation. Pay special attention to corners and seam locations, as these areas are particularly critical for proper support.
For peninsula or island cabinets, additional support may be needed. Install a solid plywood subtop (minimum 3/4 inch thick) across the cabinet frames to provide continuous support for the quartz surface. This helps distribute weight evenly and prevents stress points that could lead to cracks.
Finally, ensure all plumbing and electrical connections are properly marked and accessible. If modifications to cabinet interiors are needed for sink or cooktop installations, complete these before the countertop installation begins.
Template Creation and Fabrication
The template creation process begins with precise measurements of your cabinet layout. Professional fabricators use a combination of physical measurements and digital templating technology to create an exact replica of your countertop dimensions. This includes marking the locations of sinks, faucets, cooktops, and any other cutouts required.
During templating, fabricators account for overhangs, backsplashes, and seam placement. They also consider the cabinet structure to ensure proper support for the quartz slabs. Once measurements are complete, the template is transferred to the fabrication facility where the quartz slabs are cut.
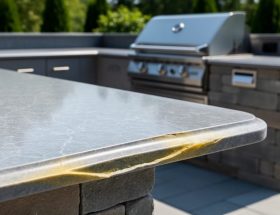
At the fabrication shop, computer-controlled cutting machines use diamond-tipped blades to precisely cut the quartz according to the template specifications. These machines operate with incredible accuracy, ensuring perfect cuts and polished edges. The fabricators can create various edge profiles, from simple eased edges to more elaborate ogee or waterfall designs.
Cutouts for sinks and appliances are made with specialized tools to prevent chipping or cracking. The edges of these cutouts are carefully polished to ensure a smooth finish. If the countertop design requires seams, the pieces are cut with perfectly matching edges that will align during installation.
After cutting, all surfaces are polished to achieve the desired finish, and quality control measures ensure every piece meets exact specifications before being transported to the installation site.
Transportation and Placement
The safe transportation and placement of quartz countertops requires careful planning and specialized equipment. Professional installers use A-frames or specialized racks to transport these heavy slabs vertically, which minimizes stress on the material and reduces the risk of cracking. The slabs are secured with straps and padding to prevent movement during transit.
Once on-site, installers employ professional installation techniques and specialized lifting equipment like suction cups and carrying clamps to safely move the countertops from the delivery vehicle to the installation area. A team of at least two installers is required to maneuver the slabs, ensuring proper weight distribution and control throughout the process.
Before final placement, installers carefully dry-fit the countertops to verify measurements and make any necessary adjustments. They use shims to ensure the surface is perfectly level and properly supported by the base cabinets. Special attention is paid to overhangs and seams, as proper positioning here is crucial for both aesthetics and structural integrity.
The team also checks for any obstacles like electrical outlets or plumbing fixtures that might interfere with placement. Once positioning is confirmed, the installers apply adhesive and carefully lower the countertops into their final position, making minor adjustments as needed to ensure perfect alignment.

Seaming and Securing
Once the pieces are properly positioned, the seaming process begins. Installers apply color-matched adhesive along the edges where two pieces meet. This specially formulated epoxy not only joins the sections but creates a nearly invisible seam when cured. The pieces are then pulled together using seam-setting clamps, which ensure tight, level alignment during the curing process.
To achieve a perfect seam, installers carefully clean the edges and use leveling tools to ensure both pieces are perfectly aligned. Any excess adhesive is immediately cleaned away before it hardens. The seaming process typically takes 15-30 minutes per joint, with the adhesive requiring several hours to fully cure.
After seaming, the countertop is secured to the cabinets using silicone adhesive and mechanical fasteners. Installers apply beads of silicone along the cabinet tops and place small brackets at strategic points. These brackets, combined with the silicone, prevent any movement or shifting of the countertop while allowing for natural expansion and contraction.
Special attention is paid to seams near sinks or cooktops, as these areas require additional reinforcement. Installers may use additional support brackets or specialized mounting hardware to ensure long-term stability. Once secured, the countertop is left undisturbed for 24 hours to allow all adhesives to fully cure before regular use.

Final Touches and Quality Checks
Sealing and Caulking
After securing the countertop sections, proper sealing and caulking are crucial final steps that ensure a professional finish and protect against moisture intrusion. The installer begins by thoroughly cleaning all seams and edges with denatured alcohol to remove any dust or debris.
For seams between countertop pieces, a color-matched seam adhesive is applied using a specialized seam setter tool. This creates a nearly invisible joint while providing a permanent, waterproof seal. The adhesive is allowed to cure completely before proceeding with additional steps.
Where the countertop meets the backsplash or wall, a high-quality silicone caulk matching the countertop color is applied in a continuous bead. The caulk is tooled smoothly to create a neat, professional appearance while ensuring proper adhesion. Special attention is paid to areas around sinks and faucets, where water exposure is most likely.
While quartz is naturally non-porous and doesn’t require sealing like natural stone, the edges and seams must be properly sealed to prevent moisture from getting underneath the countertop or between sections. Any gaps between the countertop and cabinetry are also sealed with silicone caulk to prevent spills from seeping underneath.
The caulk typically needs 24 hours to cure completely before the countertop can be exposed to water or cleaning products.
Final Inspection and Clean-up
The final inspection and clean-up phase is crucial for ensuring your quartz countertops meet quality standards and are ready for immediate use. Installers will thoroughly examine all seams, ensuring they’re properly filled and virtually invisible. They’ll check that all edges are smooth and consistent, and verify that all cutouts for sinks, faucets, and appliances are properly sealed.
Special attention is given to confirming that the countertops are perfectly level and securely attached to the base cabinets. Installers will test all overhangs for stability and verify that appropriate support brackets are correctly installed where needed. They’ll also inspect the backsplash installation, ensuring all joints are tight and properly sealed.
During clean-up, installers use specialized stone cleaners to remove any residual adhesive or caulk from the surface. They’ll wipe down the entire countertop area, including edges and backsplashes, with non-abrasive cloths. Any dust or debris from the installation process will be thoroughly cleaned from surrounding areas, including cabinets and floors.
Before considering the job complete, installers will provide you with care instructions and recommended cleaning products for your new quartz countertops. They’ll also perform a final walk-through with you, explaining any maintenance requirements and addressing any concerns you might have about your new installation.
Maintenance and Care Instructions
After installation, proper care ensures your quartz countertops maintain their beauty and durability for years to come. Maintaining quartz countertops is relatively simple, but following specific guidelines is essential for optimal results.
For daily cleaning, use a soft cloth or sponge with mild soap and warm water. Avoid harsh chemicals, abrasive cleaners, or scouring pads that could damage the surface. While quartz is highly resistant to stains, wipe up spills promptly, especially acidic substances like wine, coffee, or citrus juices.
Although quartz is heat-resistant, always use trivets or hot pads under hot cookware to prevent thermal shock. Cutting boards are essential to protect against scratches, as even though quartz is durable, direct knife use can damage the surface.
For stubborn stains or dried residue, use a plastic scraper rather than metal tools. Glass cleaner can be effective for removing fingerprints and maintaining shine, but avoid products containing bleach or ammonia.
Regular maintenance requires minimal effort – simply clean daily and inspect for any damage. If you notice any issues like chips or cracks, contact your installer immediately. With proper care, your quartz countertops will maintain their elegant appearance and functional performance for decades.
Installing quartz countertops requires careful planning, precise measurements, and professional expertise to ensure lasting quality. From initial templating to final sealing, each step demands attention to detail and proper execution. While DIY installation might seem tempting, professional installation ensures proper support, seamless joints, and warranty protection. Remember to choose a certified installer, prepare your space adequately, and maintain proper ventilation during installation. The entire process typically takes 1-2 days, with the countertops ready for use within 24 hours. For the best results, work with experienced professionals who understand the unique properties of quartz and follow manufacturer guidelines. By following these recommendations and maintaining your quartz countertops properly, you’ll enjoy their beauty and durability for many years to come.