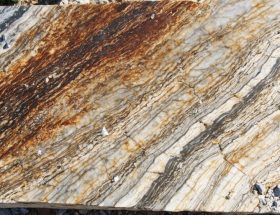
Transform rough stones into gleaming works of art through the time-honored practice of stone polishing, a craft that builds upon ancient stone finishing techniques. Starting with coarse 60-grit diamond pads, methodically progress through increasingly finer grits, maintaining consistent pressure and circular motions to eliminate scratches and develop a uniform surface. Each polishing stage reveals deeper layers of the stone’s natural beauty, gradually unveiling hidden patterns, colors, and crystalline structures that have remained dormant for millions of years. Whether working with granite, marble, or semi-precious gems, the fundamental principles of progressive refinement and careful attention to surface preparation determine the final luster and professional quality of your finished piece. Master these essential steps to achieve museum-quality results that showcase the stone’s inherent character while creating a durable, mirror-like finish that will endure for generations.
Essential Tools and Materials for Stone Polishing
Polishing Tools and Equipment
To achieve professional stone polishing results, you’ll need a specific set of tools and equipment. A variable-speed polisher or grinder serves as your primary tool, featuring speeds between 500-4000 RPM. Diamond polishing pads are essential and come in various grits, typically ranging from 50 to 3000, with each level progressively finer for achieving the desired finish.
Additional necessary tools include a water source for wet polishing, rubber gloves for hand protection, and safety goggles to shield your eyes from debris. A squeegee and clean rags help manage water and slurry during the process. For precise work, you’ll need a spray bottle for controlled water application and a measuring tool to assess the surface’s levelness.
For larger projects, consider investing in a heavy-duty floor polisher with adjustable head pressure. Supplementary items include knee pads for comfort during floor work, dust masks for respiratory protection, and non-slip shoes. Store your diamond pads in a designated carrying case to prevent damage and maintain organization between different grit levels.
Remember to maintain your tools properly, cleaning them after each use to extend their lifespan and ensure consistent results.

Abrasives and Polishing Compounds
Abrasives play a crucial role in achieving the perfect polish on stone surfaces. Starting with coarse-grit diamond pads (50-100 grit) helps remove deep scratches and level uneven surfaces. Progress through medium grits (200-400) to begin smoothing the stone, then move to fine grits (800-1500) for pre-polishing.
For the final polish, use ultra-fine diamond pads (3000+ grit) or specialized polishing powders. Common polishing compounds include aluminum oxide, tin oxide, and cerium oxide, each suited for different stone types. Aluminum oxide works well on granite, while cerium oxide excels on marble and softer stones.
Always match the abrasive to your stone type. Harder stones like granite require more aggressive compounds, while softer stones like marble need gentler options to prevent scratching. Use water as a lubricant with all abrasives to prevent heat buildup and ensure even distribution of the polishing compound.
For maintenance polishing, diamond-impregnated pads in 3000+ grit or specialized stone polishing creams can restore shine without aggressive grinding.

The Step-by-Step Polishing Process
Surface Preparation
Before beginning the polishing process, proper surface preparation is essential for achieving professional results, much like in historical stone craftsmanship. Start by thoroughly cleaning the stone surface using a pH-neutral stone cleaner to remove dirt, debris, and any existing sealants. Avoid using acidic or abrasive cleaners, as these can damage the stone’s surface.
Inspect the stone carefully for any cracks, chips, or deep scratches. These imperfections should be addressed before polishing begins. Small repairs can be made using an appropriate stone epoxy, while larger damages may require professional attention.
If the stone has stubborn stains, treat them with a poultice specifically designed for natural stone. Apply the poultice according to manufacturer instructions and allow it to draw out the stain completely before proceeding.
Ensure the work area is well-ventilated and protect surrounding surfaces with plastic sheeting or drop cloths. For vertical surfaces, tape off adjacent areas to prevent damage from polishing compounds.
Finally, let the stone surface dry completely before beginning the polishing process. Any moisture trapped in the stone can affect the quality of the polish and potentially damage your equipment. The surface should be clean, dry, and free from any residual cleaning products before proceeding to the next step.
Coarse Grinding
Coarse grinding marks the crucial first step in stone polishing, where the initial rough surface is gradually smoothed using abrasive materials. Begin with the coarsest grit available, typically 24 or 36 grit, working in systematic, overlapping passes across the stone’s surface. Apply steady, even pressure while keeping the stone and grinding pad consistently wet to prevent dust and ensure proper cutting action.
Move the grinder in a controlled back-and-forth or circular motion, covering approximately 2-3 feet at a time. Pay special attention to edges and corners, as these areas often require additional care. Continue grinding until all saw marks, scratches, and surface irregularities are removed, creating a uniform, matte appearance.
For larger surfaces, divide the area into manageable sections and work methodically to ensure consistent results. Monitor your progress frequently by wiping the surface clean and examining it under good lighting. Look for any remaining low spots or scratches that may need additional attention.
The stone should feel noticeably smoother after this stage, though it will still have a rough, hazy appearance. This is normal and expected, as finer grits in subsequent steps will progressively refine the surface. Clean the area thoroughly before moving to the next grit to prevent cross-contamination of abrasives.
Fine Grinding and Honing
After completing the initial grinding stages, fine grinding and honing are crucial steps that begin to reveal the stone’s natural beauty. This process typically involves using progressively finer diamond abrasives, starting with 400-grit and working up to 1500-grit or higher, depending on the desired finish.
Begin by thoroughly cleaning the stone surface to remove any residual coarse grit. Apply water consistently during this stage to prevent dust and ensure proper cooling. Work in systematic, overlapping patterns across the entire surface, maintaining even pressure throughout. Each grit level should completely remove the scratch pattern from the previous step before moving to the next finer grit.
For optimal results, use a variable-speed polisher set between 1000-1500 RPM during fine grinding. Keep the pad flat against the surface and avoid tilting, which can create unwanted scratches. Pay special attention to edges and corners, where inconsistent pressure can result in uneven finishing.
The honing process creates a smooth, matte finish that serves as the foundation for the final polish. You’ll notice the stone becoming increasingly smoother with each progression, though it won’t yet have the glossy shine of a polished surface. Small imperfections should gradually disappear, and the stone’s natural colors will become more pronounced, though still somewhat muted until the final polishing stage.
Final Polishing and Buffing
The final polishing stage is where your stone truly comes to life, transforming from a smooth surface into a brilliant, mirror-like finish. Begin with a 3000-grit diamond pad, applying gentle, consistent pressure in overlapping circular motions. Work systematically across the entire surface, ensuring no areas are missed. The stone should start developing a noticeable sheen at this stage.
Switch to a 6000-grit pad for enhanced clarity and reflection. This ultra-fine grit brings out the deep, natural colors and patterns within the stone, making it perfect for stone inlay applications and decorative features. Keep the surface consistently wet during this process, as proper lubrication prevents heat buildup and ensures optimal results.
For the final buff, use a premium stone polishing compound with a felt or leather pad. Apply the compound sparingly and work it into the surface until you achieve the desired glossy finish. Pay special attention to edges and corners, where maintaining consistent pressure can be challenging. Once complete, thoroughly clean the surface with a pH-neutral stone cleaner and dry it with a microfiber cloth to reveal the full brilliance of your polished stone.
Remember that different stone types may require slight variations in technique, but these final polishing steps are crucial for achieving that professional, lasting shine that will enhance your stone’s natural beauty for years to come.

Common Challenges and Solutions
Even experienced stone polishers encounter challenges during the finishing process. Understanding these common issues and their solutions can help you achieve better results and avoid costly mistakes.
Uneven Surface Texture: One of the most frequent challenges is achieving uniform polish across the entire surface. This often occurs due to inconsistent pressure application or rushing through grit progressions. To resolve this, ensure you’re maintaining steady pressure and thoroughly complete each grit stage before moving to the next finer grade.
Scratches and Swirl Marks: These unsightly marks typically appear when skipping grit levels or using contaminated abrasives. Always clean the stone surface between grit changes and follow the proper progression. For deeper scratches, you may need to step back to a coarser grit and work your way up again.
Etching and Dull Spots: Acidic substances can create dull spots on calcium-based stones like marble and limestone. Prevention is key – use pH-neutral cleaners and address spills immediately. To fix existing etch marks, you’ll need to repolish the affected area, starting with medium-grit abrasives.
Edge and Corner Problems: These areas are particularly challenging to polish evenly. Use specialized edge polishing pads and take extra care to maintain consistent pressure. Work at a slight angle rather than directly on the edge to prevent chipping.
Water Management Issues: Excessive water can lead to uneven results and potential equipment damage. Use appropriate water flow for your tools and ensure proper drainage. Too little water can cause heat buildup and stone damage, while too much dilutes polishing compounds and reduces effectiveness.
Poor Shine Development: Sometimes stones won’t achieve the desired glossiness. This usually indicates either incorrect grit progression or unsuitable polishing compounds for the specific stone type. Verify you’re using appropriate materials for your stone and consider using stone-specific polishing powders for the final polish.
Maintenance and Care
Maintaining your polished stone’s luster requires consistent care and attention to preserve its beauty and extend its lifespan. Regular cleaning with a pH-neutral stone cleaner prevents dulling and maintains the stone’s natural shine. Avoid using acidic cleaners, vinegar, or harsh chemicals that can etch the surface and damage decorative stone finishes.
For daily maintenance, dust mop or vacuum the surface to remove loose debris that could scratch the polish. Clean spills immediately to prevent staining, and use coasters under glasses and cups to protect against water marks and etching. Apply a high-quality stone sealer every 12-18 months, or more frequently for high-traffic areas, to protect against stains and maintain the polish.
Consider using felt pads under furniture legs to prevent scratches, and place mats at entrances to catch abrasive particles that could damage the finish. For stone countertops, use cutting boards to prevent scratches and avoid placing hot items directly on the surface.
If you notice minor scratches or dull spots, they can often be addressed with specialized stone polishing powders or compounds designed for touch-ups. However, deep scratches or extensive dulling may require professional restoration to maintain the stone’s optimal appearance.
Regular professional maintenance every few years can help preserve the stone’s beauty and prevent the need for more extensive restoration work. Keep detailed records of sealing dates and maintenance procedures to ensure proper care intervals are maintained.
Mastering the art of stone polishing requires attention to detail, proper technique, and the right tools. Throughout this guide, we’ve covered essential aspects from selecting appropriate equipment to executing professional-grade finishes. Remember that successful stone polishing depends on following a systematic approach, starting with coarse grits and progressively moving to finer ones.
Safety should always remain your top priority, including wearing proper protective gear and maintaining good ventilation. Regular maintenance of your polished stone surfaces will extend their lifespan and preserve their lustrous appearance. For best results, always test your chosen polishing method on a small, inconspicuous area first.
Whether you’re a DIY enthusiast or a professional, patience is key to achieving the desired finish. Take time to understand your stone type and its specific requirements. While some projects might be suitable for DIY efforts, complex or valuable stone surfaces may benefit from professional expertise.
By following these guidelines and maintaining consistent care, your polished stone surfaces will continue to enhance the beauty and value of your space for years to come.