Protect your natural stone investment with proper sealing techniques that preserve its timeless beauty and prevent costly damage. Natural stone tiles – from marble and granite to travertine and slate – require specialized sealers to guard against stains, etching, and moisture penetration. Applying the right sealer creates an invisible barrier that maintains the stone’s natural appearance while extending its lifespan and reducing maintenance requirements. Whether you’re installing new stone tile or maintaining existing surfaces, understanding proper sealing procedures ensures your natural stone retains its luxurious appeal for years to come.
Testing your stone’s absorption rate determines the type and amount of sealer needed – simply splash water on the surface and observe. If the stone darkens immediately, it requires a robust sealer. For optimal protection, apply penetrating sealers that bond with the stone’s pores rather than surface sealers that merely coat the top layer. This professional-grade approach delivers superior stain resistance while allowing the stone to breathe naturally.
Why Natural Stone Needs Sealing
Understanding Stone Porosity
Natural stone varies significantly in its porosity, which directly affects its need for sealing. Dense stones like granite typically have low porosity rates of 0.4-1.5%, making them more resistant to staining. In contrast, limestone and travertine can have porosity rates ranging from 3-12%, requiring more frequent sealing to maintain protection.
Marble, a popular choice for luxury installations, has moderate porosity levels between 0.5-3%, depending on the specific variety. Slate exhibits variable porosity, usually between 0.4-5%, with some types being more porous than others. Sandstone is among the most porous natural stones, with rates often exceeding 15%, demanding rigorous sealing protocols.
Understanding your stone’s porosity is crucial for determining sealing requirements. A simple water test can help: place a few drops of water on the stone surface. If the water absorbs quickly (within 5 minutes), the stone has high porosity and needs frequent sealing. If water beads remain on the surface longer, the stone has lower porosity and requires less frequent sealing.
Regular testing and observation of your stone’s water absorption rate will help maintain optimal protection and preserve its natural beauty.

Common Threats to Unsealed Stone
Unsealed natural stone is highly susceptible to various forms of damage that can permanently affect its appearance and integrity. The porous nature of stone materials creates a vulnerability to erosion and damage from everyday substances. Common liquid stains from wine, coffee, oils, and acidic beverages can quickly penetrate the surface, leaving lasting discoloration that becomes increasingly difficult to remove over time.
Etching poses another significant threat, particularly to calcium-based stones like marble and limestone. When acidic substances contact these surfaces, they create dull spots and surface damage that cannot be wiped away. Even seemingly harmless items like lemon juice or vinegar can permanently alter the stone’s finish.
Water absorption is also a major concern, potentially leading to deeper structural issues. In bathroom and kitchen applications, prolonged exposure to moisture can result in efflorescence, spalling, and deterioration of the stone’s surface. Additionally, harsh cleaning products and abrasive materials can scratch and wear down unsealed stone, compromising both its aesthetic appeal and durability over time.
Choosing the Right Sealer
Penetrating vs. Topical Sealers
When selecting a sealer for natural stone tile, you’ll primarily choose between penetrating and topical sealers, each offering distinct advantages for different applications. Penetrating sealers, also known as impregnating sealers, sink deep into the stone’s pores to create an invisible barrier that repels water and stains while maintaining the stone’s natural appearance. These sealers are ideal for high-traffic areas and outdoor applications because they don’t change the stone’s slip resistance or surface texture.
Topical sealers, conversely, form a protective layer on the stone’s surface, providing a visible finish that can range from matte to high-gloss. While they offer excellent protection against spills and stains, they may alter the stone’s natural appearance and can show wear patterns in heavily trafficked areas. These sealers are particularly suitable for indoor applications where you want to enhance the stone’s color or achieve a specific aesthetic finish.
For most natural stone applications, penetrating sealers are the preferred choice as they offer long-lasting protection without altering the stone’s inherent characteristics. However, topical sealers might be more appropriate for specific situations, such as creating a wet look on slate or protecting highly porous stones in commercial kitchen environments. The choice ultimately depends on factors like stone type, location, desired appearance, and expected wear patterns.

Stone-Specific Sealer Requirements
Different types of natural stone require specific sealers to ensure optimal protection and longevity. Marble, being calcium-based and highly porous, needs a penetrating sealer that provides stain resistance while maintaining its natural finish. For polished marble, use a premium-grade impregnating sealer that won’t alter the stone’s reflective surface.
Granite, though generally denser than marble, still benefits from sealing. Choose a solvent-based penetrating sealer for darker granites, while lighter varieties may require a fluorocarbon aliphatic resin sealer for enhanced protection against oil-based stains.
Travertine’s naturally porous surface demands special attention. Select a water-based penetrating sealer that fills the stone’s numerous pores while allowing it to maintain its natural vapor transmission. For honed travertine, consider a color-enhancing sealer to bring out the stone’s warm tones.
Slate requires a penetrating sealer that can handle its layered structure. Look for products specifically formulated for dense stones that won’t create a surface film. For sandstone and limestone, choose pH-neutral sealers that won’t react with the stone’s mineral content.
Quartzite, despite its durability, benefits from a high-quality penetrating sealer to protect against staining. Opt for products that offer both oil and water resistance without changing the stone’s natural appearance.
Always test your chosen sealer on a small, inconspicuous area first, as different stone varieties, even within the same category, can react differently to various sealer formulations.
Step-by-Step Sealing Process
Surface Preparation
Proper surface preparation is crucial for achieving optimal sealing results. Begin by cleaning and preparing stone surfaces thoroughly to ensure the sealer bonds effectively. Remove all dirt, dust, and debris using a pH-neutral stone cleaner and allow the surface to dry completely for at least 24 hours.
Check for any existing sealers by performing a water drop test. Place a few drops of water on the stone surface – if the water beads up, there’s likely an existing sealer that needs to be stripped. Use a professional-grade stone stripper following manufacturer instructions to remove old sealers.
Repair any cracks, chips, or damage before sealing. Small repairs can be made using color-matched epoxy or stone-specific repair compounds. For larger damage, consult a stone restoration professional.
Test the stone’s absorption rate in an inconspicuous area by applying a few drops of water. If the stone quickly absorbs the water, it’s ready for sealing. If water beads or sits on the surface, additional cleaning or stripping may be needed.
Ensure proper ventilation in the work area and maintain a consistent room temperature between 50-80°F (10-27°C). Cover adjacent surfaces to protect them from sealer overspray or drips.
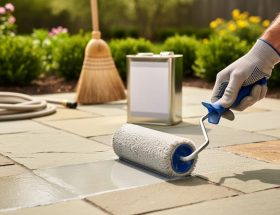
Application Techniques
Begin by thoroughly cleaning the stone surface and allowing it to dry completely. Apply the sealer using a clean, lint-free cloth, foam brush, or paint roller, depending on the surface area. Work in small, manageable sections of about 3-4 square feet at a time to ensure even coverage.
For polished stone surfaces, apply the sealer in thin, even strokes, making sure to avoid pooling or streaking. On rougher textures like tumbled or split-faced stone, use a slightly more saturated application to ensure proper penetration into the porous surface. Always work the sealer into the stone using circular motions for optimal absorption.
Allow the first coat to penetrate for 10-15 minutes, then wipe away any excess sealer with a clean, dry cloth before it dries. This prevents a hazy residue from forming on the surface. Most natural stones require two coats for adequate protection, but always follow the manufacturer’s specific recommendations.
For vertical surfaces, apply from bottom to top to prevent drip marks. When sealing grout lines, use a small brush to ensure thorough coverage. Wait at least 30 minutes between coats, and allow the final coat to cure for 24-48 hours before exposing the surface to water or heavy traffic.
Test the sealer’s effectiveness by placing a few drops of water on the surface – if the water beads up, the sealing is successful. If it absorbs quickly, additional coats may be necessary.

Curing and Protection
Proper curing time is essential for ensuring optimal sealer performance on natural stone tiles. After application, allow the sealer to cure for 24-48 hours before exposing the surface to regular foot traffic. For areas that will experience heavy use or water exposure, extend the curing period to 72 hours for maximum protection.
During the curing process, avoid placing any furniture, rugs, or heavy objects on the sealed surface. Keep the area completely dry and free from spills or cleaning products. If water contact occurs accidentally, blot it immediately with a clean, dry cloth to prevent potential sealer damage.
For exterior applications, protect the newly sealed stone from rain and direct sunlight for at least 24 hours. Consider using temporary covering or scheduling the sealing project when weather conditions are favorable. Maintain ambient temperatures between 50-80°F (10-27°C) throughout the curing period for optimal results.
Once fully cured, introduce regular use gradually. For the first week, clean only with a dry dust mop or soft cloth. Avoid harsh cleaning products for at least 14 days after sealing. This careful approach during the initial period helps establish a durable protective barrier that will maintain your stone’s beauty and integrity for years to come.
Remember that different sealers may have specific curing requirements. Always consult the manufacturer’s guidelines for precise timing and care instructions.
Maintenance and Resealing
Daily Care Tips
Proper daily care is essential for maintaining sealed stone surfaces and extending the life of your natural stone tiles. Start each day by sweeping or dust-mopping to remove loose debris that could scratch the surface. For regular cleaning, use a pH-neutral stone cleaner and warm water, avoiding acidic or abrasive cleaning products that can damage the sealant and stone.
Clean spills immediately to prevent staining, blotting rather than wiping to avoid spreading the liquid. Use coasters under glasses and protective pads under furniture legs to prevent scratches and wear. Place mats near entrances to minimize tracked-in dirt and moisture.
Monthly, inspect the stone’s surface by performing a water test – if water no longer beads up, it’s time to reseal. In high-traffic areas, consider more frequent inspections. Never use vinegar, lemon juice, or other acidic cleaners, as these can etch the stone and deteriorate the sealant. For stubborn stains or maintenance concerns, consult a stone care professional rather than experimenting with harsh chemicals.
When to Reseal
The frequency of resealing natural stone tile depends on several factors, including stone type, usage, and exposure to wear. A simple water test can help determine if resealing is needed: sprinkle a few drops of water on the stone surface and observe. If the water beads up, your seal is still effective. However, if the water absorbs within 5-10 minutes, it’s time to reseal.
High-traffic areas typically require more frequent resealing, sometimes annually, while less-used spaces might go 3-5 years between applications. Kitchen countertops and bathroom surfaces often need attention every 12-18 months to prevent organic staining and maintain protection.
Watch for these key indicators that signal the need for resealing:
– Stone appears darker or shows water marks
– Spills leave visible stains even after cleaning
– Surface feels rough or appears dull
– Water no longer beads on the surface
– Stone shows increased sensitivity to etching
Regular maintenance and prompt resealing when needed will help preserve your stone’s beauty and extend its lifespan.
Proper sealing of natural stone tile is not just a maintenance task – it’s an essential investment in protecting and preserving your stone’s beauty and longevity. Throughout this guide, we’ve explored how sealing creates a protective barrier against stains, moisture, and everyday wear while enhancing the stone’s natural characteristics.
Remember that different types of stone require different approaches to sealing, and choosing the right sealer is crucial for optimal results. Whether you’re working with porous marble, dense granite, or delicate travertine, following the correct preparation steps, application techniques, and maintenance schedule will ensure lasting protection.
Regular maintenance and timely resealing are key factors in extending the life of your natural stone surfaces. By monitoring your stone’s water absorption and maintaining proper cleaning routines, you can determine when it’s time to reseal before any damage occurs.
While DIY sealing is possible for many homeowners, don’t hesitate to consult professionals for challenging installations or valuable stone surfaces. Their expertise can prevent costly mistakes and ensure the best possible outcome for your investment.
By implementing the guidelines and best practices outlined in this article, you can maintain the beauty and integrity of your natural stone tiles for years to come, protecting both their aesthetic appeal and material value.