Quartz countertop seams are unavoidable in most installations, but their visibility depends entirely on three controllable factors: strategic placement, pattern selection, and fabricator skill. Every quartz slab measures approximately 120 by 56 inches, making seams necessary for kitchens with longer runs, L-shapes, or islands. The difference between a nearly invisible seam and an obvious eyesore lies in understanding how light, pattern, and color interact at the joint.
Position seams away from primary work zones and sightlines. Place them near sinks or cooktops where cutouts naturally draw the eye elsewhere, and avoid centering them in long, uninterrupted spans where they become focal points. The 25-percent rule applies: seams placed within the first or last quarter of a countertop run appear less obvious than those in the middle third.
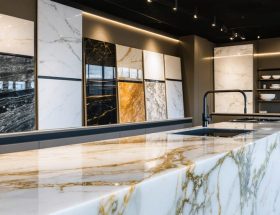
Select patterns and colors that naturally camouflage seam lines. Solid colors and uniform patterns reveal even minor misalignments, while busy veining, mottled designs, and darker tones mask joints effectively. Book-matching—mirroring slabs at the seam—works only with dramatic veining; subtle patterns emphasize rather than hide the transition.
Demand fabricator accountability through seam inspection before installation. Professional-grade seams require color-matched epoxy, perfectly flush surfaces within 1/32-inch tolerance, and tight joints no wider than a credit card. Visit the fabrication shop to approve seam placement on your actual slabs, as template drawings cannot predict how patterns will meet.
Understanding these fundamentals transforms seams from installation compromises into planned, nearly imperceptible transitions that preserve your countertop’s visual continuity.
Understanding Why Quartz Countertops Need Seams
Standard Quartz Slab Dimensions and Limitations
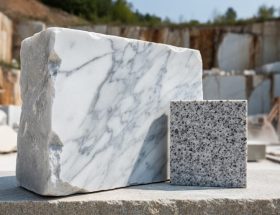
Most quartz slabs manufactured today come in standard dimensions of approximately 120 inches long by 56 inches wide, though some fabricators may have access to jumbo slabs measuring up to 130 inches by 65 inches. These dimensional constraints are primarily what necessitate seams in countertop installations.
Understanding these limitations helps explain seam placement in your kitchen design. For example, a typical 10-foot countertop run can usually be accommodated with a single standard slab without seaming. However, L-shaped configurations, island perimeters exceeding 10 feet, or layouts with extended peninsula areas will require at least one seam to complete the installation.
The width limitation of 56 inches becomes particularly relevant for kitchen islands. If your island design includes an overhang for seating that extends the total depth beyond this measurement, a seam becomes unavoidable. Similarly, full-height backsplash applications or waterfall edge designs may require additional seams depending on the overall height requirements.
While jumbo slabs offer some flexibility in reducing seam quantity, they come with premium pricing and may present challenges during transportation and installation. Your fabricator will assess your specific layout dimensions during templating to determine the optimal slab configuration that minimizes visible seams while working within these standard size parameters.
When Seamless Installation Is Possible
While most quartz countertop installations require seams, certain configurations allow for completely seamless surfaces. Small bathroom vanities typically fall within the single-slab threshold, as most vanity tops measure between 30 to 60 inches wide, well within standard quartz slab dimensions of approximately 55 by 120 inches. Similarly, powder room vanities and compact wet bars can often accommodate seamless installation.
Bar tops and kitchen islands with limited dimensions also present opportunities for single-slab solutions. A narrow galley kitchen with countertops measuring 6 feet or less can sometimes achieve a seamless look, provided the layout doesn’t include complex corners or unusual angles. Small prep stations, coffee bars, and dedicated baking centers frequently work as standalone seamless features.
The feasibility depends on three factors: the actual measurements of your space, the specific slab size available from your chosen manufacturer, and the countertop configuration. Even in these ideal scenarios, you’ll need to account for any cooktop or sink cutouts, which can affect structural integrity and may necessitate seams for support. Always consult with your fabricator early in the planning process, as they can confirm whether your specific project qualifies for seamless installation based on precise measurements and the quartz brand you’ve selected.
Strategic Seam Placement: The Planning Phase
Optimal Seam Locations in Kitchen Layouts
Strategic seam placement can significantly reduce visibility and maintain the aesthetic flow of your quartz countertops. The goal is to position seams where they blend naturally with the kitchen layout or occur at functional interruptions.
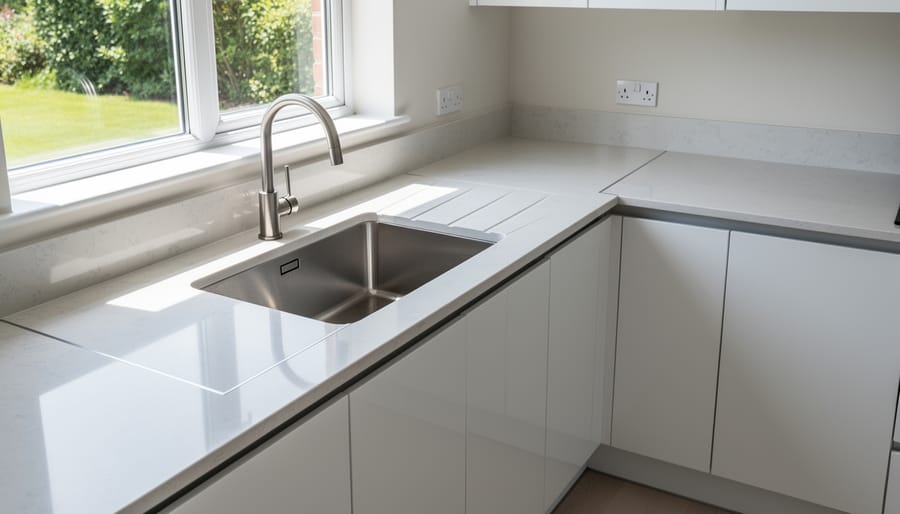
Sink cutouts represent ideal seam locations because the cutout itself creates a visual break in the surface. Fabricators can position seams just behind the sink, where they’re partially hidden and less noticeable during everyday use. This approach works particularly well for undermount sinks where the seam sits beneath the bowl area.
Cooktop and range areas offer another strategic location for seams. The appliance cutout provides a natural dividing point, and the seam can be placed adjacent to or behind the cooking surface where it’s obscured by the appliance itself. This positioning is especially practical in long countertop runs where seams are unavoidable.
Corners present excellent opportunities for seam placement, as they occur at natural transition points in the countertop layout. An L-shaped kitchen can accommodate seams at the corner junction, where the directional change makes them less perceptible. The eye naturally accepts breaks at these architectural angles.
For extended straight runs, position seams at functional zones like the transition between prep and serving areas. Avoid placing seams in high-visibility locations such as directly in front of the sink or at the center of long, uninterrupted expanses where they become focal points.
Experienced fabricators evaluate your specific kitchen layout to determine optimal seam locations that balance structural requirements with aesthetic considerations, ensuring seams enhance rather than detract from your countertop investment.
Locations to Avoid for Seams
Strategic seam placement requires understanding which locations create both functional and aesthetic problems. Certain areas should be avoided whenever possible to ensure your countertops perform well and look their best.
High-stress zones pose the greatest risk for seam failure. Never place seams directly adjacent to cooktops or ranges, where thermal expansion and contraction can stress the joint. Similarly, avoid positioning seams immediately next to sink cutouts, as these areas experience constant moisture exposure and physical stress from dish stacking and cleaning activities.
Primary work zones demand careful consideration. A seam placed in the center of your main prep area creates visual disruption and provides an unnecessary crevice where food particles can accumulate. The space directly in front of your sink and the landing zone beside your range should remain seam-free when possible.
Corner placements present another challenge. While corners might seem inconspicuous, seams positioned at inside or outside corners experience increased mechanical stress and typically show more visible misalignment over time. The compound angles make achieving perfectly flush surfaces more difficult.
Avoid placing seams where they’ll align with cabinet door edges or other vertical lines in your kitchen. These parallel lines draw attention to the seam rather than disguising it. Instead, work with your fabricator to position seams diagonally across visual pathways or in naturally shadowed areas between appliances.
Working with Your Fabricator Early
Bringing your fabricator into the conversation during the early design phase can make a significant difference in minimizing seam visibility and placement issues. Many homeowners wait until after finalizing their kitchen layout to contact a fabricator, only to discover that their design creates unavoidable seam challenges. Instead, schedule a consultation before locking in your countertop dimensions and exploring quartz design options.
Experienced fabricators bring valuable insight about current slab availability, typical slab dimensions, and practical layout constraints that affect seam placement. They can review your kitchen plans and suggest modifications that may eliminate seams entirely or relocate them to less visible locations. For example, slight adjustments to island dimensions or the positioning of cooktops and sinks can sometimes mean the difference between one seam and none.
This collaborative approach also allows fabricators to advise on pattern selection based on what’s actually in stock. Some quartz patterns are easier to match across seams than others, and your fabricator can guide you toward options that will work best with your specific layout requirements while maintaining the aesthetic you envision.
How Quartz Pattern and Color Affect Seam Visibility
Best Quartz Patterns for Concealing Seams
Strategic pattern selection significantly impacts seam visibility in quartz countertops. Understanding which designs naturally camouflage seams helps homeowners and designers make informed decisions during the planning phase.
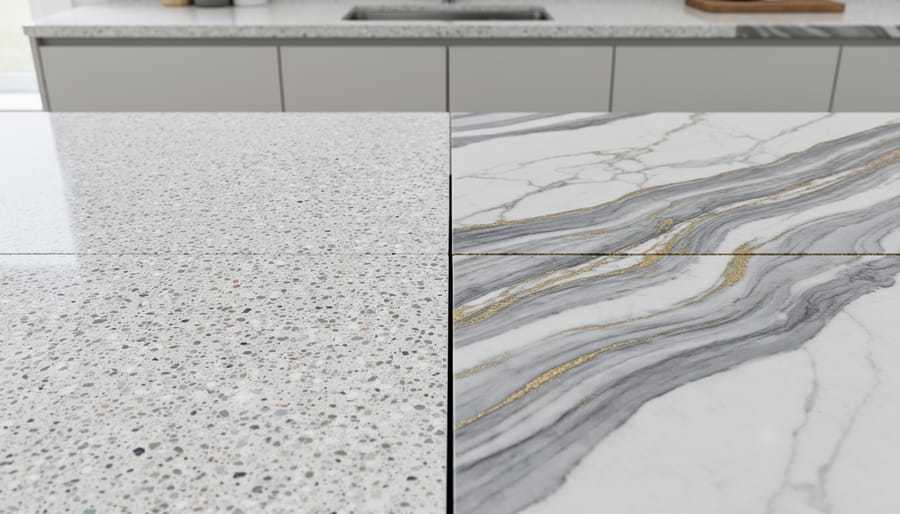
Busy, multi-colored patterns with abundant movement rank among the most forgiving options for concealing seams. Designs featuring speckles, veining in multiple directions, and varied particle sizes create visual complexity that draws the eye away from seam lines. The inherent randomness in these patterns makes it difficult to distinguish where one slab ends and another begins, particularly when fabricators achieve proper alignment.
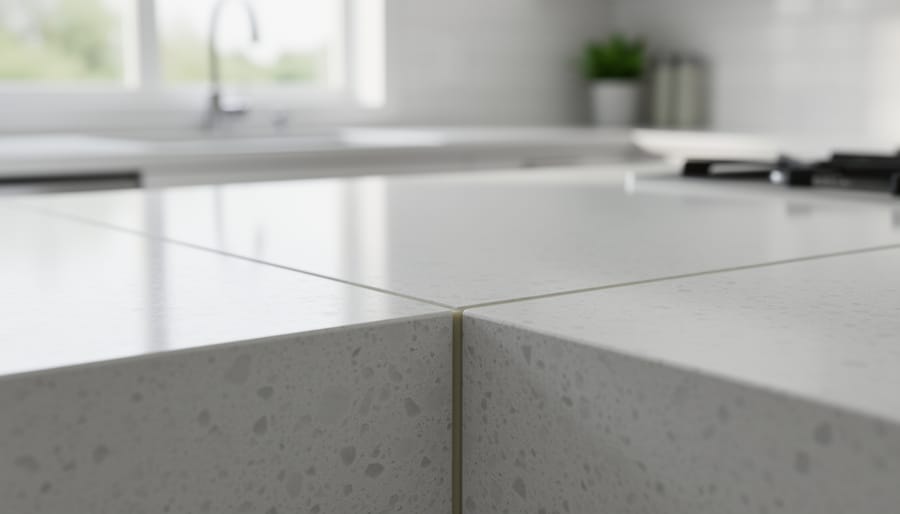
Small-scale patterns with consistent repetition throughout the surface also excel at hiding seams. Unlike large-format designs where pattern interruptions become obvious, these finely detailed surfaces maintain continuity across joints. Salt-and-pepper patterns, tight granular designs, and uniform speckled finishes fall into this category and remain popular choices for kitchens where multiple seams are unavoidable.
Surprisingly, solid colors without distinct veining can effectively minimize seam appearance when choosing quartz colors. Pure whites, consistent grays, and uniform blacks create a monolithic appearance where properly executed seams blend seamlessly. The absence of pattern matching requirements means fabricators focus entirely on achieving tight joints and color consistency.
Conversely, dramatic veining patterns, particularly those with linear movement or large-scale designs, present the greatest challenge. Marble-look quartz with bold veining requires meticulous bookmatching efforts, and even skilled fabrication cannot always achieve invisible seams. These statement patterns work best in smaller installations where seams can be eliminated entirely or strategically positioned in less visible locations.
Challenging Patterns That Highlight Seams
Certain quartz patterns naturally draw attention to seams, making them more challenging to conceal regardless of fabrication quality. Bold veining patterns, particularly those with dramatic contrasting colors like dark veins on white backgrounds, create visual lines that rarely align perfectly at seams. When the veining doesn’t flow continuously across the joint, the interruption becomes immediately noticeable.
Large-scale patterns present similar challenges. Designs featuring oversized marble-look veining or expansive geological movement often span dimensions larger than standard slab sizes, making seamless continuity virtually impossible. The human eye naturally follows these dramatic patterns and easily detects where they break or restart.
Book-matching becomes particularly difficult with patterns featuring random, non-linear movement. While book-matching works well with predictable veining, chaotic or multi-directional patterns found in some exotic quartz designs create mismatches that highlight rather than hide seams. Patterns with distinct clusters, concentrated veining in specific areas, or strong directional flow also resist matching efforts.
If you’re drawn to these dramatic patterns, plan seam locations strategically in less visible areas and maintain realistic expectations. Consider consulting with your fabricator during pattern selection to understand how your chosen design will perform at seams, potentially saving disappointment during installation.
The Role of Book-Matching and Vein Matching
Book-matching and vein-matching are fabrication techniques where installers attempt to align patterns across seams for visual continuity. With natural stone like granite or marble, this is often achievable because adjacent slabs from the same block share similar veining. However, quartz countertops present different challenges. Since quartz is an engineered material manufactured in batches, pattern consistency exists within each slab but rarely between different slabs, even from the same production run.
For solid colors and subtle patterns, seam visibility is naturally minimized, making matching less critical. With heavily veined or patterned designs, achieving perfect book-matching is typically unrealistic. Fabricators can orient slabs to create general visual harmony and align dominant pattern directions, but expecting mirror-image matching sets unrealistic expectations. Some premium quartz manufacturers offer jumbo slabs that reduce seam frequency, which proves more effective than attempting complex matching. When selecting patterned quartz, view multiple slabs during templating to understand natural variation and discuss realistic alignment possibilities with your fabricator upfront.
The Fabrication Process: What Makes a Quality Seam
Professional Cutting and Edge Preparation
The quality of quartz countertop seams depends heavily on precision cutting and meticulous edge preparation. Professional fabricators use CNC machines or bridge saws equipped with diamond blades to achieve cuts accurate within 1/32 of an inch. This level of precision is essential because even minor deviations become visible gaps once slabs are joined together.
Edge preparation involves more than straight cuts. Fabricators must ensure cut edges are perfectly square and smooth, typically polishing them to match the slab’s finished surface. Any chips, rough spots, or irregularities along the edge will prevent proper adhesion and create visible imperfections in the seam line. Professional quartz installation techniques include dry-fitting pieces before final installation to verify alignment and make necessary micro-adjustments.
The cut edges must also be perfectly straight without bowing or curvature, which requires skilled handling during fabrication and transport. Many fabricators apply support rails to large pieces to prevent flexing that could compromise edge straightness. When edges meet precisely without gaps, the resulting seam becomes nearly invisible, especially after proper filling and polishing. This attention to cutting accuracy separates amateur installations from professional-grade results.
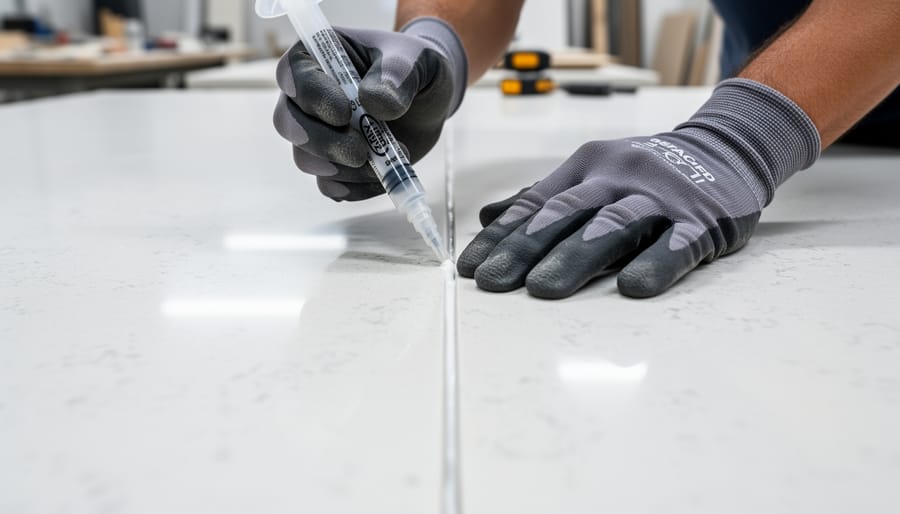
Adhesive Selection and Application
Professional quartz seam joining requires specialized two-part epoxy adhesives specifically formulated for engineered stone. These adhesives cure to create bonds stronger than the material itself, ensuring structural integrity and longevity. The most critical aspect of adhesive selection is color matching—manufacturers offer extensive palettes of tinted epoxies to blend seamlessly with various quartz patterns and shades.
Fabricators typically mix epoxy colors on-site to achieve precise matches, often combining multiple pigments to replicate the base color and veining characteristics of your specific slab. For complex patterns, achieving an invisible seam requires careful color layering and an understanding of how the adhesive will cure, as some epoxies shift slightly in tone during the hardening process.
Application involves applying a thin, consistent bead of epoxy along both seam edges, then carefully bringing the pieces together with controlled pressure. Professional installers use specialized seam-pulling equipment to create tight joints while maintaining perfect alignment. Excess adhesive is removed immediately, and the seam is polished flush with the surrounding surface once cured. The entire process must occur within the epoxy’s working time, typically 5-10 minutes, making precision and experience essential for optimal results.
Finishing and Polishing Seam Lines
After the adhesive cures, fabricators use specialized grinding and polishing tools to refine the seam area. The process begins with coarse-grit diamond pads to level any height differences between slabs, ensuring a flush transition. Progressively finer grits smooth the surface, removing visible scratches and blending the seam with the surrounding countertop.
Professional fabricators match the factory finish by using the same polishing sequence as the original manufacturing process. For honed finishes, this means stopping at a lower grit level, while polished surfaces require finer pads to achieve the characteristic glossy sheen. The goal is making the seam visually disappear by matching both the texture and reflectivity of the adjacent areas.
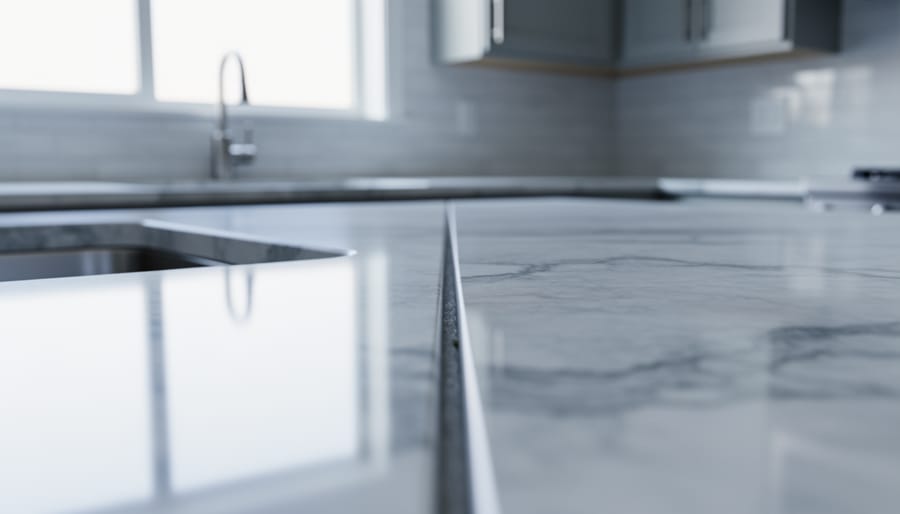
Proper polishing eliminates the ridge or valley that can occur at seam lines, creating a seamless feel when running your hand across the joint. Quality workmanship ensures you won’t detect the seam by touch, only by close visual inspection of the color or pattern alignment.
Realistic Expectations: What a Good Seam Looks Like
The ‘Lipstick Test’ and Acceptable Standards
Industry professionals use several benchmarks to evaluate seam quality, with the “lipstick test” being the most widely recognized standard. This practical test involves attempting to slide a credit card into the seam gap. If the card doesn’t fit, the seam meets acceptable industry standards. Professional installers typically aim for seams with gaps no wider than 1/32 of an inch, though the best craftsmen achieve nearly invisible joints.
A properly executed seam should feel smooth to the touch when running your finger across it, with no discernible lip or height difference between slabs. The seam adhesive should be color-matched to the quartz material, making it blend seamlessly with the countertop’s pattern and veining. While slight color variation may occur due to the adhesive’s translucent nature, it should not be immediately noticeable from normal viewing distances.
What constitutes acceptable also depends on the quartz pattern itself. Busy patterns with significant movement naturally disguise seams better than solid colors or subtle designs. For solid-color quartz, expect more visible seams compared to patterns with heavy veining or flecking. Understanding these realistic expectations helps you evaluate your installer’s work objectively and know when to request corrections versus accepting normal industry standards.
Red Flags That Indicate Poor Workmanship
Even professionally installed quartz countertops can occasionally suffer from poor craftsmanship. Recognizing these red flags helps you ensure quality work before making final payments. The most obvious issue is visible gaps between seam edges, which should never exceed 1/16 inch and ideally remain almost imperceptible. These gaps not only look unprofessional but also trap debris and moisture.
Uneven surfaces at seams represent another serious problem. Run your hand across the seam—you shouldn’t feel any noticeable lip or height difference between slabs. This indicates improper leveling during installation and affects both aesthetics and functionality.
Pattern misalignment is particularly problematic with veined or patterned quartz. While perfect matching isn’t always possible due to manufacturing variations, installers should attempt to align prominent veins and patterns for visual continuity. Completely disregarded patterns suggest rushed or careless work.
Color-mismatched adhesive stands out as an amateur mistake. The epoxy or resin used in seams should be carefully color-matched to your specific quartz material. Visible white, gray, or yellowed adhesive lines indicate either wrong product selection or sloppy application.
Finally, watch for chipped edges near seams or excessive polishing marks that create dull spots around the joint. These issues reveal handling damage or inadequate finishing work that professional installers should avoid.
Comparing Quartz Seams to Other Countertop Materials
When considering countertop seams, understanding how different materials compare helps set realistic expectations for your project. Each material presents unique characteristics that affect seam visibility and long-term performance.
Quartz typically offers more predictable seaming results than natural stone options. Since quartz is engineered with consistent patterns and colors throughout each slab, fabricators can achieve better pattern continuity across seams. When you compare quartz to granite, you’ll notice granite’s natural veining patterns make perfect seam alignment nearly impossible, as no two slabs are identical. This often results in more noticeable transitions, particularly with heavily veined or patterned granite.
Marble presents similar challenges to granite, with the added consideration of its softer composition. While marble seams can be expertly matched by skilled fabricators, the material’s unique veining means each seam requires careful planning. Additionally, marble’s porosity makes it more susceptible to staining around seam areas if not properly sealed.
Solid surface materials like Corian offer the most seamless appearance among countertop options. These materials can be chemically bonded and sanded smooth, creating nearly invisible seams. However, solid surface countertops lack the depth, luxury appearance, and heat resistance that quartz and natural stone provide.
Quartz strikes an effective balance in this comparison. While seams remain visible upon close inspection, they’re generally less noticeable than natural stone seams and more durable than solid surface options. The material’s non-porous nature means seams won’t trap moisture or bacteria, and properly executed joints maintain structural integrity without special maintenance requirements. For homeowners prioritizing both aesthetics and practicality, quartz seams represent a reliable middle ground.
While seams in quartz countertops may initially seem like a necessary compromise, understanding their role in proper installation helps set appropriate expectations. The reality is that most kitchen configurations will require at least one seam due to the dimensional limitations of quartz slabs, typically measuring 120 by 55 inches. Rather than viewing seams as flaws, consider them a functional aspect of professional fabrication that enables the installation of this durable, beautiful surface in your space.
The key to satisfaction with your quartz countertops lies in strategic planning and partnering with experienced fabricators. Thoughtful seam placement in low-visibility areas, careful attention to pattern and vein matching, and selecting designs that naturally camouflage seam lines can dramatically reduce their visual impact. Modern fabrication techniques and high-quality adhesives have made seams increasingly inconspicuous when executed properly.
Working closely with your fabricator during the templating phase allows you to make informed decisions about seam locations and understand any limitations specific to your chosen material. Remember that certain quartz patterns, particularly those with bold veining or dramatic movement, may present greater challenges for seamless matching than subtle, consistent designs.
When installed by skilled professionals using proper techniques, seams should be barely perceptible from normal viewing distances and won’t compromise the structural integrity or overall aesthetic appeal of your countertops. The investment in experienced fabrication pays dividends in both the immediate visual result and long-term performance. With realistic expectations and quality workmanship, your quartz countertops will deliver the stunning, functional surface you envision for years to come.