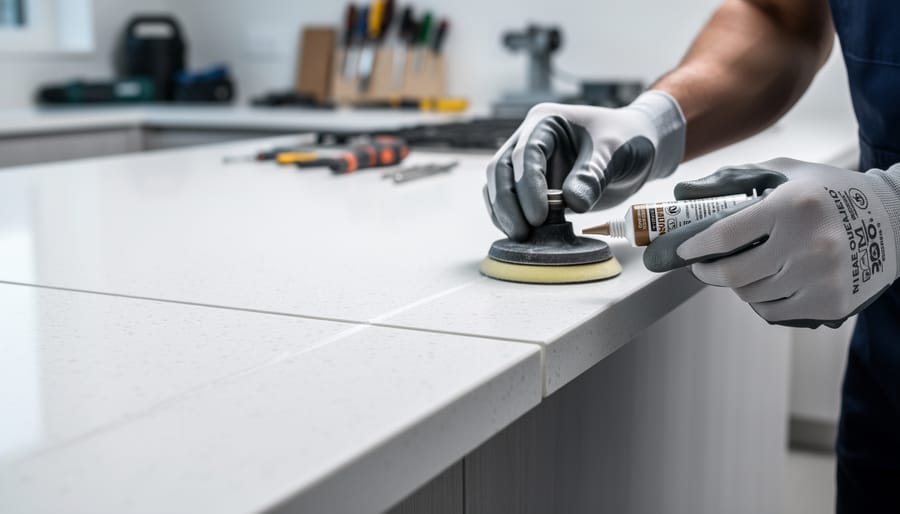
Detailing quartz countertop sections properly means managing seams, edges, and joints so they’re structurally sound and nearly invisible. The process requires precise templating, professional-grade adhesive, careful color matching, and mechanical polishing to blend seams into the surrounding surface. When done correctly, section details can make a 15-foot run of quartz look like a single continuous slab, while poor execution leaves visible lines that compromise both appearance and resale value.
Section detailing matters because quartz slabs have physical size limits, typically maxing out around 120 by 60 inches. Any kitchen larger than a basic galley layout will need multiple pieces joined together. The junction points become focal areas where installation quality shows, particularly in high-traffic zones near sinks and cooktops where seams concentrate. Understanding these technical requirements helps homeowners evaluate quotes, set realistic expectations, and distinguish between average and exceptional fabrication work.
The technical side involves substrate preparation, adhesive chemistry, and finishing techniques that mirror stone fabrication traditions while accounting for quartz’s engineered properties. Unlike natural stone with inherent color variation that can mask imperfections, quartz’s uniform appearance makes every seam detail critically visible. This characteristic cuts both ways: quartz offers predictable color matching between slabs from the same production run, but it also reveals substandard joinery instantly.
Most homeowners researching section details are evaluating whether quartz fits their layout or vetting fabricators before signing contracts. The quartz pros and cons extend directly to installation complexity, since larger projects demand advanced detailing skills that separate capable installers from exceptional ones.
Understanding Quartz Countertop Section Details
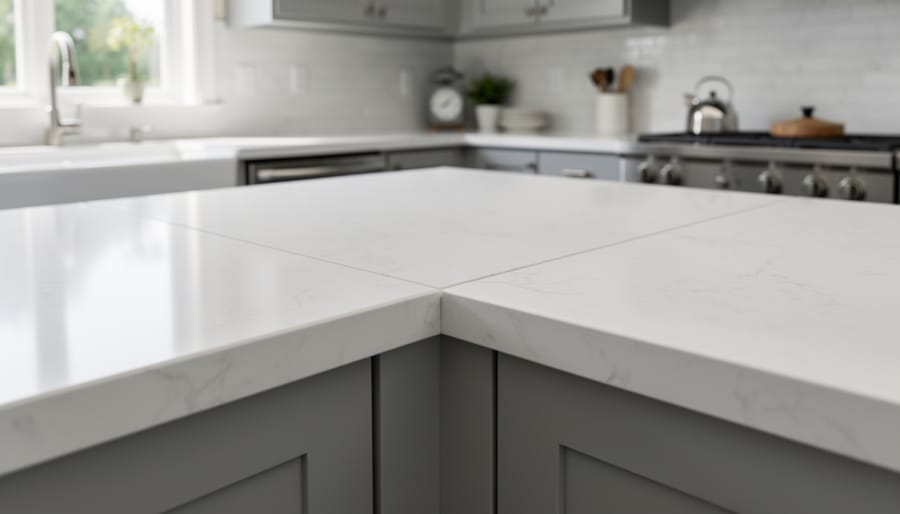
Quartz countertop section details refer to the specific treatment points where individual pieces of material meet, transition, or terminate. These critical junctures include seams where two slabs join, edge profiles that define the countertop’s perimeter, backsplash transitions where horizontal and vertical surfaces meet, and corner treatments at inside and outside angles. Unlike solid-surface materials that can be thermoformed or natural stone that may fracture differently, quartz slabs have fixed dimensions that necessitate careful planning of these detail points.
Seams represent the most scrutinized detail in quartz installations. Because quartz slabs typically measure 120 by 55 inches or smaller, most kitchen layouts require at least one seam. The visibility of these joints depends on color matching, vein alignment, and fabrication precision. Dark or heavily patterned quartz can camouflage seams effectively, while solid light colors reveal even minor imperfections. Strategic seam placement in low-traffic sight lines makes a substantial difference in the finished appearance.
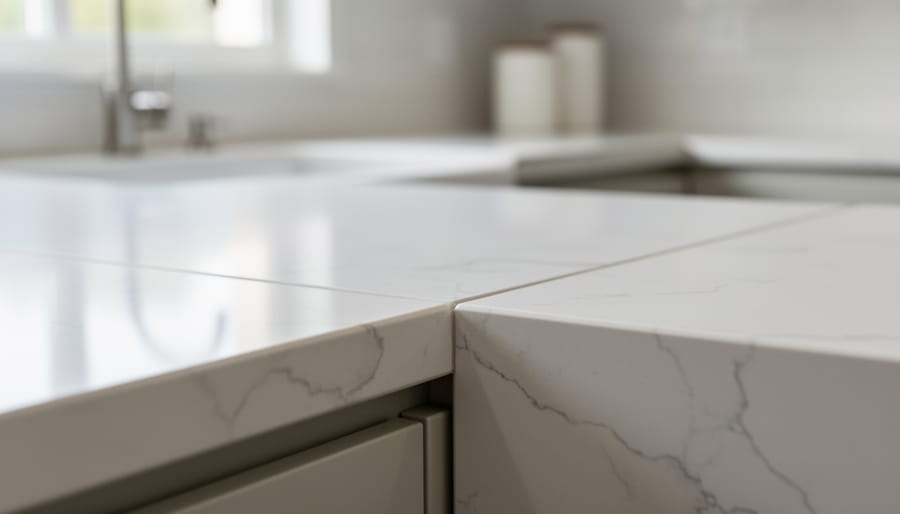
Edge profiles serve dual purposes: they protect the vulnerable slab perimeter and establish aesthetic character. Options range from simple eased edges to elaborate ogee or waterfall profiles. The edge treatment must coordinate with both the quartz pattern and the overall design style. Thicker edge profiles can be achieved through lamination techniques that bond additional material, creating the appearance of a more substantial slab.
Backsplash transitions and corner treatments present additional detailing challenges. Where countertop meets wall, the joint must be clean, sealed, and visually intentional. Corners, whether inside angles at sinks or outside angles at peninsulas, require precise mitering or careful radiusing to maintain pattern continuity. These decisions about slab size and seaming fundamentally shape both installation complexity and long-term satisfaction with your countertop choice.
Tools and Materials You’ll Need
Proper quartz section detailing requires specialized equipment and materials that differ significantly from standard countertop installation. Having everything on hand before starting prevents delays and ensures professional results.
Essential Tools and Materials
- Laser level or digital measuring system for precise alignment across multiple sections
- Seam setter clamps (minimum 4-6) designed specifically for stone countertops to maintain even pressure
- Two-part epoxy adhesive color-matched to your quartz slab
- Pneumatic or manual caulking gun rated for high-viscosity adhesives
- Variable-speed angle grinder with diamond polishing pads (50-3000 grit progression)
- Denatured alcohol or acetone for surface cleaning and prep
- Razor blades and plastic scrapers for adhesive removal
- Digital caliper or feeler gauges for checking lippage (0.5mm tolerance maximum)
- Microfiber cloths and lint-free rags
- Shims in various thicknesses (0.5mm to 2mm) for fine adjustments
- Respirator mask rated for silica dust and solvent fumes
- Heavy-duty work gloves with grip coating
The adhesive deserves special attention since quartz requires specific formulations. Select a two-part polyester or epoxy resin designed for engineered stone, never general-purpose construction adhesive. Most fabricators provide color-matched adhesive with the slabs, but verify you have sufficient quantity, typically 50-100ml per linear foot of seam.
Quality measuring tools make the difference between visible and invisible seams. A laser level ensures sections align vertically, while digital calipers confirm edge gaps stay within the 0.5mm maximum before joining. Invest in professional-grade seam setters rather than improvising with standard clamps, as even pressure distribution prevents cracking and lippage during cure.
Safety Precautions and Workspace Preparation
Working with quartz countertops presents specific hazards that demand careful attention before you begin any detailing work. Understanding these risks and preparing your workspace properly will prevent injuries and ensure professional results.
Personal protective equipment is non-negotiable when working with quartz. Wear safety glasses or goggles at all times to protect against flying particles during cutting or grinding. A respirator rated N95 or higher protects against crystalline silica dust, which poses serious respiratory hazards. Heavy-duty work gloves prevent cuts from sharp edges, while steel-toed boots guard against foot injuries if a section slips.
Adequate ventilation is critical, especially when working with adhesives and solvents. Work outdoors when possible, or ensure workshop doors and windows remain open with fans providing cross-ventilation. Many adhesives used for quartz emit strong fumes that can cause dizziness or respiratory irritation in enclosed spaces.
Prepare your workspace by clearing a large, flat area with enough room to lay out full sections without obstruction. The floor or work surface must be completely level and capable of supporting the combined weight of multiple slabs. Cover the area with protective padding or blankets to prevent scratching the finished side of your quartz sections during positioning and dry-fitting.
Keep the workspace temperature between 60-80°F and relative humidity below 70 percent. Extreme temperatures affect adhesive curing times and can compromise bond strength, while high humidity interferes with proper seam formation. Store adhesives and materials at room temperature for at least 24 hours before use to ensure consistent performance.
Step-by-Step Quartz Section Detailing Process
Measuring and Marking Section Joints
Start by measuring the full length of your countertop run and determining where seams must fall based on your slab sizes. Most quartz slabs measure 120 by 55 inches, so calculate your layout to place seams at natural break points, near sinks, cooktops, or corners, rather than in prominent sight lines.
Mark potential seam locations on your template using a straightedge and fine-tip marker. Position seams perpendicular to the front edge whenever possible, as diagonal seams create longer, more visible joints. For L-shaped counters, place the seam at the inside corner rather than along a straight run.
Check the vein pattern on your slabs before finalizing seam placement. Book-matching or sequencing veins across a seam requires marking both pieces while they’re side by side. Use painter’s tape to label mating edges with corresponding numbers.
Measure from a fixed reference point, typically the wall or cabinet front, and transfer these marks to both the underside and top surface of each section. Double-check measurements by dry-fitting sections in place. A 1/8-inch gap at the seam is standard; mark this spacing on your template.
Mark plunge-cut locations for undermount sinks at least three inches from any planned seam to prevent structural weakness at the joint.
Preparing and Dry-Fitting Sections
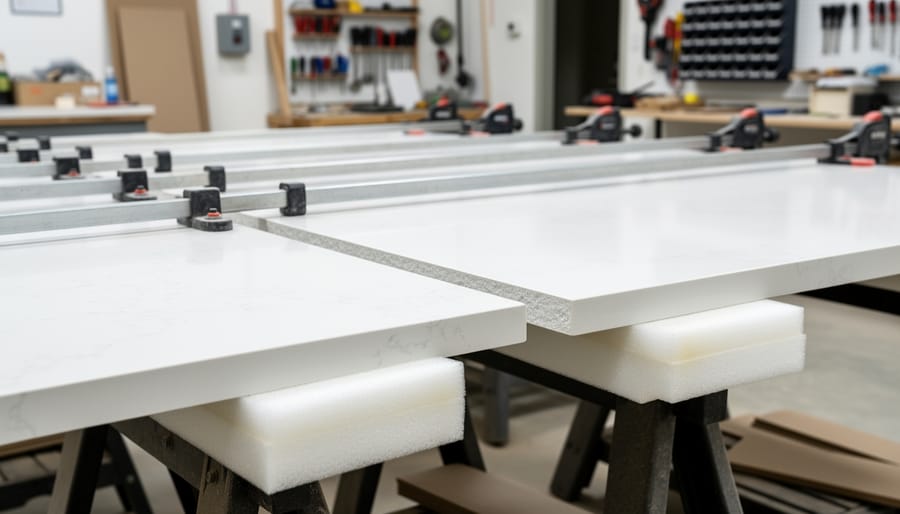
Before applying any adhesive, thorough preparation and test-fitting prevent costly mistakes and ensure tight, nearly invisible seams.
Start by cleaning all mating edges with denatured alcohol to remove dust, oils, and residue from cutting. Run your fingers along each edge to detect any chips or irregularities that could create gaps. Use 220-grit sandpaper to smooth minor imperfections, keeping edges perfectly square.
Position both sections on the cabinets without adhesive, bringing the seam together. Check that surfaces are level using a straightedge placed across the joint. Any difference in height (called lippage) creates a visible, tactile line. If one section sits higher, shim the lower piece or sand the cabinet supports slightly.
Examine the seam gap under bright light. A properly fitted joint should be hairline-thin, no wider than a credit card’s thickness. If gaps exceed this, the edges likely need minor adjustments. Mark problem areas with painter’s tape.
For pattern-heavy quartz, rotate or shift sections slightly to align veining across the seam. This visual continuity matters more than perfect measurement alignment in many installations.
Once satisfied with the fit, mark cabinet positions with pencil so you can replicate exact placement during glue-up. Take photos of the seam from multiple angles as reference. Remove sections and you’re ready for adhesive application.
Applying Adhesive and Joining Sections
Select a two-part epoxy adhesive specifically formulated for quartz, matching it as closely as possible to your slab’s base color. Most fabricators use polyester resin systems tinted with color agents, but for DIY applications, pre-tinted quartz repair kits work well. Mix the adhesive according to manufacturer ratios, typically equal parts resin and hardener, ensuring complete blending without introducing air bubbles.
Apply a thin, continuous bead along the entire seam edge of one section, staying about one-eighth inch from the edge to prevent squeeze-out. Work quickly, as most quartz adhesives begin setting within five to seven minutes. Position the mating section carefully, then bring the pieces together with steady, even pressure rather than a sudden push.
Immediately install seam clamps or draw clamps every 12 to 18 inches along the joint. Tighten gradually in sequence from one end to the other, checking that surfaces remain flush as you go. The goal is firm contact without over-tightening, which can create lippage or stress cracks. You’ll see a small amount of adhesive squeeze from the seam, this confirms good coverage.
Allow the adhesive to cure undisturbed for the full time specified by the manufacturer, typically 60 to 90 minutes. Removing clamps prematurely compromises bond strength. Temperature affects cure time significantly; work in conditions between 65 and 75 degrees Fahrenheit for predictable results.
Finishing Seams and Edges
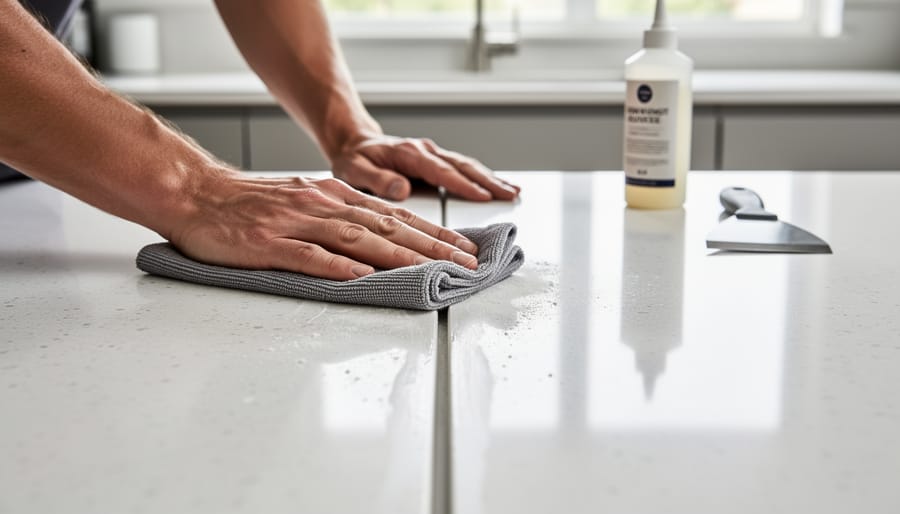
Once the adhesive reaches its initial set (typically 5-10 minutes), you’ll need to act quickly but carefully to finish the seam before full cure occurs. Start by scraping away excess adhesive using a razor blade held at a 45-degree angle to the surface. Work along the seam line in smooth, consistent strokes, removing the bulk of overflow without gouging the quartz. Any adhesive left on the surface will be extremely difficult to remove after curing.
For color-matching, professional installers often mix fine quartz dust or color pigments directly into the adhesive before application. If your seam appears slightly visible after curing, you can create a matching compound by collecting dust from cutting offcuts and blending it with clear epoxy or specialty seam filler. Apply this mixture sparingly along the seam line using a plastic spreader, feathering it into the surrounding surface.
Polish the seam area once fully cured using progressively finer abrasives. Begin with 400-grit wet sandpaper if any raised adhesive remains, then move through 800, 1500, and 3000-grit to restore the factory finish. Keep the surface wet during polishing to prevent heat buildup and scratching. A variable-speed polisher with foam pads works best for larger areas.
Edge finishing requires attention to both the vertical face and the top radius. Use a hand-held polisher with diamond pads to blend any transitions where sections meet at corners or endpoints. Check your work under bright, angled lighting, seams that appear invisible straight-on may show under raking light. The goal is a surface where your fingertip cannot detect any ridge or valley as it crosses the seam.
Aesthetic Considerations for Section Details
Strategic seam placement can make or break the visual success of your quartz installation. Position seams away from primary sight lines, avoid the center of an island or directly in front of the sink where they’ll catch your eye constantly. Instead, locate them near cooktops, behind appliances, or in corners where cabinets and natural breaks in the countertop already exist. These less-visible locations let the continuous surface pattern flow without interruption.
Vein matching presents both opportunity and limitation. While quartz offers more consistency than natural stone, prominent veining patterns still require careful alignment at seams. Book-matched sections, where adjacent pieces mirror each other, create symmetry but double your material needs and drive up countertop costs. Running the veins parallel to seams rather than perpendicular minimizes pattern disruption, though this isn’t always possible given slab dimensions and layout constraints.
Solid colors and fine-grained patterns offer the most forgiving canvas for section details. Dramatic veining or high-contrast patterns magnify even hairline seams, so evaluate samples specifically at potential seam locations. Hold two pieces together at eye level in natural light, this reveals how noticeable transitions will actually be.
Edge profiles must integrate seamlessly where sections meet. A complex ogee or waterfall edge demands precise alignment; even slight height differences become glaringly obvious. Simple eased or square edges tolerate minor variations better and require less skilled finishing work. Consider how your chosen edge treatment affects both the difficulty of achieving invisible seams and the visual weight it adds to transitions.
The structural reality: load-bearing requirements sometimes override aesthetic preferences. L-shaped layouts need seams at the corner for stability. Islands exceeding slab dimensions require joins regardless of sight lines. Large cutouts for sinks or cooktops dictate seam locations based on remaining material strength. Accept these engineering constraints early rather than compromising installation integrity for a slightly better view.
Verifying Quality and Troubleshooting Common Issues
After completing your quartz section detailing work, a thorough quality inspection ensures professional results that maintain the low maintenance quartz reputation. Run your fingers along seams in both directions; you shouldn’t feel any lip or edge where sections meet. Acceptable seams may be barely visible but should feel completely flush and smooth to the touch. Check from multiple angles under different lighting conditions, as overhead lighting can reveal imperfections that side lighting masks.
Common issues have straightforward solutions if caught early. Visible seams with color mismatches often result from inadequate color-matching during adhesive application. If the adhesive hasn’t fully cured (typically 24 hours), carefully remove it with a razor blade and reapply tinted adhesive. For cured seams, specialized seam fillers designed for quartz can improve color matching. Lippage, where one section sits higher than another, indicates improper clamping or substrate issues. Minor lippage under 1/32 inch can sometimes be corrected by carefully grinding the high section with diamond pads, though this risks voiding warranties and should only be attempted by experienced installers.
Adhesive squeeze-out that wasn’t cleaned within the working time requires patient removal with a razor blade held flat against the surface, followed by polishing with a dedicated quartz polish. Gaps at seams typically mean sections weren’t pulled tight enough during clamping; this requires disassembly and reinstallation.
Call a professional fabricator immediately if you discover cracks radiating from seams, sections that rock or move under pressure, or lippage exceeding 1/32 inch. These issues indicate structural problems that will worsen over time and potentially void material warranties if DIY repairs are attempted.
Frequently Asked Questions
Will seams in my quartz countertop be visible?
Even professionally installed seams will be slightly visible upon close inspection, but quality detailing makes them nearly invisible from normal viewing distances. Seam visibility depends on the pattern complexity, solid colors show seams more than busy patterns, and the installer’s skill in color-matching adhesive and aligning sections precisely.
Can damaged section details be repaired after installation?
Minor chips and cracks at seams can often be repaired using color-matched epoxy or resin, though repairs may remain slightly visible. Significant structural damage or widespread lippage typically requires professional re-installation of the affected section, making proper initial detailing crucial.
How do quartz seams compare to granite or other materials?
Quartz seams are generally less visible than granite seams because quartz’s engineered consistency allows for better color and pattern matching at joints. The comparison between quartz vs. granite extends to seam aesthetics, where quartz’s uniformity provides an advantage in creating seamless-looking installations.
Do seams and detailed areas require special maintenance?
Seams need no special maintenance beyond regular cleaning, but avoid letting standing water or harsh chemicals sit directly on seam lines for extended periods. The adhesive used in professional installations creates a waterproof bond, but excessive moisture exposure over time can compromise even well-executed seams.
Beyond these common concerns, homeowners often wonder whether section detailing is a realistic DIY project. The honest answer depends on your comfort with precision work and access to specialized tools. Simple edge finishing on a single-piece countertop falls within capable DIYer territory, but creating invisible seams between multiple sections demands professional equipment and experience. Most fabricators won’t warranty installations they didn’t perform, which adds financial risk to self-installation attempts. If your project involves L-shaped layouts, island connections, or patterns requiring careful vein matching, professional installation protects both your investment and aesthetic outcome.
Mastering quartz countertop section detailing transforms a functional installation into a stunning focal point. The techniques covered, from precise measurement and careful dry-fitting to methodical adhesive application and meticulous seam finishing, directly determine whether your countertop looks professionally crafted or obviously assembled.
Success hinges on understanding that every detail choice carries aesthetic weight. Strategic seam placement, attentive vein matching, and skilled edge finishing aren’t just technical checkboxes. They shape how your countertop integrates with your overall design vision and how satisfied you’ll feel each time you see it.
Whether you’re a DIY enthusiast tackling your first installation or a professional refining your craft, these detailing fundamentals remain constant. Take time during the selection process to visualize how sections will meet, where seams will fall, and how transitions will flow. This forethought, combined with patient execution of proper techniques, ensures your quartz countertop delivers both the durability you expect and the seamless beauty you desire.
The difference between adequate and exceptional results lives in these details. Invest the effort to get them right.