Soil erosion threatens stone installations by undermining foundations, creating voids beneath pavers, and washing away the supportive base that keeps your investment stable. Four proven techniques stop this damage: vegetative cover, terracing and grading, erosion control fabrics, and proper drainage systems. Each method addresses different erosion triggers, from sheet erosion on gentle slopes to concentrated runoff that carves channels through your landscape.
The financial argument for soil stabilization is straightforward. Replacing a compromised stone patio or retaining wall costs thousands, while preventive measures typically run hundreds. This calculation makes the case for repairs vs prevention clear before erosion forces your hand.
Soil loss rarely announces itself with dramatic sinkholes. Instead, you’ll notice subtle settling, gaps opening beneath stone edges, or water pooling where it previously drained. By the time these signs appear, significant base material has already migrated downslope or washed into storm drains. The techniques outlined here interrupt this process at multiple points, creating redundant protection that accounts for varying soil types, slope angles, and rainfall intensity.
Professional landscapers and DIY homeowners alike benefit from understanding which technique fits specific conditions. A gentle suburban lawn requires different erosion control than a steep commercial site, and combining methods often delivers better results than relying on a single approach. The goal is matching your site’s vulnerabilities with the most effective countermeasures.
Understanding the Soil-Stone Connection
Your stone feature stands only as secure as the soil beneath and around it. While we often focus on the visible beauty of natural stone installations, the invisible foundation of stable soil determines whether that beauty endures or crumbles. Soil and stone exist in a constant relationship where movement in one inevitably affects the other, making soil stability a cornerstone of preventive protection for any stone investment.
When soil shifts, settles, or washes away, stone features respond with visible damage. A patio begins to tilt as underlying soil compacts unevenly. Retaining wall stones crack when backfill erodes and pressure redistributes. Foundation stones settle and separate when water infiltration undermines the base. These aren’t isolated incidents but predictable outcomes of soil instability. The same erosion forces that affect crumbling gravestones in cemeteries threaten residential stone installations, just on different timescales.
Three primary soil problems drive stone damage. Erosion removes soil particles through water flow or wind, creating voids that allow stone to shift and settle. Compaction issues arise when soil wasn’t properly prepared before installation or when heavy loads compress poorly stabilized ground, leading to uneven settling. Water infiltration saturates soil, reducing its bearing capacity and causing freeze-thaw cycles that heave stones out of position. Each problem operates differently, but all share the same outcome: compromised stone integrity.
Understanding this connection transforms how you approach stone installation and maintenance. The stone itself may be perfect, cut and placed with precision, but without addressing the soil that supports it, that perfection becomes temporary. Soil stability isn’t a secondary concern relegated to landscapers; it’s a structural requirement that determines whether your stone feature lasts decades or requires costly intervention within years.
Technique 1: Geotextile Fabric Installation
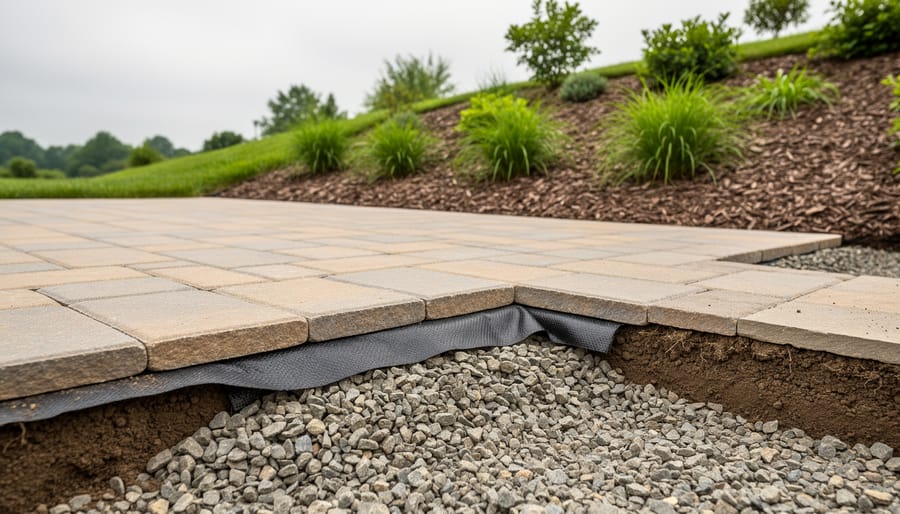
Geotextile fabrics create a critical barrier between your stone features and the soil beneath, preventing the mixing that leads to settling and structural failure. These engineered permeable textiles, woven or non-woven synthetic materials, allow water to pass through while blocking soil particles from migrating upward into your stone base or downward into voids.
The fabric works through filtration and separation. As water drains through the geotextile, it carries fine soil particles that would normally work their way into aggregate base layers or wash away entirely. The fabric’s tight weave or bonded fibers trap these particles while maintaining permeability, typically rated at 50 to 150 gallons per square foot per minute depending on the product. This prevents the loss of base material that causes pavers to sink unevenly and creates those frustrating dips in stone patios.
Non-woven geotextiles suit most residential stone applications. Their needle-punched construction creates a thick, spongy layer that cushions stone features while providing excellent filtration. Use 4-ounce fabric under patios and walkways with light foot traffic, 6-ounce for driveways, and 8-ounce or heavier beneath retaining walls where soil pressures run higher. Woven geotextiles offer greater tensile strength for steep slopes or areas with significant lateral forces but provide less cushioning.
Installation demands attention to detail. Clear the area of rocks, roots, and debris that could puncture the fabric. Spread the geotextile across the prepared subgrade with seams overlapping 12 to 18 inches, running perpendicular to the direction of water flow when possible. Pin the fabric every 3 to 5 feet using landscape staples or stakes. Avoid walking directly on the fabric during aggregate placement; instead, dump material at one edge and spread it gradually to prevent tearing.
The fabric extends up vertical surfaces by 6 inches where stone features meet retaining walls or curbs, creating a continuous barrier against soil intrusion. For curved pathways, cut relief slits rather than forcing the fabric to conform, then overlap the cuts. Once your aggregate base sits atop the geotextile, compact it in 2- to 3-inch lifts to the proper density without displacing the fabric below.
This simple layer adds negligible cost, usually under 50 cents per square foot, while dramatically extending the lifespan of stone installations by maintaining the stable foundation they require.
Technique 2: Strategic Vegetation and Root Systems
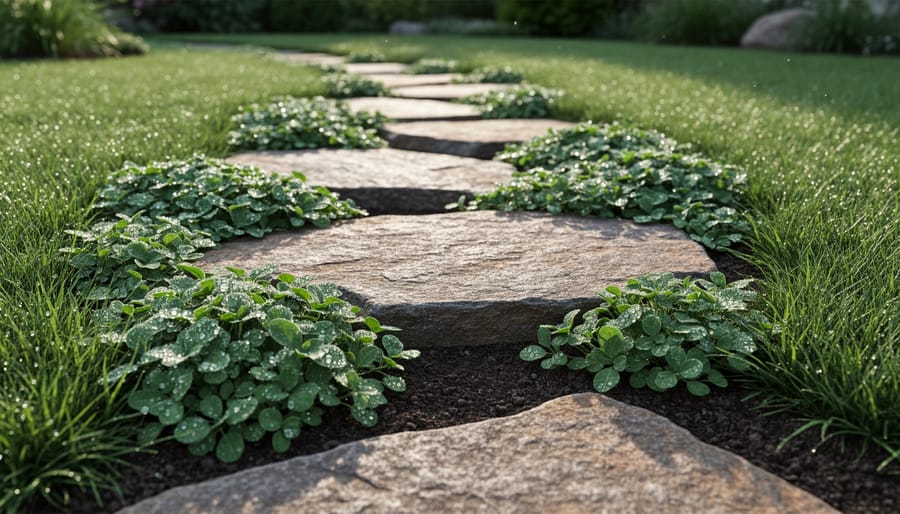
Strategic planting offers a natural solution to soil erosion while complementing stone installations, but only when done correctly. The right plants create an underground network of roots that bind soil particles together, reducing washout and shifting. The wrong plants, however, can crack joints, lift pavers, and undermine the very stone features you’re trying to protect.
Deep-rooted groundcovers and ornamental grasses excel at stabilizing soil because their root systems spread laterally near the surface while sending anchoring taproots deeper into the soil profile. This dual-action root structure holds topsoil in place during heavy rains while preventing deeper erosion. Plants like creeping juniper, liriope, and fescue grasses develop dense root mats within the first 6 to 12 inches of soil, exactly where erosion typically starts around stone edges.
The key is matching root characteristics to your specific stone application. For areas adjacent to stone patios or walkways, select plants with fibrous, non-invasive root systems that won’t seek moisture underneath pavers or push through joints. Near retaining walls, deeper-rooted plants stabilize the soil mass behind the wall without compromising structural integrity.
| Plant Type | Root Characteristics | Minimum Distance from Stone | Maintenance Needs |
|---|---|---|---|
| Creeping Juniper | Shallow, spreading fibrous roots | 12-18 inches | Low; trim annually |
| Ornamental Fescue | Dense, clumping root system | 6-12 inches | Moderate; divide every 3-4 years |
| Liriope (Monkey Grass) | Rhizomatous, moderately spreading | 12-18 inches | Low; cut back in late winter |
| Sedums (Stonecrop) | Very shallow, mat-forming | 3-6 inches | Very low; drought-tolerant |
Placement matters as much as plant selection. Keep plants with aggressive root systems at least two feet from stone joints and three feet from retaining wall bases. For stone patios, create planting beds beyond the hardscape perimeter rather than cutting openings within the paved area, which invites root intrusion and complicates maintenance.
Regular maintenance preserves the balance between soil stabilization and stone protection. Trim plants before they overgrow onto stone surfaces, where trapped moisture accelerates staining and biological growth. Monitor for signs of root encroachment near joints and remove any volunteers that sprout too close to stone edges. Once established, these strategic plantings require minimal intervention while continuously working to hold soil in place around your stone features.
Technique 3: Proper Grading and Drainage Systems
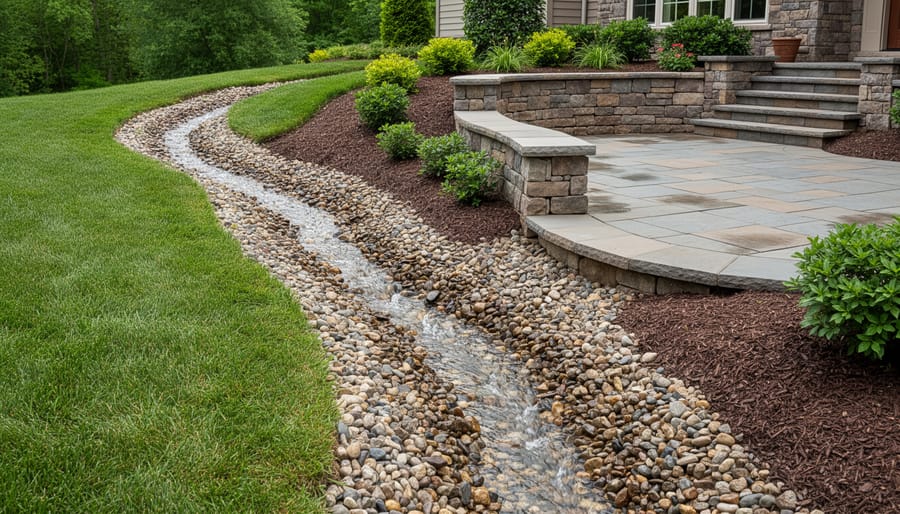
Water is the primary culprit behind soil erosion around stone installations. Without proper drainage control, even the most carefully installed stone features can fail as water carves channels through the surrounding soil, undermining foundations and destabilizing bases. Grading and drainage systems address this threat at its source by directing water away from vulnerable areas before it can cause damage.
The foundation of effective drainage starts with proper grading. Your site should slope away from stone features at a minimum grade of 2 percent, that’s a two-inch drop for every ten feet of horizontal distance. This slope creates a natural path for water to follow, preventing it from pooling against retaining walls or seeping beneath patio stones. For areas adjacent to buildings, increase this to 5 percent for the first ten feet to ensure positive drainage. The grade should be consistent and smooth, without depressions that trap water.
Swales offer an elegant solution for managing larger water volumes across your landscape. These shallow, vegetated channels follow the natural contours of your property, collecting runoff and guiding it to designated drainage areas. A properly designed swale typically measures 12 to 18 inches deep with gently sloping sides, planted with erosion-resistant grasses that slow water velocity while allowing infiltration. Position swales to intercept water before it reaches stone installations, and ensure they discharge to appropriate outlets rather than toward neighboring properties.
French drains provide critical subsurface drainage for stone features where surface grading alone can’t solve water problems. These systems consist of perforated pipe surrounded by gravel in a fabric-lined trench, capturing water that infiltrates the soil and channeling it away from your stone work. Install French drains along the back of retaining walls to relieve hydrostatic pressure, or beneath patios where water tends to accumulate. The pipe should maintain a minimum slope of 1 percent to ensure water flows freely toward the discharge point.
Drainage channels integrated into hardscape designs combine function with aesthetics. Linear drains set flush with stone surfaces capture sheet flow before it escapes to surrounding soil, while decorative grates maintain the visual appeal of your installation. For permeable applications, consider slot drains or catch basins positioned at low points to handle concentrated water flow.
The key to successful drainage lies in planning these systems before stone installation begins. Map your site’s natural water flow patterns, identify problem areas where water concentrates, and design grading that works with, not against, these patterns. This proactive approach prevents the soil erosion that compromises stone integrity and extends the life of your investment.
Technique 4: Mechanical Stabilization with Aggregate Base
A properly compacted aggregate base functions as the structural foundation beneath stone installations, distributing weight evenly and preventing the settling that causes pavers to sink, patios to crack, and retaining walls to lean. This mechanical stabilization technique creates a stable platform that resists compression under load while allowing water to drain through rather than pooling beneath your stone features.
The aggregate you select determines the base’s long-term performance. Crusher run, also called dense-grade aggregate or quarry process, combines multiple stone sizes from dust to three-quarter-inch particles that interlock when compacted. Road base materials follow similar sizing principles but often include additional fines for superior compaction. Both options outperform single-size gravel, which lacks the particle variety needed for true mechanical lock.
- Crusher Run
- A mix of crushed stone and stone dust containing particles from fine powder to three-quarter-inch pieces that compact into a stable, interlocking base layer.
- Plate Compactor
- A vibrating machine that applies downward pressure to compress aggregate layers, typically required for bases exceeding two inches in depth.
- Proctor Density
- The optimal moisture content at which aggregate achieves maximum compaction, usually between 95-100% of laboratory-tested standards for structural applications.
- Lift
- A single layer of aggregate material, generally two to four inches thick, spread and compacted before adding the next layer in multi-depth installations.
Layer depth varies with your application. Patios and walkways typically require four to six inches of compacted base, while driveways supporting vehicle traffic need six to eight inches. Retaining walls demand even deeper bases, eight to twelve inches depending on wall height, since they must resist lateral soil pressure. Install aggregate in lifts no thicker than four inches, compacting each thoroughly before adding the next.
Compaction transforms loose aggregate into a solid foundation. For small projects under fifty square feet, a hand tamper suffices for two-inch lifts. Larger installations demand a plate compactor, which should make three to four passes over each lift until no visible movement occurs. Adding water during compaction helps particles settle, but too much moisture prevents proper consolidation. The aggregate should feel slightly damp, not soaked.
Proper base preparation ranks among the most effective stone preservation methods because it prevents the settling that creates most structural problems. Stone installed over poorly compacted or inadequate base material will shift over time, creating uneven surfaces, widening joints, and allowing water infiltration that accelerates deterioration. A well-constructed aggregate foundation keeps stones level for decades, distributing weight and maintaining the precise grading that directs water away from your installation.
Combining Techniques for Maximum Protection
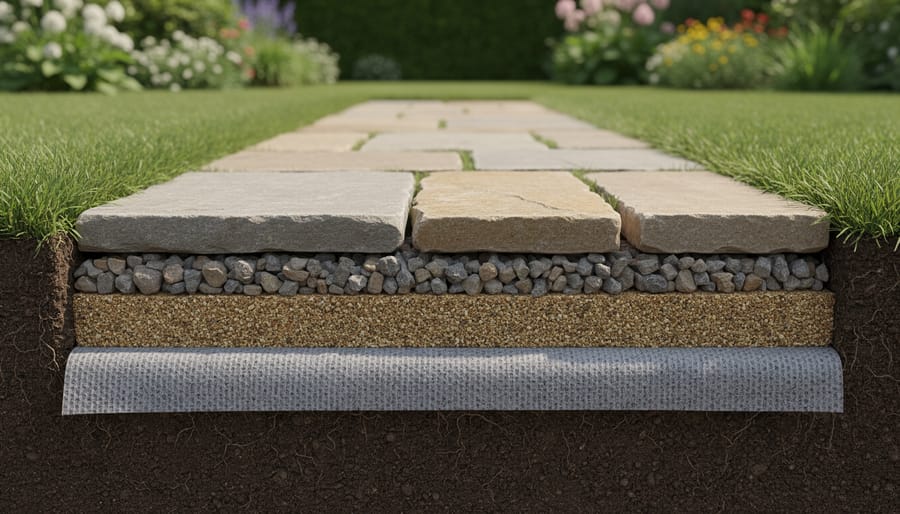
The most effective soil stabilization doesn’t rely on a single technique, it combines multiple methods to address the specific challenges of your site. A typical residential stone patio benefits from geotextile fabric laid over compacted native soil, topped with a 4-6 inch aggregate base, surrounded by proper grading that directs water away from the installation, and strategic groundcover plantings at the perimeter to bind the soil.
Consider a retaining wall project in a sloped yard with clay soil and moderate rainfall. The contractor installed French drains behind the wall to manage hydrostatic pressure, placed geotextile fabric between the backfill and native soil to prevent mixing, used deep-rooted native grasses on the slope above to reduce surface erosion, and ensured proper grading at the wall base to channel water to designated drainage points. Three years later, the wall shows no settling or movement.
For a stone walkway through a garden, combining techniques might mean a crushed stone base for the path itself, geotextile beneath to prevent weed intrusion and maintain separation from the garden soil, and low-growing plants like creeping thyme between pavers to bind surface soil without lifting stones. The plants also soften the aesthetic while serving a structural purpose.
Assess your site conditions first: soil type, slope grade, water flow patterns, and proximity to existing structures all influence which combination works best. Sandy soil with good drainage might need less intensive measures than heavy clay prone to movement. Modern stone monitoring technology can help track settlement patterns if you’re dealing with a high-value installation on challenging terrain.
The key is addressing water, soil structure, and surface stability simultaneously rather than treating one aspect in isolation. Each technique reinforces the others, proper drainage reduces soil saturation that would otherwise wash through geotextile, while vegetation stabilizes areas where mechanical methods alone would fail.
Protecting your stone installations starts beneath the surface. While homeowners and contractors often focus on selecting quality materials and achieving proper stone placement, the soil foundation supporting these features determines their long-term success. The four techniques covered, geotextile fabrics, strategic vegetation, drainage systems, and mechanical stabilization, aren’t luxury additions. They’re essential components of responsible stone installation.
The cost of neglecting soil stability becomes apparent within months or years: sunken pavers, cracked retaining walls, separated joints, and shifting foundations. Addressing these failures after the fact costs significantly more than implementing preventive measures during initial installation. For existing stone features showing signs of soil-related problems, early intervention prevents minor issues from escalating into complete reconstruction projects.
Think of soil stabilization as insurance for your stone investment. A properly stabilized foundation extends the life of stone patios, walkways, and walls by decades. It maintains the aesthetic you paid to create and prevents the safety hazards that come with unstable stonework.
Whether you’re planning a new stone installation or maintaining existing features, assess your site conditions honestly. Sandy soil? Poor drainage? Slopes near stone foundations? Each presents specific challenges that the right combination of these techniques can solve. Your stone deserves a stable foundation that matches its durability and beauty. Take the time to get the soil right, and your stone features will perform as intended for generations.